How to Hide the Wires in Your Home Theater
You’ve made up your mind: It’s finally time to build your home theater nirvana — a place where you can spend many happy hours binge-watching your favorite TV shows and movies. You have studied all of your hardware options and subscribed to every major streaming service, and now you are ready to be wowed with immersive sound and stunning 4K image quality.
There is only one problem: How do you actually interconnect all this stuff so that your home theater doesn’t look like a spaghetti factory?
Nobody wants to see their dreams come to a crashing halt because of clutter or objections from a significant other, so let us give you a helping hand.
Tools of the Trade
When it comes to hiding wiring, the main rule of thumb is this: Always look for the path of least resistance. If you have an attic above your home theater room or crawlspace below, take full advantage of these open spaces. If that’s not an option, you will either need to open your walls to run wire or hide wiring under your baseboard and/or carpeting as it travels around the room. There are lots of tools like these to help you fish wire under carpets and through walls. If you are not the handy type, plenty of companies make paintable wire covers to hide unsightly bundles of cables. These are super easy to install.
Here’s a summary of some of the creative techniques for making those pesky wires disappear:
– Take advantage of any gaps that may already be there. Since trim elements like crown molding and baseboards run around a room, take advantage of the small gaps they can provide (i.e., behind the molding or underneath the baseboard). If the room does not have either, you can install a foam crown molding or foam chair rail to create a raceway for wires. This is actually a pretty easy DIY project and adds to your décor to boot.
– Run wiring underneath carpets, throw rugs or runners. There are all sorts of options for flat wire that can be fished underneath a carpet so as to not create an annoying bump in your rug.
– Use wall-mounted flat speaker wire. There are speaker wires on the market that can be installed onto your wall almost like a drywall repair — you simply affix the very thin wire to the wall with adhesive, then apply some joint compound to integrate the tiny bump of wire into your wall for a smooth finish. A little sanding and paint, and voila! Bonus: This type of wire will even work under wallpaper.
– Add some cord concealers. These nifty rigid raceways are a great way to hide a bundle of cables in a neat conduit that can be stuck to a baseboard or wall with dual-sided tape. They are easy to install and paintable. There are also flexible cord concealers that can be used behind your gear as it travels between shelves.
– You can never have enough zip ties! Zip ties are the installer’s best friend — kind of like duct tape to a handyman. They provide a great way to neatly bundle and manage cables. You can also use zip ties creatively to route cables neatly behind cabinets and between shelves.
– Utilize coves and light strips. If your room has a lighting cove or some other kind of design element that houses strip lighting, take advantage of these spaces to hide wire. LED light strips are very low wattage and can be very close to low-voltage wire without fear of causing a fire.
– Break down the barriers. It may sound like a desperate measure, but as a professional installer, I can tell you this is often our only viable option for hiding wires. It doesn’t actually take a lot of effort to open up a wall or ceiling and fish wires around a room — something that becomes even easier if you have an attic above or crawlspace below. All you have to do then is find someone to come and patch the holes you needed to make.
Now let’s take a closer look at the specific kinds of wiring interconnections you’ll need to make in your home theater.
Video Wiring
Hopefully you have selected the perfect size TV and mounted it at the correct height on the wall, so that your line of vision when seated in your favorite chair lands smack dab in the middle of the screen. This is a good start! If you are not lucky enough to have a power outlet behind your TV, there are some great user-installable outlet relocation solutions such as this one.
Most modern-day TVs have built-in apps, but if you want some of the additional features offered by an Apple TV®, Amazon Fire Stick or Roku®, those connections are simple: just plug them into an available HDMI® port on your TV (or use an HDMI extender cable if necessary). Most of these devices are small enough to slide behind a TV so that you don’t have to run wires anywhere, even if an HDMI cable is needed.
If you want the fastest speeds possible, it is best practice to use a hard-wired Ethernet connection from your router or network switch into the back of the streaming device — even if it means running cabling in your basement or ceiling, or going through a wall. (Ethernet cabling can be run for over 300 feet if necessary without signal degradation.) If a hard-wired connection is not possible, the device should work fine wirelessly, as long as it is paired correctly to your Wi-Fi network and you have a strong signal in your home theater. (Click here for some tips on optimizing Wi-Fi.)
For best video quality, DVD and Blu-ray Disc™ players should be connected to your TV with HDMI cables instead of analog ones. Bear in mind that HDMI cabling should be as short as necessary and should never exceed 50 feet in length or you run the risk of signal degradation.
Audio Wiring
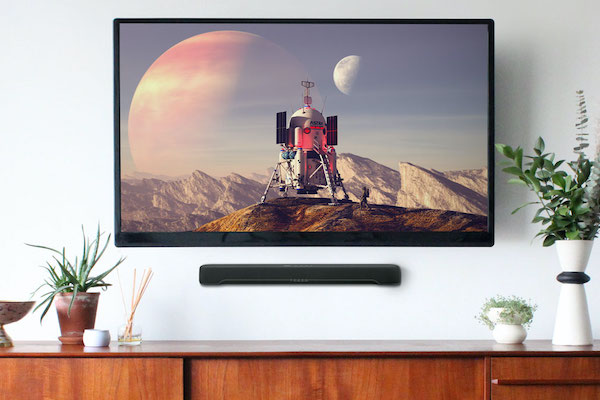
As TV manufacturers strive to reduce the bezel around the screen, the biggest casualty is sound quality — you simply cannot fit good speakers into these new designs. So add a sound bar! Even the most basic sound bar will provide audio that’s miles above the speakers built into a TV, but if you’re looking for a great one, consider the Yamaha MusicCast BAR 400. This audio gem even comes with a wireless subwoofer to provide that magical low-end rumble of a rolling tank or the Millenium Falcon. The connections for these devices could not be easier: simply use a short cable to route the TV audio output into the sound bar input (and, from there, to a subwoofer, if you have one) and you’re ready to rock.

If you are a home theater aficionado, you’ll definitely want to take advantage of the amazing surround tracks that accompany most modern movies and TV shows. This requires at least a pair of rear speakers for a basic 5.1-channel system (five main speakers and the “.1” subwoofer.) You will hear a lot of opinions on where rear speakers should be placed, but one thing is for sure: They should never be in front of you. Instead, they should be positioned off to the sides of your listening area or behind you, angled in. In a commercial cinema these are typically on the side walls but your particular room may not allow that. If you need to use ceiling speakers for the rears, this can be a pretty acceptable alternative.

Of course, running wires around a room can be a hassle, despite all the great tools described above. An even better solution is to add a pair of wireless surround speakers such as the Yamaha MusicCast 20, which are compatible with all current MusicCast-enabled devices. Simply place a pair in the back of your room to get those amazing fly-over effects you crave. These speakers are available in black or white and are also compatible with music streaming services and your mobile phone so you can use them for music listening too. Bear in mind that even though you do not need speaker wire to connect these speakers, they will still need power, so you will need a power outlet somewhere in proximity. Failing that, you can always use one of the user-installable outlet relocation solutions mentioned earlier in this article.
Adding an AV Receiver
If your budget can stretch a bit further and you desire a higher level of audio performance, you should consider using a full-featured AV receiver like the MusicCast-enabled Yamaha RX-V6A. AV receivers (AVRs for short) act as both the central hub and “brains” of your system, though installing it will require a little planning.

First, determine where you will place the AVR. Even if it has some wireless capability (as the RX-V6A does), there will still be some video and/or audio wiring required … and since all your home theater wires will be connected to the AV receiver, its location needs to be carefully considered. For example, you’ll need to connect it to your TV with an HDMI cable — the shorter the better. In this kind of setup, your streaming devices will also have to move to the receiver location and will connect directly to the HDMI ports on the back of the receiver (instead of your TV).
Second, map out all of your endpoints. Your center channel dialogue speaker will go immediately below your TV. The left and right speakers will go on your TV wall or in your entertainment center, and your goal is to create an equilateral triangle between you (at your seated location) and each speaker. If you failed geometry in school, this just means that the distance between the left and right speakers should be the same as the distance between you and each speaker.
Placing the subwoofer is a lot easier since low frequencies are not very localized, meaning that it’s hard to hear where they come from. Your sub should simply go somewhere along the front (screen) wall of your room, preferably in a corner so you can take advantage of the energy those adjacent walls help create. For a truly chest-pounding audio experience, consider using two subwoofers and place one in each corner.
If you want to ratchet up the immersion factor, you might want to make the move to a 7.2-channel system, which requires two additional speakers mounted in the ceiling or on the rear wall of your room. (The “.2” is just an indication that there are two subwoofers in the system, although you can actually run a 7.1 system with a single subwoofer … but .2 is definitely recommended.)
The ultimate surround set-up is Dolby Atmos® — the holy grail of movie sound. This adds two or four speakers in the ceiling to a 7.2 channel setup to fill the gap between the side and rear surround speakers. If you use two ceiling speakers, these are typically slightly forward of the seating area. If you choose four speakers, then you would mount an additional pair in the ceiling between your seating area and the back wall.
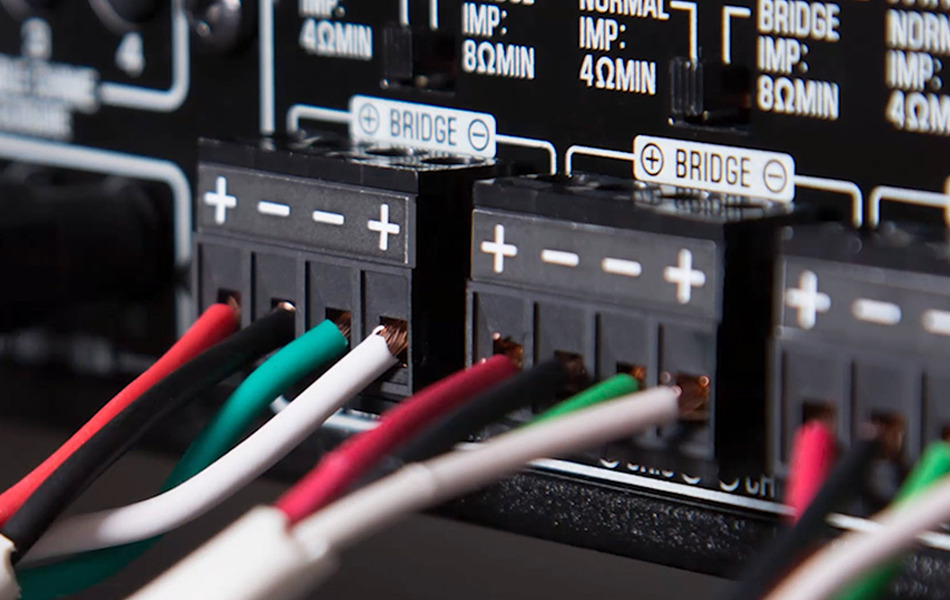
Once you’ve decided on all your speaker locations, you need to choose the wire you’ll be using to connect them. I recommend a minimum of 16-gauge, but 14-gauge or 12-gauge wire will perform better. (Bear in mind that if you intend to run the wire through walls or in the ceiling, you will need wiring that is CL-rated for safety.) In addition, unless you’re using wireless subwoofers, you’ll need to run line-level cables from the AV receiver to each sub.
Now it’s time to start unboxing your AV goodies and get your room wired up for an amazing home theater experience … without any unsightly clutter!
Check out these related blog articles:
How to Recreate the Movie Theater Experience at Home
Building the Ideal Home Theater
Top Five Things You Should Know When Hiring an AV Installer
Click here for more information about Yamaha AV products.
Keep reading