Doing a Firmware Update on Your AV Receiver
We’ve all heard that firmware updates are crucial for every piece of electronic equipment we own, from our smartphones to our Wi-Fi® routers and everything in between. But what is firmware, really?
Firmware refers to the background program that runs a particular device. Basically, it’s software that is specifically designed for a piece of hardware. Sort of like “software for hardware.”
Unlike regular software — which are the programs that handle broad tasks like communicating, gaming and record keeping — firmware has a narrow purpose. It’s specifically written to address particular issues for one — and only one — piece of hardware.
Usually, you will only need to update firmware when the manufacturer sends out a notice to do so. Like all your other electronic equipment, your Yamaha AV receiver has firmware that may need to be updated from time to time.
Network Receivers
If you’re using a Yamaha network receiver that’s connected to your home Wi-Fi network, you’ll periodically receive an automatic notification on the front panel telling you that a firmware update is available.
When you see that notification, simply select “OK” on the on-screen display menu using the ENTER button on the remote. Wait a moment or two for the software to be downloaded and that’s it – you’re done!
Older or Non-Network Receivers
But what if your receiver is older or not a network model? Are firmware updates even available for such receivers? And how do you access them?
It’s simple – all you need to do is download the firmware update online. Here’s how to do it:
1. Visit the AV receiver page on the Yamaha website. Find your receiver model and click on it.
2. Once you’re on the product page for your specific receiver, click on the Downloads tab. If there are firmware updates available for your model, you’ll see a section called “Firmware / Software.” If it’s been a while since you’ve checked, you may find several updates listed – choose the most recent version.

3. Connect a standard USB thumb drive to your computer and download the firmware to it – a process that usually takes just minutes. Once that’s done, remove the thumb drive and plug it directly into the USB port on your receiver.
4. Power off your receiver. Then press and hold the STRAIGHT button on the front panel. With your finger still on the STRAIGHT button, press the Main Zone power button:
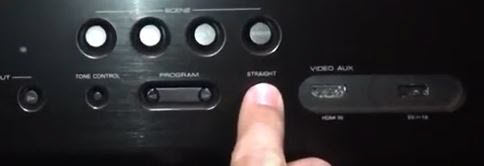
Keep your eye on the receiver’s display screen. Once you see the words “Advanced Set Up” appear, you can let go of the STRAIGHT button, then release the power button.
5. Press the PROGRAM left or right buttons on the front of the receiver until the display shows “Update USB.”
6. Press the INFO button on your receiver to start the update process. Have a little patience (or a cup of coffee) — it can take up to 20 minutes for the update to install.
The update goes through different stages. When it gets to the end of stage six, the process is complete – look for the on-screen display to say “Update successful, please power off.”
Enjoy Your New Features
Once you power your receiver off and then power it back on, you’re all set.
Now just sit back, relax and enjoy the great new features and increased functionality your firmware update delivers.
Keep reading