
How Do Electronic Drums Work?
There is a lot of misunderstanding when it comes to exactly how electronic drums work. In reality, they’re not nearly as complicated as most people think — in fact, the technology is actually quite simple. In this article, we’ll take a deep dive into the inner workings of electronic drums and explain how they deliver their sonic magic.
The Magic Of Quartz Crystal
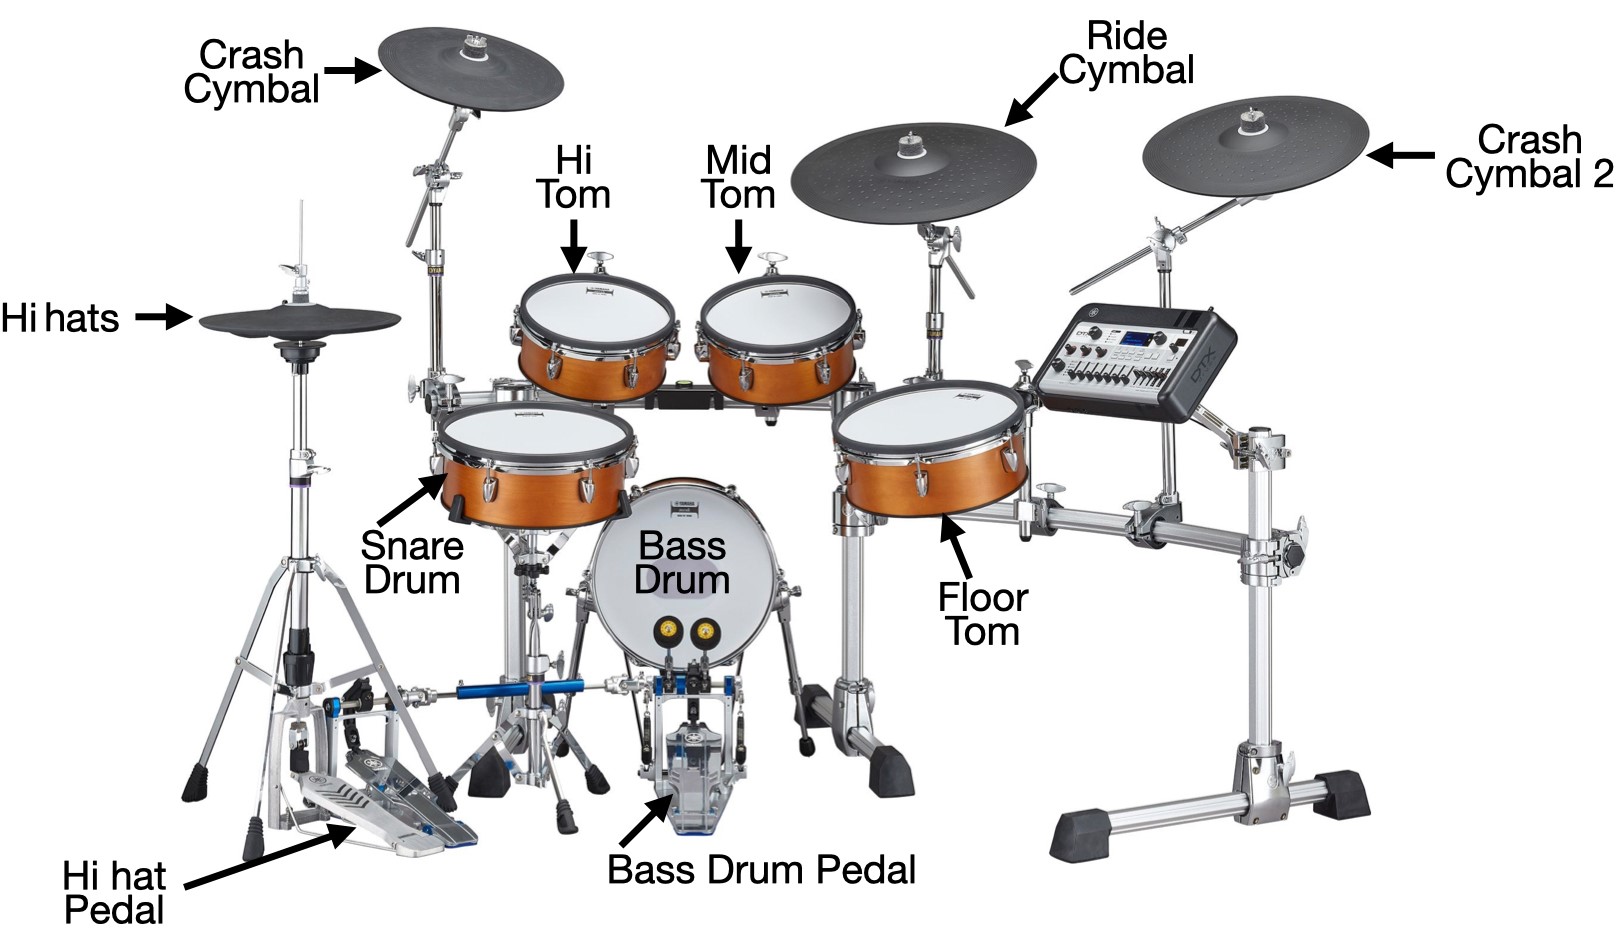
As you can see from the illustration below, an electronic drum kit consists of several pads and a couple of pedals, plus a module, which is actually a specialized computer that acts as the central “brain.”
We’ll talk more about the module later in this article, but for now let’s focus on the pads. Interestingly, one of the most important parts of just about every drum pad comes from the Earth itself. This is a small brass disc (usually around 1″ or 27 mm in diameter) with what looks like a circular piece of paper on one side. Together, this is called a piezo sensor (or piezo pickup).

The white material is actually an extremely thin slice (or wafer) of quartz crystal. By themselves, neither part does anything special, but put them together and attach a couple of wires, and they start to behave like a very basic microphone.
If you attach one of these piezo sensors to something else (such as a block of wood or lump of plastic) and hit it, the sensor will send out a little spike of electricity. The amount of electricity (that is, the amount of voltage) generated depends upon how hard you hit the object: Hit it lightly, and the spike will be quite small; hit it harder, and the spike will be much larger.

Because they are really flexible, piezo sensors make very good loudspeakers, and so they are excellent for giving us information and receiving information. That’s why you’ll find them in pretty much every electronic device you own, from your phone to your computer — even your refrigerator and microwave have them. When you leave your refrigerator door open or your microwaved popcorn is ready, the appliance tells you by making a pinging or beeping sound … and that sound is coming from a piezo sensor. When your phone beeps to tell you that you have a message, that’s also probably a piezo sensor embedded in your phone. And when you hit an electronic drum pad, it is a piezo sensor that’s responsible for making that little voltage spike go all the way down the cable to the module.
Piezo Sensors in Pads
Depending on the pad, there might be one or more piezo sensors, or even one piezo sensor and a special switch called a pressure switch. As an example, the mesh pads that come with Yamaha DTX8 Series and DTX10 Series electronic drum kits have either one (toms) or three (snare) piezo sensors under the head and another on the shell. The ones under the head detect when you hit the drumhead with your drumsticks, and the one on the shell is there to detect when you hit the rim of the pad. The signals go from both sensors down the cable from the pad to the module, allowing the module to “know” which part of the pad was hit.

Cymbal Pads and Pressure Switches
Most cymbal pads (such as the Yamaha PCY175 or PCY155 you’ll find incorporated in DTX Series electronic drum kits) have three areas (“zones”) you can hit, which give you three sounds. These are called 3-zone pads.

The middle zone (the “bow”) has a piezo sensor under it, just like in drum pads, but the zones at the top (“bell”) and edge have pressure switches instead, and this allows cymbal pads to do something that drum pads can’t do.
Here’s how it works: When you hit the cymbal pad anywhere, the piezo sensor in the bow sends a little voltage spike down the cable to the module, and the module plays the sound you’ve programmed it to play when the cymbal pad is hit. But when you hit the bell or the edge, the associated pressure switch diverts the spike down a different part of the cable, so the module knows that a different part of the cymbal has been hit.

It’s worth noting that, although many electronic drum manufacturers require the use of two cables to connect their 3-zone pads to their modules, Yamaha cymbal pads connect to the module with just a single cable, making setup faster and easier.
Cables Are More Important Than You Realize
Most people don’t give a second thought to the cables they use to connect their drum pads to the module, but they are actually very important.
If you unplug and look at the end of the cables you plug into your drum pads, you’ll see that they terminate in a jack with a number of shiny sections and black rings. The exact number of each determines how many different channels of information the cable can send to the module at any one time. The most common of these jacks are the TRS (“Tip/Ring/Sleeve”), which contains three shiny sections and two black rings, and the TS (“Tip/Sleeve”), which contains two shiny sections and one black ring.

The longest shiny part (the “sleeve”) is the electrical “ground.” It doesn’t carry any information — it simply ties things together so that all the components interact nicely without hum. Each of the other shiny sections, however, can carry different information. A TS cable/jack can only carry information from one piezo, but a TRS cable/jack can carry voltage spikes from both the head piezo and the rim piezo. So if you ever suddenly have a problem with a pad just after you’ve set up your electronic drum kit, check the jack and make sure you haven’t accidentally used a TS cable by mistake, as that could seriously limit the ability of your drum pads.
It’s also worth remembering that not all cables are created equal. The cables that come provided with Yamaha DTX kits all comply with international standards, whereas some cheaper cables that can be easily bought online may not, meaning that they can fail to provide a good connection or work loose easily, which you don’t want to happen on stage!
The Module
So what happens when the little spike of electricity from the piezo pickup or pressure switch gets to the module?
Firstly, the module looks at the size of the voltage, and works out from that how hard the drummer hit the pad. (Because each pad is connected with its own cable, the module knows which one was hit.) Next, it looks up what sounds are assigned to that pad and decides which sound it should play, and how loudly.
When you hit an acoustic snare drum quietly, the sound is very different than it is when you hit it very hard. Electronic drum kits do much the same thing: If you hit a drum pad lightly, the module will play the sound softly; if you hit it hard, it will play the sound loudly.

The modules in most modern electronic drum kits, including all Yamaha models, store and play back samples (digital recordings) of real drums and cymbals. These recordings will be made at many different volume levels, from very quiet to very loud, so there might be over a hundred samples of the same snare drum, for example, each played at a slightly different volume. This allows the module to play back exactly the right sort of hit at the correct volume for your playing, depending on where you hit the pad and how hard you hit it.
That’s how it works. There is no magic, but there is some clever electronics … and, believe me, it makes all the difference. So the next time you play your electronic drum kit, thank quartz crystal for its innate properties, and know that inside each of your drum pads is an essential piece of the Earth.

Keep reading