Tagged Under:
Adding Keyboard Fills
How to go beyond just playing the melody.
Whether you are playing a song by yourself or backing a singer, adding some melodic elements beyond the written melody really adds to your performance. If you are used to only reading music, this may seem daunting at first, but here are some suggestions that will help guide you through these uncharted waters.
Respect The Melody
Begin by considering how busy the melody is, as well as the general mood and feel of the piece. That’s important because whatever you are going to add needs to be in the same style and character. A melody consisting of long, held notes doesn’t call for having busy licks interspersed; conversely, anything you add to a busy, highly rhythmic melody should have some space and room to breathe. Listen to the song repeatedly and get a good feel for it beforehand so that any fills you add complement it tastefully.
For the purposes of our explorations in this article, we’ll use this simple melody:

As you can see and hear from this next example, it can be effective to just echo a single note from the melody — often the last note, in a higher octave like a bell chime response:

This can be a single note, an octave (as in bar 4) or a broken octave, where you play a note and then immediately add a second note an octave higher or lower (as in bar 8).
Or, building on that concept, you can try adding a fuller chord voicing. I like to include an octave within such a voicing (as in bar 4 below), and I sometimes roll the notes so it sounds more like an arpeggio (as in bar 8).

You can also repeat part of the written melody as an echo effect. This works especially well when it’s an octave higher:

Bear in mind that your fills don’t have to be exactly the same; sometimes it’s good to vary the figure slightly so you’re not repeating it literally, as in this example:

Complement the Melody
Another approach is to take some aspect of the melody and create a new answering phrase that is related to that element. If, for example, the original melody has a signature melodic leap up (or down), you can mimic it with the same interval, even though you are not using the same notes:

Or you can base your fill on a rhythmic figure in the melody. In this next example, I’m using the “quarter note followed by the two eighth-notes” motif of the melody and building on it for my fill:

Outline The Harmony
Another way to create fills is to outline the harmony, then add some colorful tones to your arpeggiations. Even just arpeggiating the current chord as a seventh chord (major seventh, minor seventh, dominant seventh etc.) works, though that approach is a little ordinary. I like to add at least one color tone coming from more extended chords, which I discussed in this Well-Rounded Keyboardist posting. I also tend to not start on the root of the chord, which I feel sounds very predictable.
Here are a few examples for three common chord qualities (I suggest you explore these types of ideas for other chords as well):


Applying this concept to our melody, you can see that we don’t have a lot of beats to fill for each chord, and I didn’t want to overplay or cram too many notes into the space, so I crafted a figure to cross over both the E minor and G7 suspended chords:

I also chose to stop arpeggiating halfway through bar 4, as I felt it was getting too busy, so I used the octave chime style to complete the phrase.
Here’s one more example, this time changing the direction of the arpeggiation:

Preparing For Soloing
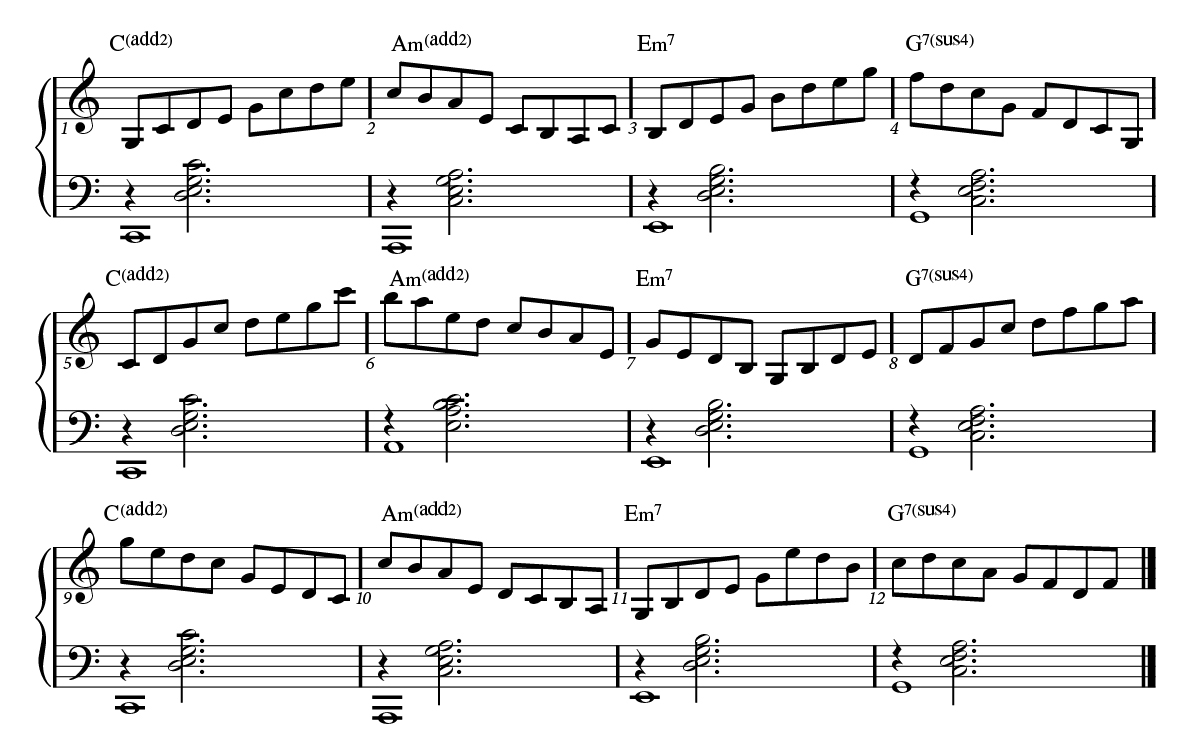
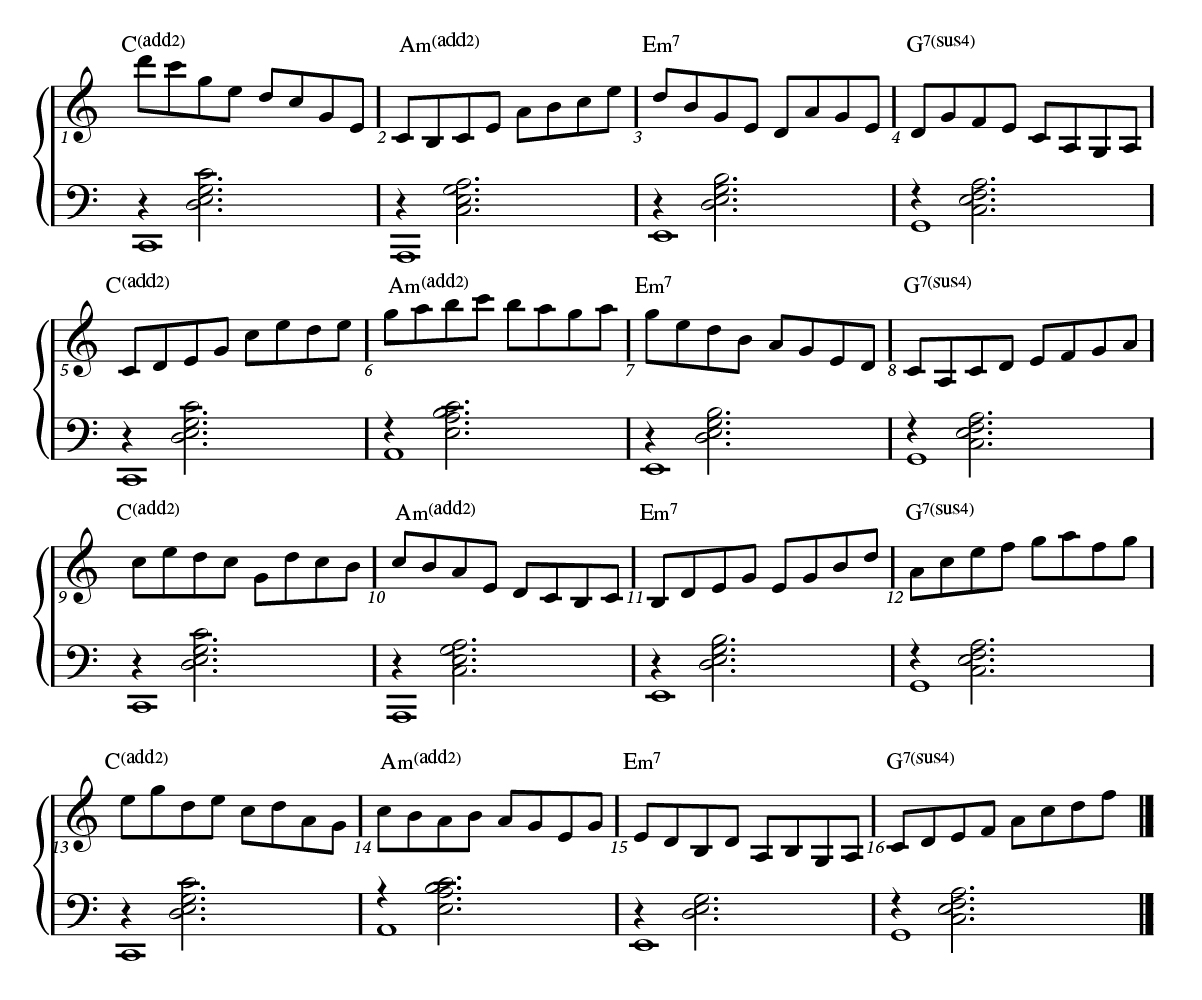
Learning how to arpeggiate through changing chords is a great first step in learning how to solo — the topic of this Well-Rounded Keyboardist blog posting. I suggest that you practice the following two exercises, as the proficiency you gain from doing so will help inform your fills and melodic development.
Start with this finger-twister, beginning at a slow tempo, then building up speed as you get better at it:
Then try this alternative version, which employs more color tones and more intricate melodic movement:
All audio played on a Yamaha P-515.
Check out our other Well-Rounded Keyboardist postings.
Click here for more information about Yamaha keyboard instruments.


