Tagged Under:
Pop/Rock Chord Voicings, Part 3
Octave-based melodies, arpeggiations and rolling notes.
In Parts 1 and 2 of this three-part series, we covered numerous voicings and passing chord concepts for playing in pop and rock styles of music. In this installment, we’ll put those ideas together.
Getting in the Groove
You need more than good voicings to sound hip — you also need to impart a good feel to your music. Regardless of whether you’re playing solo or in a band, you want to come up with rhythmic patterns that match the feel of the music. Here are two audio clips of me playing on top of a C major chord (once slowly, and once at a moderate tempo with drums added), using some of the concepts we’ve discussed:
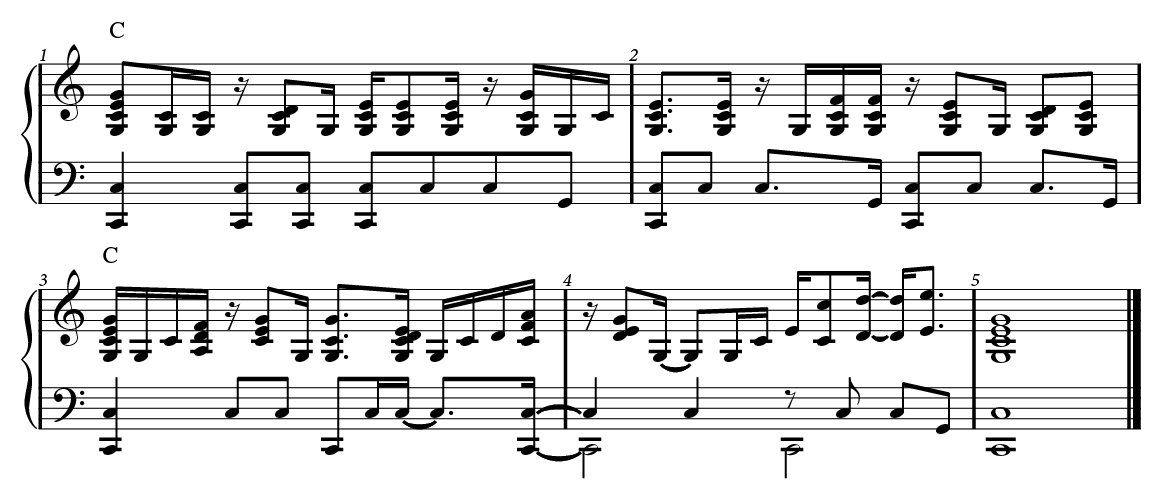
The first thing I want to draw your attention to is how I keep my right hand in basically the same position the whole time, until the octave melodic fill leading into the last bar. Based on the playing of keyboardists like Elton John, this style works well behind vocals, and gives the music energy without getting too busy, or getting in the way of the melody.
Notice the use of the Sus2 voicing on the second sixteenth of beat 2 in bar 1, and again on beat 4 of bar 2; I also use a Sus4 voicing in bar 2. Bar 3 has two different passing chords: first, a D minor at the end of the first beat, with a nice syncopation to resolve it on the second sixteenth of beat 2. The figure on beat 4 of that same bar ends on an F triad, which again resolves into a Cadd2 on the next beat, using the same syncopated rhythm.
I also employ some small arpeggiations of the chord voicings, playing the notes of some chords individually to break up the chords with a touch of melody. Finally, leading into bar 5 I play a short melody in octaves, which is a common way (in rock music, anyway) to fill spaces between the singer’s phrases. My advice is to keep those simple and don’t overdo them, unless it’s your time to shine with a solo.
Roll On
Rather than always playing your chord voicings as a block, try rolling the notes, which means rapidly sweeping through a given voicing. This is different from an arpeggio, in that you keep holding each note, so you are quickly adding the next notes until you are sustaining the full voicing. Here are a few ways to do that:

The wavy line to the left of the chord voicing is how a rolled or quickly arpeggiated chord is notated, and the arrow indicates the direction of the roll. (The figure in bars 2, 4 and 6 is what you actually play when you see the notation in bars 1, 3 and 5.) The version in bars 3 and 4 has you holding the top note for a split second before continuing the roll downward — this is a more melodic way to do a roll. The version in bars 5 and 6 is a roll upwards, which you could do for any of these previous examples as well. To make it more colorful I added the 2nd (D) to the chord voicing, playing both the middle C and D at the same time with my thumb and then continue the roll upwards. I suggest you practice these exercises slowly at first, learning to hold each note after it’s played until you are sustaining the full chord voicing; also try rolling the chord at different speeds.
Less is More
For slower songs, or in situations where you want to leave more space, you can add a little fill by playing either a single octave note, an octave-based simple melody, or a small arpeggiation, as shown below:

The first idea (bar 1) is the simplest, but it can be very effective. I suggest you not choose the root of the chord or the current melody note for your octave, as it might either be boring or get in the way of the vocal. The second idea is a simple countermelody, which will hopefully work with the vocal. The third idea is a small downward arpeggiation — again, try choosing some colorful notes. The final example is a two-handed quick arpeggiation. For this, I chose two triads: a 2nd inversion C major played with the left hand, followed by a root position G major in the right hand, which creates the 5th, major 7th and 9th of the C major seventh chord.
To give you a little inspiration, here are the same right-hand figures played over different, and changing harmony in the left hand:

Now we’re getting some real sophistication in our playing, while keeping our ideas clear and not overplaying. Bar 2 uses the sus2 voicing over the 3rd in the bass that we learned in Part 2 of this series. For bar 3, I kept the same right-hand voicing and moved the bass to a B-flat to get a very cool-sounding chord that has nice color tones (the major 7th [D] and the 6th [G], also called the 13th). I keep following the same kind of voice-leading downwards to create the last voicing for the A minor 9th.
Putting It All Together
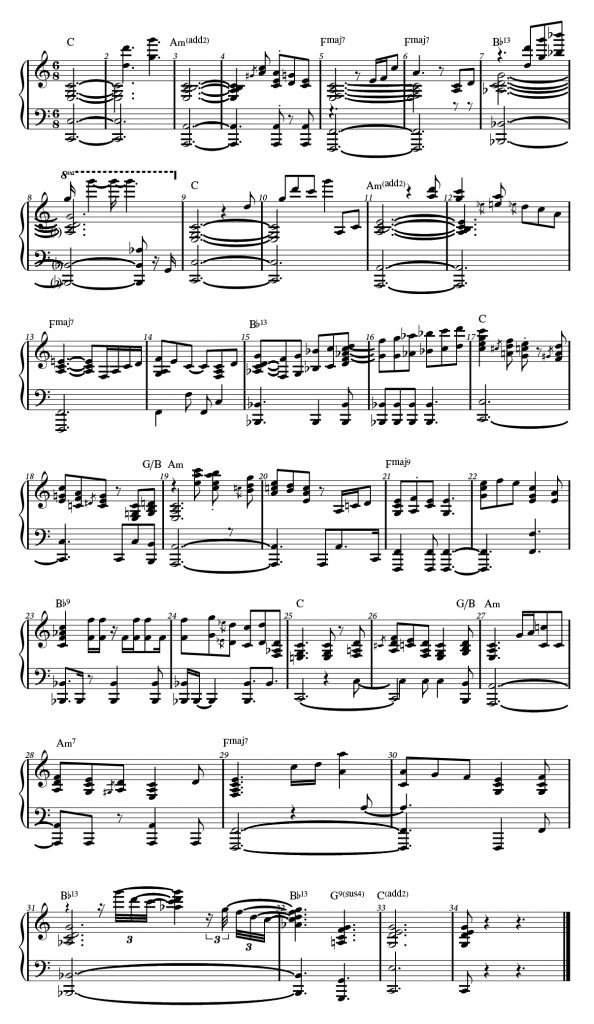
OK, time to use everything we’ve discussed. The performance below is more advanced than the examples I’ve given you up to this point. I suggest you listen to it a number of times, following along with the music to get a sense of how it goes before trying to read and play it yourself:
The example has a gospel flavor to it, and is played in 6/8 time. This time signature has a feeling of two beats per bar, but each beat is made up of three subdivisions rather than two.

An analysis of the transcription reveals that bars 1 – 11 are using the lower chord voicing, followed by the simple octave fills and small arpeggio ideas discussed earlier. Bar 4 has a descending fill that implies using a G passing chord between two inversions of the A minor. I then repeated that downward concept again on the A minor in bar 12.
Bar 14 uses an F 6th arpeggio to set up an Fadd2 voicing (in fourths), and the next bar has a cool, jazzy chord which builds up some energy with a climbing octave melody phrase. This spills over into bar 17, where a series of descending passing chord figures are played between inversions of the C chord. A quick G with B in the bass passing chord sets up the A minor nicely, with the downward passing chord phrases mimicked again for continuity.
Bars 21 and 22 use a C triad over the F bass for color, with the idea repeated an octave higher the second time around for variety. For the Bb dominant chord, the energy is ramped up again with rhythmically repeated octaves between the two hands, moving into a melodic line back to the C major.
Bars 25 through 28 go back to working the passing chord concepts again, with a moving melody added across bar 29, using the C triad over F and then a 4th-based voicing that looks like a Csus4 triad (or is it Fsus2?) to lead into that colorful Bb dominant chord again. Two downward-rolled arpeggio figures calm the energy down as the wrap-up approaches; these also serve to set up the final V to I resolution, although the V chord is a suspended 4th.
Whew! That’s a lot of analysis, but it demonstrates how all the concepts we’ve presented in this three-part series can be used. Plenty for you to digest and work on!
All audio played on a Yamaha P-515.
Check out our other Well-Rounded Keyboardist postings.
Click here for more information about Yamaha keyboard instruments.


