Discover the Sonic Possibilities of Your Drums, Part 2
In Part 1 of this two-part series, we discovered how the sound of a drum is affected by various tonewoods, drum heads and muffling. This time, we’ll see how different tunings, hoops and bearing edges impact on tonality.
Tune Up!
One of the easiest ways to give your drums a new personality is by changing the tuning. Good tuning takes a bit of practice, but the results are well worth the effort.
Here’s how to tune snare drums and toms:
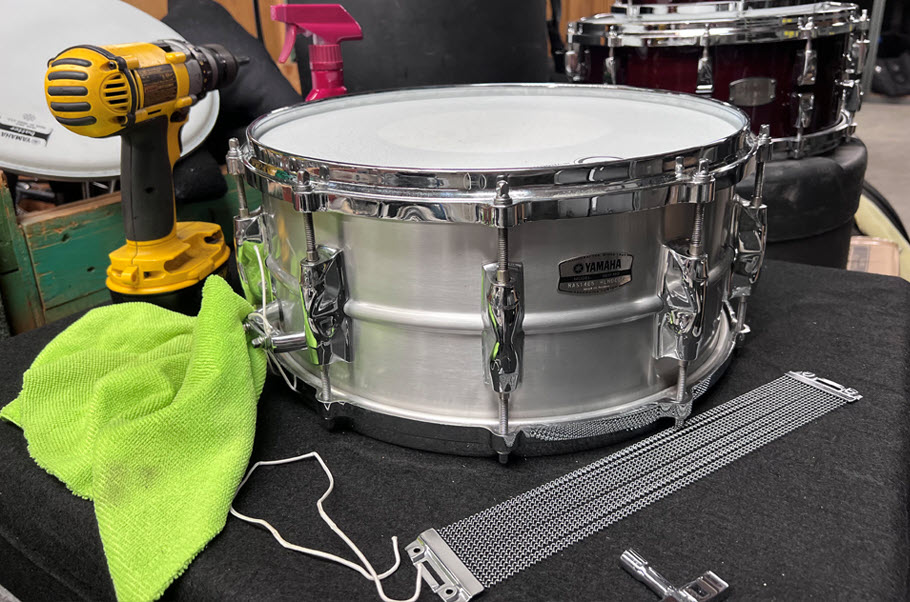
1. Start by evaluating the condition of the drum heads. Heads that are torn, stretched or have pock marks will be difficult to tune and should be replaced.
2. Whether you’re replacing the heads or not, take them off before you begin the tuning process and use a clean, dry cloth to remove debris from the heads, the metal hoops and the bearing edges (the thin edge of a drum shell that directly contacts the head; more below). Take care not to damage the bearing edges because a dent or crack in the edge can make tuning difficult.
3. Next, stretch the head to make tuning easier. Set the drum down on a flat, dry surface with an old towel underneath, and seat the head on the shell by making sure that the “flesh hoop” (the hoop of the head) surrounds the shell and that the head lies flat on the bearing edge. Then gently press down a few times on the middle of the head with your palm, as shown below. You may hear a cracking noise when you push down on new heads; this is the sound of the glue separating from the flesh hoop and is completely normal.

4. The next step is to check the tension rods, washers and metal hoop. If any of these parts are bent or damaged, they should be replaced. Bent tension rods can be spotted by rolling them along the edge of a table, and you can check a metal hoop by laying it on a piece of glass or a stone countertop. It should lay flat and not rock back and forth. If necessary, you can add a a small dab of viscous lithium grease to each tension rod, but don’t overdo it or they’ll loosen too easily. (Yamaha drums use a special lubricant for tension rods that lasts a very long time — sometimes even for the life of the drum.) Finger-tighten each tension rod until the washer comes in contact with the metal hoop.
5. Pick a tension rod (call it “number 1”) and tighten it a half-turn using a drum key. Do the same to the tension rod opposite, then all the others, following the tuning patterns show below. These patterns help create equal tension across the head, which reduces unwanted overtones and ensures consistent pitch throughout the entire drum head. Even tension also helps prevent rims from bending and shells from going out of round.

6. Once there’s tension on the head, you can use quarter-turns for finer adjustment. Depending upon the size of the drum, the weight of the head and the desired pitch, you’ll need between two and five half-turns — but snare side heads usually require more tension to achieve the high sensitivity required for ghost notes, drags and buzz rolls.
7. As you work your way through a tuning pattern, you may notice that some of the tension rods become loose. That’s because the metal hoop is being pulled down by the tension rods you’ve already tightened, so finger-tighten as you go if necessary.
8. Once the head has enough tension to produce a note, tap it near each tension rod and listen for consistent pitch. Adjust the rods where the pitch varies significantly, then strike the head in the center with a stick and listen for a pure note without any weird overtones.
9. When done, tune the bottom head in the same manner, being careful not to break snare side heads by overtightening. For toms and kick drum, start with the resonant head tuned to the same pitch as the batter head; this will maximize sustain. From there you can experiment by tuning the resonant head higher (less sustain, slight pitch bend up) or lower (less sustain, slight pitch bend down). As you get to know your drums, you’ll learn the range of pitches where they “speak” best. Tuning too high will choke the drum, while tuning too low can make a drum sound dull and muddy, like a cardboard box.
Contemporary drummers who typically tune their kits high include Stewart Copeland and Bill Bruford. The great Buddy Rich also utilized a signature high tuning. Drummers that favor a low tuning include Dave Grohl and Lars Ulrich, as did Led Zeppelin’s John Bonham.
Here are some videos that show Yamaha Artists playing in different tunings:
Dario Panza on a Live Custom Hybrid Oak kit with the toms tuned low.
Joshua Johnson on a Stage Custom Birch kit with medium tuning.
Steve Gadd on a Recording Custom kit with the snare tuned medium and the toms tuned high.
Tuning a Bass Drum
Follow the same steps for tuning a bass drum, keeping in mind that there are a few important differences. Most bass drums use straight wood hoops with T-rods and claws, so take extra care when aligning the wood hoop with the flesh hoop of the head. One to two turns on each tension rod for the batter head should be enough to create the low-pitched “whump” heard in most contemporary music genres, but jazz drummers may want to tune a little higher to create a longer, more defined note. If the batter hoop has a hoop protector (shown below) to prevent damage from the foot pedal clamp, be sure it’s positioned at the bottom where the pedal will be attached.

Before you seat the resonant head, consider whether or not you’ll add a pillow, blanket or other device designed to dampen a bass drum. Internal damping may not be needed if the heads already have built-in damping. To get maximum “woof,” tune the resonant head low (one to two turns), but make sure that none of the tension rods are loose enough to rattle. If you’re looking for a pure tone with more sustain, tune the resonant head higher (two to four turns).
An Alternative Tuning Method
Here’s an alternative tuning technique that works very well for some drummers:
1. Finger-tighten the tension rods, then place your palm in the center of the head and push down. The head will wrinkle.
2. Using a drum key, tighten one tension rod until the wrinkle near that rod disappears.
3. Then move clockwise to the next tension rod and repeat the process until you have completed a circle and there are no wrinkles.
4. Finally, do a tap test to check the pitch near each tension rod and adjust if necessary.
Snare Wire Tension
The tension on snare wires can have a big impact too, so be sure to check it as part of the tuning process.
Here’s how: With the snares switched on, tap the drum at the center of the head very lightly. If it sounds like a tom, the snares are too tight and the drum is choking. Loosen the throw off so that the snares rattle slightly when struck at a low volume. If they rattle too long, tighten the throw off.

You may encounter a situation where hitting a tom causes the snare to buzz. This is called “sympathetic vibration” and can usually be cured by making sure that the toms and snare are not tuned close to one another in pitch.
Bearing Edges
As mentioned previously, the bearing edge is the part of a drum shell that directly contacts the head. It significantly impacts the tone and articulation of the drum, with different shapes producing different tones. The bearing edges for Yamaha PHX Series drums, for example, are cut at 30 degrees, but each type of shell (tom, floor tom or bass drum) has a different radius (R). The radius is the area at the top of the bearing edge where the head touches the wood, and it determines the amount of vibration transferred from the head to the shell. The edge for the PHX bass drum (R1.5) produces a clear, sharp sound, while the tom edges (R2 and R4) produce a fatter, more rounded sound.

Yamaha Recording Custom Series drums use a R1.5/30-degree bearing edge to deliver a sharp response and a wide tuning range with a variety of head choices.

Yamaha Tour Custom drums feature 45-degree bearing edges that add tonal depth and quick response while providing the perfect amount of sustain.
Hoops
Drum hoops can be made of steel, brass, aluminum or wood, and each has a unique sound. Yamaha Live Custom Hybrid Oak Series drums, for example, use 2.3 mm steel hoops for a tighter sound and sharp response, while the company’s PHX Series drums feature 3 mm die-cast aluminum hoops that are manufactured using a proprietary process developed by Yamaha. These hoops provide precision tuning due to their rigidity but — unlike zinc die-cast hoops, which are heavy and reduce head vibration — produce a rich, melodic tone and moderate attack without suppressing head vibration.

Yamaha Tour Custom Series drums utilize a unique 2.3 mm inverse DynaHoop that controls overtones and focuses the fundamental tone of the shell.

Listen to Yamaha Artist Shoji Hirakawa play a Yamaha Tour Custom drum kit.
All of these elements — tonewoods, heads, muffling, tuning, bearing edges and hoops — are part of a formula that you can use to create your ultimate drum sound. Time to roll up your sleeves and get started!
Photographs courtesy of the author.
Keep reading