How to Record TransAcoustic Guitar Effects
Add depth and interest to your guitar parts … without the need for an amplifier.
Yamaha TransAcoustic (TA) guitars are unique in that they provide reverb and chorus effects that project directly from the instrument, without the need for an external amplifier.
Yes, you read that right: No amplifier required.
That doesn’t mean you can’t use an amp with a TA guitar. To the contrary — all TransAcoustic guitars (there are several models to choose from) are equipped with a piezo pickup system, which lets you plug in a standard 1/4″ cable and send the signal, with chorus and/or reverb if desired, to the amplifier of your choice.
That said, there’s something really special about the sound of the TA effects hanging in the air all around you as you play. In this article, I’ll describe how to capture that sound using a microphone and the DAW of your choice. (“DAW” stands for “Digital Audio Workstation” — software that allows you to record on your computer.)
Make the Commitment
The first rule of recording is that there is no right or wrong way. The only rule I follow in that regard is, “If it sounds right, it is right.”
In many instances, getting started recording the TA effects can be just that easy: Turn them on, play a bit, make some adjustments and see what sounds right for the type of production you’re going for. The TransAcoustic effects are controlled from three knobs on top of the guitar. To turn the effects on, simply push in the Line Out Volume knob for a second or two, then adjust the Reverb and Chorus control knobs to taste. With the Reverb knob, anything past the 12 o’clock position is a Hall effect, and anything below 12 o’clock is a Room effect. With the Chorus knob, turning it up increases the intensity of the effect, while turning it completely counterclockwise switches the effect off.
Easy enough. However, there are a few things that need to be thought through before you begin. First of all, the effects that you capture will be committed to the recording, meaning that they cannot be removed afterwards. Since most acoustic guitars do not have effects built in, they are traditionally added after recording, either inside your DAW with digital plugins, or with the use of hardware effects devices such as stomp boxes.
That said, you can always add to the effected sound afterwards, so think through how much you want to capture in the first place. Again, if it sounds right, it is right, so if you like what you hear out of the guitar and in your headphones, get it down. If not, just record the guitar dry; additional types of effects can always be added later as need be.
Choose Your Weapon and Position it Correctly
I strongly suggest that you use the most neutral-sounding microphone in your arsenal so as to translate the natural sound of the TA guitar with minimal influence coming from the mic itself. If you choose to use something like a classic “desert island” dynamic mic like a Shure SM57, bear in mind that it’s got a fairly midrange tonality that may sound great on amps and drums, but will not deliver the full natural sound of an acoustic guitar.
With that in mind, I personally prefer to use low noise, high quality condenser mics such as the Earthworks QTC50 or DPA 4006, both of which translate the sound of acoustic guitar openly and naturally. I tend to choose omnidirectional mics for this purpose because they also capture the sound of my room in a nice 360-degree pattern, but the focused sound of a cardioid pattern may be a better choice if your room is not acoustically treated.
Of course, other microphones can be used as well. I’ve gotten good results with the sE Electronics sE8, Audio Technica AT4033/CL and Rode NT1-A (all condenser models), as well as the Royer R-10 dynamic ribbon mic. If budget allows, go for a high-end mic like the Neumann U87, TLM 103 and KM184, AKG 414, C451 and C12, or the Schoeps CMC5. All of these deliver excellent results on acoustic instruments, especially acoustic guitars.
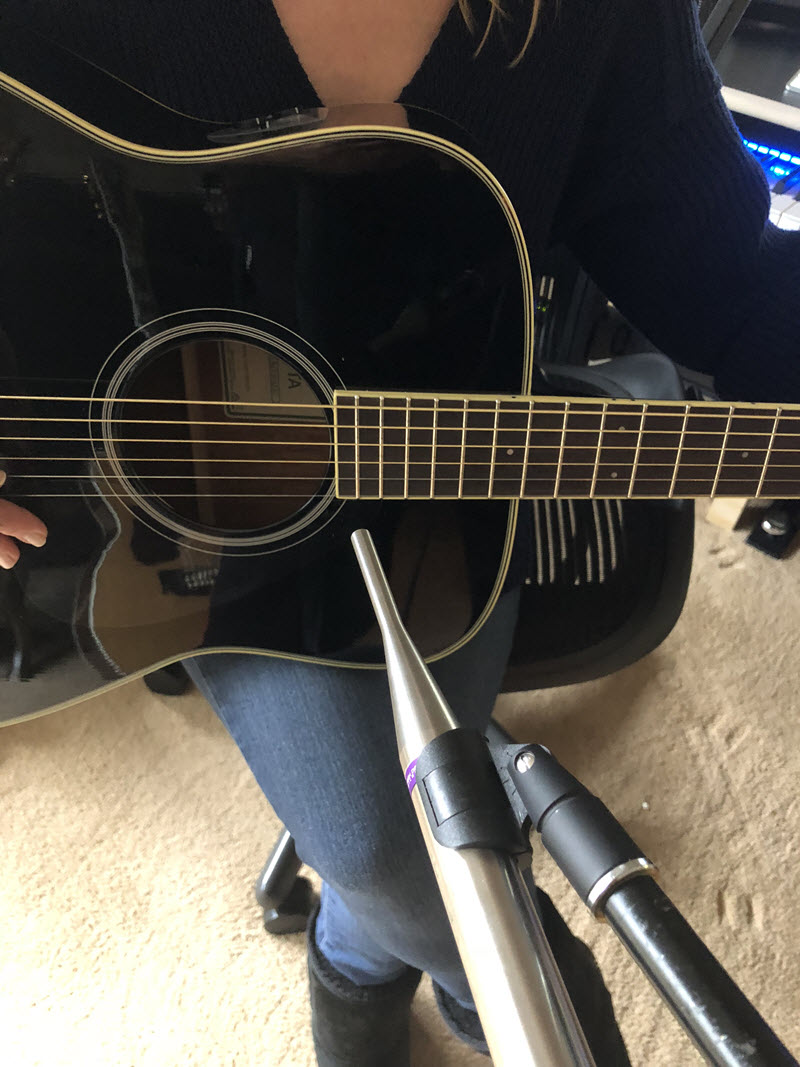
After considerable experimentation, I found that I got the best results by placing an Earthworks QTC50 omnidirectional mic about four inches away from my FG-TA guitar, pointed approximately where the sound hole meets the fretboard. Here’s a picture of that setup:
The Best of Both Worlds
With acoustic instruments that have a built-in pickup (such as Yamaha TA guitars), I often use the combination of a microphone and the internal pickup. This tends to give me more production options in the mix stage, and can help deliver a bigger sound. To route the pickup signal to your DAW, simply plug in a 1/4″ cable and connect it to any input on your computer’s audio interface.
Give a Listen
Here are some examples of the way I recorded my FG-TA on a recent TV scoring session for a major cable channel, using a an Earthworks microphone plus the signal from the FG-TA’s pickup, connected to a Line 6 Helix guitar processor with no amp, cabinet or effects models engaged (I just wanted the pure, direct sound).
First, here’s the sound of the guitar with only the Room effect engaged. In this example, the microphone signal is panned hard left and the pickup signal is panned at around 2 o’clock (midway between right and center):
Next, here’s the guitar with only the Chorus effect engaged. The pickup signal is on the left, panned at 10 o’clock (about midway between left and center) and the microphone signal is panned hard right:
Double Down
One great way to thicken up your acoustic guitar parts is to double them. Yes, you could copy the same track and offset it by a few milliseconds, or effect it differently, but it tends to sound better when you simply play it again and pan the overdub to the opposite side. This way, the slight differences in your performance create a “rub” that sounds natural.
In this audio clip, the guitar on the left has the Room effect only, and the guitar on the right has a little Chorus effect — just enough to add a nice shimmer and sense of depth:
Full Mix
Looking to achieve a full, wide open sound? Try doubling the track naturally, using the TA Room effect on one pass and the Chorus effect on a second pass, then pan the two slightly opposite one another. This audio clip presents the full mix; I’ve done nothing but pull down some of the low end with an EQ just to clean up the production, since there are other instruments (drums, percussion, bass and a slide guitar) involved. But as you can hear, the combination of the TA Room and Chorus effects adds a great deal to the overall feel of the track:
Solo Example
Finally, here’s a clip of me doing some solo playing on my FG-TA. Here, I’ve turned on some of the guitar’s Hall and Chorus effects, once again capturing the sound with an Earthworks microphone and the pickup through the Helix with no amp, cabinet or effects modeling. It was all recorded in a single pass, with the microphone panned hard left and the DI panned hard right:
Needless to say, the key to getting the most out of the TA effects is to experiment to see what sounds best, always depending on the needs of the track and the overall focus of the production. You’ll find that, in almost every instance, adding some TransAcoustic reverb and chorus will add depth and interest to your guitar parts.
Photograph courtesy of the author.
Click here for more information about Yamaha TransAcoustic guitars.
Wondering how the TransAcoustic effects are created? Click here to discover the answer.


