Tagged Under:
Timpani Maintenance
Solutions to common timpani problems.
The percussion family consists of vast number of instruments. In a standard music room, there will be timpani, marimbas, xylophones, bells, snare drum, bass drum, cymbals, tambourine, triangles and much more. All require regular care and maintenance. In this article, we’ll talk about one of the most difficult percussion instruments to maintain: Timpani.
Problem #1: The pedals are slipping.
This is the most common issue regarding timpani. Before you adjust the spring tension, you must check the range of the timpani. Plastic heads stretch and if the timpani are not tuned to the correct range (something that should be checked every month), the pedal will slip or will not stay in place.
Here’s a chart showing standard tonal ranges for Yamaha and most modern-day timpani:
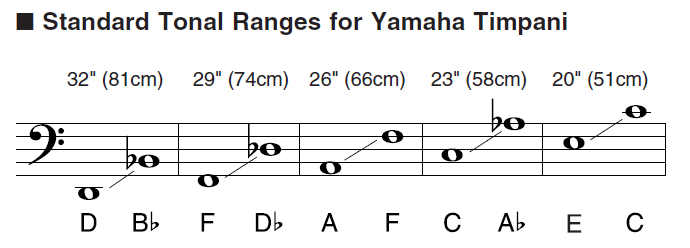
If your timpani are not in the proper range, make the necessary adjustment. Once you are certain that each timpano is tuned properly, check its pedal. If it is still not holding the pitch, then it is time to adjust the balance action spring. This component regulates the tension between the pedal and the head. Be very careful when adjusting the spring — if you loosen it too much, it can come off.
If the pedal will not stay on the top note, you need to tighten the spring. If the pedal will not stay on the bottom note, you need to loosen the spring. Remember: “Righty tighty, lefty loosey.” Bear in mind also that when you change a timpano head, you need to loosen the spring to “reset” it back to the middle tension. A lot of people forget to do this and then you will have pedal problems because the spring is too tight and can’t be tightened any further.
Problem #2: The pedal is “sticky” or doesn’t move smoothly when tuning the pitch.
This is usually an issue of lubrication (or lack of lubrication). Locate the part known as the spider mechanism (on Yamaha timpani, it is located under the base), then identify the rod that goes through the base and pulls the mechanism when the pedal is engaged. (See the circled part [4-8] in the illustration below). This is the rod that needs lubrication:
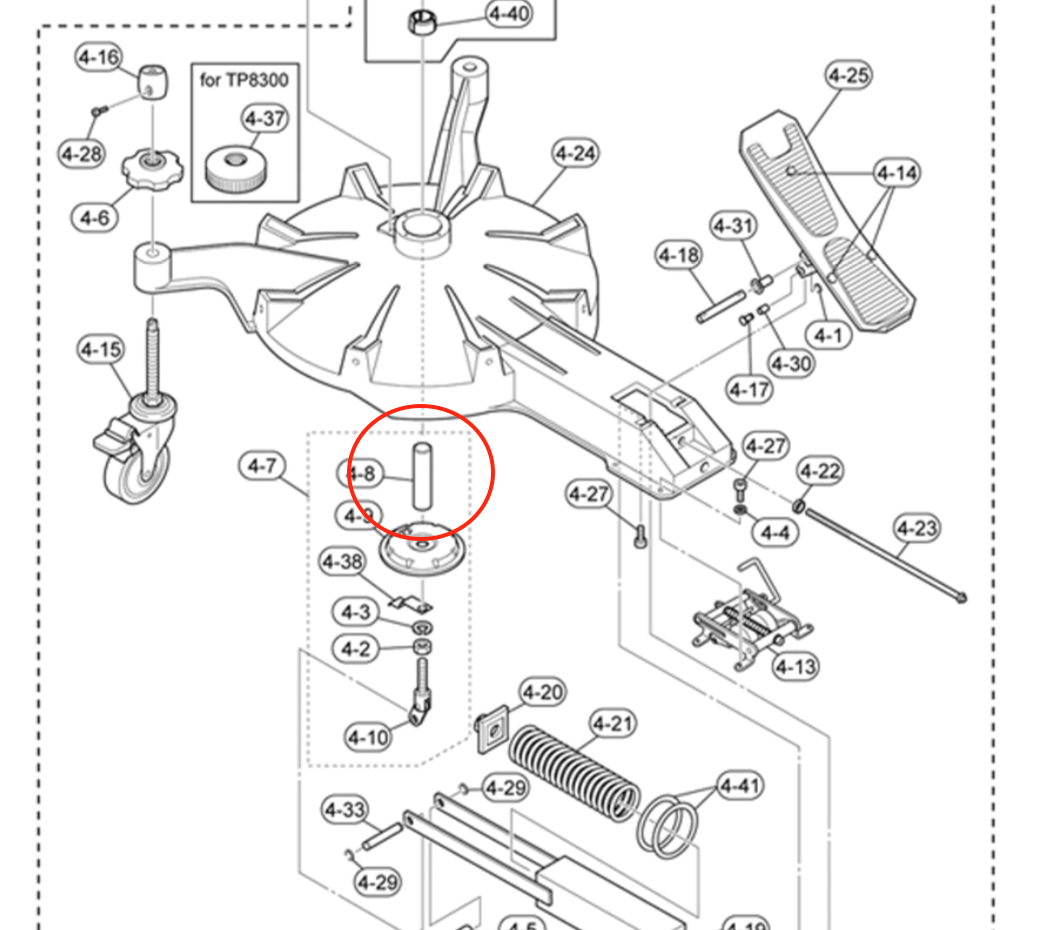
Here are the steps to do so:
1. Push the pedal up to the highest note.
2. Carefully set the drum on its side on a carpeted surface.
3. Clean the rod with a rag and remove any debris or old grease.
4. Using a Q-tip, apply some white lithium grease to the rod. (White lithium grease holds up better than spray lubricant.)
5. While the drum is on its side, move the pedal to spread out the grease. If it is extremely dry, you may need to apply more grease.
6. Put the drum back in the normal playing position and play.
Problem #3: The gauge doesn’t work.
This is a common problem in a school setting. Check that the cable (similar to a brake cable on a bicycle or motorcycle) is attached to the strut and is not bent. You can use zip ties to loosely secure it to the strut so that it doesn’t get pulled out during transportation.
If this does not fix the problem, it’s time to get a new cable. This is usually a simple matter of contacting the manufacturer or an authorized dealer. Be sure to have the model number of the timpani to help them locate the correct part.
Bonus Question: Where should the pedals be set when the drums are not being played or stored?
If your timpani are being used every day during the school year, pedals should be kept in the middle of the range after every rehearsal. Whenever the timpani are moved, push the pedals to the top note in the range. This will help keep the heads centered in case the drums are hit going through a door. Over the summer and during breaks, set the pedal to the lowest note. This will help keep tension off the head for long periods of time and give the drum heads more life.
Click here for more information about Yamaha timpani.


