How to Create a Signature Snare Drum Sound
When it comes to our drumming idols, we can usually identify them by their signature snare drum sound. Think about these drummers and see if you can hear their sound in your head even without listening to them: Elvin Jones, Dave Weckl, Steve Jordan, Matt Cameron, Anton Fig or Steve Gadd.
Not that hard, is it?
That’s because they all have a memorable sound.
The snare drum is the main part of your drum kit and is therefore the key element in creating your individual sound and style. Picture the joy you’ll get when you’re driving the groove with a perfectly phat snare, or that great feeling of control when you’re cracking rimshots at will. Those are the kinds of ultimate goals every drummer aspires to.
When it comes to creating your signature snare drum sound, here are the things you need to keep in mind.
1. Choose the Right Snare Drum
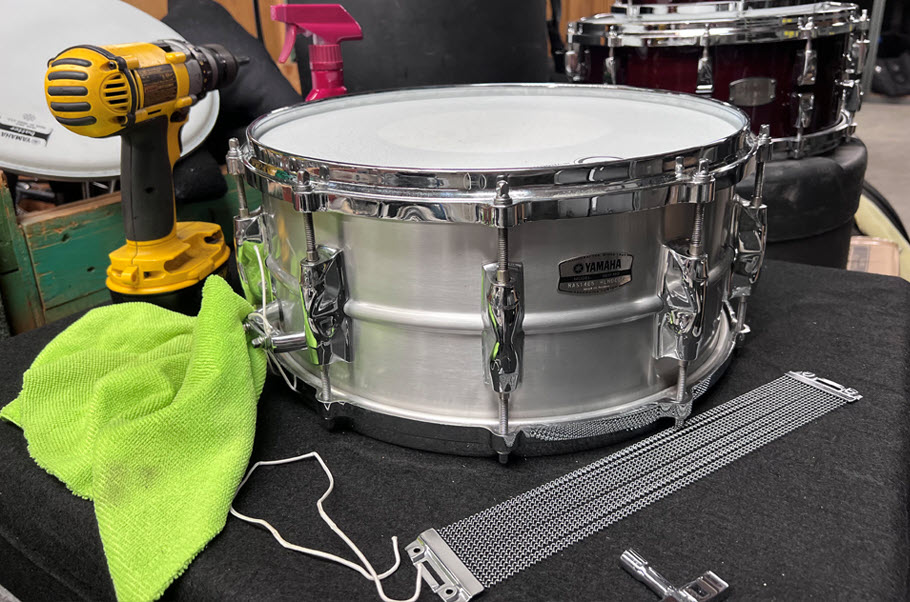
Wood or Metal Shell?
Snare drums come with either wood or metal shells. Maple, birch, oak, mahogany and walnut are some of the more commonly used materials in wood shells. The sound of these drums is generally fat and warm — think Anton Fig.

Steel, brass, aluminum, copper, bronze and titanium are some of the more commonly used metal shell materials. The sound of these drums is generally bright and ringy — and they can really cut through a mix. (Think Matt Cameron.)

The best rule of thumb is to build up your snare drum collection so you have multiple wood and metal models that will work in different environments and musical settings.
Size Matters
Snare drums generally come in diameters from 12″ to 15″, and in depths from 4″ to 8″. Smaller diameter drums (12″ and 13″) will have a higher tuning range than larger 14″ and 15″ drums. Drums with shallower depth will give you more of a crack, whereas an 8″ deep drum will give you a fuller tone.
Head Type Matters Too
Drum heads come in coated or clear varieties and can be single- or double-ply.
Coated heads are a great option if you are playing with brushes or want a warmer sound.
Clear heads have more attack and yield an open, bright sound.
Single-ply heads have a bright, natural and resonant sound. They are great for jazz and lighter playing styles that require more articulation.
Double-ply heads have fewer overtones, are warmer sounding and are the choice for heavier hitters that require more durability.

2. Tune Your Snare Drum Carefully
The tuning of your snare drum is one of the most important elements in attaining a signature sound. To a large degree, it’s a matter of personal taste. Do you like a lower, fatter sound or a higher pitched sound? How does the drum feel at the different tunings? How does the drum sound at your ideal tuning when it’s mic’d up through a sound system?
Unless you are playing the same type of environment and music night after night, your sound and tuning could change somewhat, every time you play. Mine does, and there is nothing wrong with that. It’s about adapting to your surroundings and realizing that the snare tuning that worked so well at an outdoor gig last night might not work in tonight’s small indoor club gig, with all its commensurate volume issues.
Similarly, choosing an 8″ x 14″ snare drum tuned up super tight for a jazz gig might not be the best option, while a 5″ x 14″ with a medium tuning would most likely feel better to you and be a more suitable choice.
3. Make the Sound Appropriate for the Music You Are Playing
For instance, if you are playing in an industrial rock band, you might want a metal drum tuned high with a nice crack to it. If you are in a country band, you might want a deeper, wood snare tuned medium to low in order to create a fatter sound.
If you are doing a good deal of studio work, you will need several different snare drums to better serve the style of song you are working on. If you’re mostly gigging live, you’ll probably have to get by with just two. This gives you flexibility and also gives you a backup in case you break a head or some other component fails.
In my band, we play rock covers from the ’60s to current and have a repertoire of over 400 songs. That requires me to have a snare sound that will work with a wide range of songs — songs that were recorded with many different snare drums. Obviously, I can’t change snare drums between songs or retune my one drum for each song to match that specific sound perfectly, so I have to find a nice middle ground using a tuning that’s not too high or too low. I often carry one wood and one metal snare on these gigs, giving me options depending upon the song list we’re playing on any given night.
4. To Muffle or Not to Muffle? That is the Question.
Muffling can greatly affect a drum’s tone, sustain and volume. Some drummers don’t like to add any muffling to their snare – they prefer the wide-open tone that includes a little ring in the decay of the sound. Others prefer to deaden that ring a bit to control and tighten up the sound.
There are many options out there to muffle your snare. In the ’60s and ’70s, drummers would sometimes put a wallet or piece of cloth on the edge of the batter head. (Beatles drummer, Ringo Starr, used a pack of cigarettes!) My preferred method is to take a small piece of duct tape, roll it over itself and stick it to the edge of the head. Many drummers have ridiculed me about this, but it works!
Today there are many other options available to muffle the sound. These include:
– Moongels or gel stickers
– Control Rings
– A product placed on top of your snare drum such as jingles or the Big Fat Snare Drum
– Cutting out the center of an old head and placing it upside down over your existing head, or even just using the upside-down head without the hole cut out
5. Tailor Your Sound to Your Environment
It goes without saying that snare drums can be very loud. That’s why you need to take into consideration the acoustics of the environment you are playing in, so that your snare sound complements the room and doesn’t obliterate it.
For example, I recently played in an airplane hangar. It was really big and really loud! In any large room or hall, you should opt for a lower tuned and somewhat muffled snare so you can better control the volume.
Of course, if you’re playing an outdoor gig, you usually don’t have to worry about the volume or the often tricky acoustics of indoor venues. This is a great opportunity to use a louder, more open sounding snare drum tuned higher if you so choose.
If you are practicing in a somewhat dead-sounding bedroom with carpet on the floor and have forgiving family members and neighbors, you can use more of an open, ringy sound.
Conversely, if you are practicing in your garage with concrete floors and no soundproofing, go for lower tuning and some muffling to produce a fatter and more controllable sound that your neighbors will appreciate.
As you can see, there are many variables and options in choosing the snare drum that is right for you and then putting all of that together to create your own signature sound. The key is to experiment and continually try out new things, with a goal of developing your own instantly recognizable sound!
Photos courtesy of the author.
Click here for more information about Yamaha snare drums.
Keep reading