
Tagged Under:
How to Change Timpani Drum Heads
Timpani heads do not need to be changed very often – we recommend every 1 to 2 years – but it’s still important for band directors to know how to change them. Unfortunately, many directors don’t know how or think it’s too difficult. Yes, changing drum heads on timpani is more involved than it is for tom or snare drums, but anyone can do it. Here’s how.
Determine the Head Sizes You Need
Unlike other concert drums (i.e., tom, snare or bass drum), timpani heads typically need to be two inches larger than the actual timpano. This is because they extend beyond the edge of the bowl. When purchasing a replacement head for a 32″ timpano, you need a 34″ head; a 29″ timpano requires a 31″ head, etc.
Unlike other concert drums (i.e., tom, snare or bass drum), timpani heads typically need to be two inches larger than the actual timpano. This is because they extend beyond the edge of the bowl. When purchasing a replacement head for a 32″ timpano, you need a 34″ head; a 29″ timpano requires a 31″ head, etc.
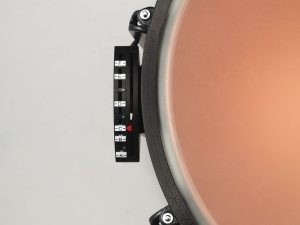
You can, of course, determine the diameter of your timpano head with a measuring tape, but identifying it on Yamaha timpani is extremely easy. Just find the model number of the drum, which is on the badge located under the counterhoop directly above the pedal.
On the badge, you’ll see a set of numbers like TP-3323, TP-4323, TP-6323 or TP-7323. “TP” stands for timpani. The first two numbers indicate the Series. The last two numbers are the size of the timpani. So, TP-3323 is a 23″ timpano in the 3300 Series.
Depending on when your timpani was purchased, the first two numbers may be different than those listed here, reflecting older Yamaha lines. Regardless, the only numbers with respect to the size of the timpani are the last two.
Once you know the model number, you can find a list of appropriate timpani heads from Remo or Evans. You can also use an iPhone app called TimpHeads.
Determine the Type of Heads You Need
There are several types of timpani heads. Whichever one you choose, it is important that all your timpani have the same type of head so that they match in sound and appearance.
There are several types of timpani heads. Whichever one you choose, it is important that all your timpani have the same type of head so that they match in sound and appearance.
Timpani heads can have an aluminum insert ring, a steel insert ring or no insert ring around the collar of each head. Insert rings raise the head above the counterhoop by a small amount.
We recommend heads with an aluminum insert ring. For one thing, they provide a thinner bearing edge for the head to rest upon, thereby increasing tuning consistency and making the head seating process easier. In addition, aluminum insert rings will not rust when taken outdoors.
Yamaha timpani come with Remo RC-Series Renaissance® Hazy Aluminum Insert heads. Remo makes timpani heads in both clear and hazy versions, but the hazy version is stronger and has a darker fundamental with a more focused tone.
Collect the Necessary Tools and Materials
Here are the tools and materials you will need to change timpani heads:
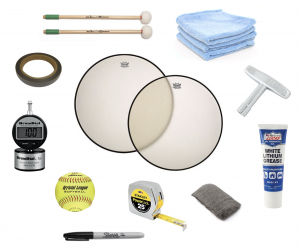
- Timpani mallets
- Rags
- Timpani tuning key
- Lithium grease
- Steel wool
- Tape measure
- Marker
- Softball or block of wood
- DrumDial, a tool that allows equal amounts of pressure to be measured at each tension rod to ensure even tuning.
- Teflon tape
Change the Heads
-
- Put the pedal to the lowest position (heel down) and place a softball or block of wood under the pedal.
- Using a timpani drum key, loosen all of the tension rods.
- Note the position of the counterhoop — when you put it back on the drum, it must be in thesame position. One you’re satisfied you know exactly how it is positioned, remove the counterhoop and set it aside.
- Remove the old head.
- Wipe out the bowl and clean the bearing edge with a rag.
- Apply Teflon tape to the bearing edge.
- Put on the new timpani head. Make sure that the logo is opposite the playing area, with the seam 90 degrees (3 or 9 o’clock) from the playing area.
- Inspect the counterhoop and clean with rags if necessary. If there are any rough spots on the bearing edge, smooth them out with steel wool. Make sure the tension rods are free of dirt and are properly lubricated with lithium grease.
- Put the counterhoop back on and finger-tighten all of the tension rods.
- Use the tape measure to center the head on the bowl.
- Place your foot on the heel of the pedal and remove the softball or block of wood.
- Slowly raise the pedal to the highest position.
- Tighten the tension rods to tune the top note of the range of the drum.
- Use the DrumDial to make sure there is even tension on all of the tension rods. This is also known as “clearing” the head.
- Let the drum sit for a couple of days and then check the range.
- Clear the head again.
For more information, Remo offers a detailed video series showing how to change timpani heads.
Perform Regular Maintenance
Performing regular maintenance is important for both the timpani and their drum heads. Every other week, check to make sure the drums are in the correct range. The chart below shows the standard tonal ranges for Yamaha timpani:
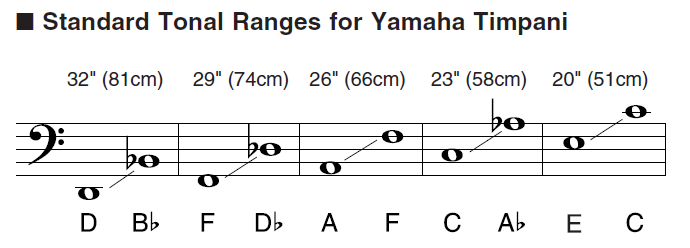
Plastic heads stretch, and if the timpano is not in the correct range, the pedal will slip or not stay in place. While you are checking the range, use the DrumDial to make sure that the head is still cleared (i.e., that there is even tension at all of the tension rods).
Click here to learn more about Yamaha timpani.
Keep reading