Tagged Under:
Getting Great Vocal Tracks, Part 1: The Vocal Chain
It starts with the gear, setup and vibe.
Recording compelling vocal tracks requires more than just putting a mic in front of a singer and pressing the record button. The success of a vocal session hinges on the gear and setup you use as well as psychological aspects such as making the singer (whether it’s you or someone else) relaxed and comfortable. In this article, we’ll take a look at each of these.
Mic It
When famous producers and engineers talk about how they selected a microphone for a particular session, they often mention how they had to make a difficult choice between several expensive vintage models to find the best one for a particular singer. For most home recordists, however, that’s a fantasy scenario. Particularly if you’re new to recording, you probably only have one or two relatively inexpensive mics to choose from.
But don’t despair. While it certainly helps to have high-end gear, you can still get a darn good vocal sound with almost any mic. The most significant X factor is the quality of the singer and the vocal performance.
That said, using the best mic you can will certainly help. (If you can’t afford to buy one, perhaps look into renting one.) Generally speaking, you’re likely to get superior results if you use a large-diaphragm condenser mic to record vocals. These models are designed to provide accurate reproduction and offer good high-end response, which flatters the human voice and helps in enunciation, thus making it easier to hear the lyrics being sung.
These days you can get a serviceable large-diaphragm condenser without spending a ton of money. For example, the Steinberg UR22mkII Recording Pack bundles an ST-M01 Studio Condenser mic along with a UR22mkII audio interface and a pair of headphones.
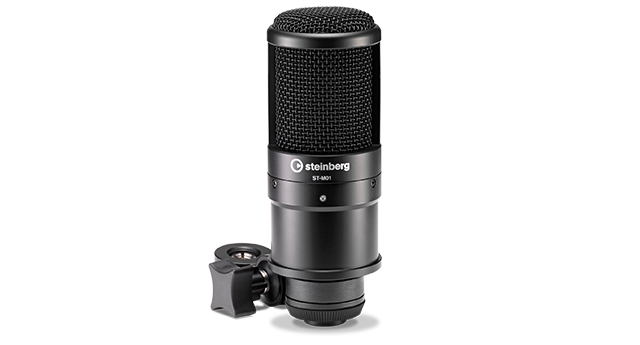
If you don’t have a large-diaphragm condenser, even a good quality hand-held dynamic mic designed for live performance can work. There have actually been tons of hit records made with such mics!
Place It
Mic placement will affect the vocal sound quite a bit. Ideally, it’s best to position the mic about three to five inches in front of the singer’s mouth, but try to make sure you have a pop filter (sometimes called a “pop screen”) between the mouth and the mic to reduce the pickup of plosives — popped Ps and other consonant sounds. Pop filters are inexpensive and well worth including in your studio arsenal, but if you don’t have one immediately on hand, position the mic so it’s a little above or below the singer’s mouth, and/or encourage them to move their head slightly off to the side when singing “p”s or “t”s.

Most vocal mics pick up audio in what’s called a cardioid pattern, meaning they’re most sensitive to signal coming from directly in front. That’s all well and good, but be aware that cardioid mics are prone to something called the proximity effect, which means that the closer you get to it, the more bass is added, thus accentuating the low end of the singer’s voice and making it sound “bigger.” You can use the proximity effect to your advantage to help beef up an otherwise thin voice.
(Pre)Amp It
The signal coming out of a microphone is very low level and has to be amplified to a higher level (called line-level) before being sent to your DAW. The device that takes care of that task is called a mic preamp. A mic preamp has significant impact on the sound quality and is almost as important as the microphone itself in terms of making a vocal sound rich and clean.
Most people in home studios use the preamp built into their audio interface, rather than a dedicated one. The quality of the preamp will usually be commensurate with the overall quality of the interface. The Steinberg UR Series and UR-RT Series interfaces incorporate Yamaha D-Pre mic preamps, which do an excellent job. UR-RT interfaces also include Rupert Neve transformers (Neve was a legendary analog console designer) which can be switched into the input circuit to add subtle saturation that imbues the signal with a pleasant “warmth.”

The other part of your audio interface that’s critical are its analog-to-digital converters (ADCs for short). When a vocal is picked up by a microphone and passes through a mic preamp, the signal is still analog, but it needs to be digitized to be sent into your computer’s DAW software. Just as with mic preamps, the converters in an interface can vary in quality; generally, the better the interface, the better all its components will be, and therefore the better the sound of the vocals you record with it.
Hang It
Unless your studio has professional acoustic treatment, you’ll probably want to minimize the acoustic reflections when recording vocals. Reflections are created by sound waves bouncing off the walls and coming back into the microphone slightly delayed from the direct sound. These can cause phase issues that degrade the overall quality of the recording.
There are several steps you can take to prevent this kind of problem. You can make your own absorbers by hanging up blankets or comforters in front and in back of the singer. These can be draped over mic stands or hung on the walls or even from the ceiling — whatever works. Alternatively, you can purchase a “reflection filter,” which is a small baffle made of absorbent material that sits on a mic stand behind the microphone.

If you can’t purchase one of these in time for your vocal session, or if you aren’t able to set up absorbers or baffles, it’s not the end of the world. I’ve recorded plenty of vocals successfully without them, but they’ll certainly help you get a more professional sound.
Vibe It
Now that we’ve discussed the gear, let’s get to the intangibles, the most important of which is coaxing the best performance out of a singer. One of the best ways to do so is by enhancing the atmosphere, or vibe, in your studio in a way that helps the singer relax. A calm singer is more likely to give a performance that best captures the emotion of the song. Lowering the lighting always helps, and having as few people as possible in the studio during the session is another good way of having the singer avoid nervousness and distractions.
One critical part of helping the singer relax is to create a headphone mix (a “cue mix”) that’s comfortable for them to sing to. In home studios, this is usually accomplished with an app such as the dspMixFX software that comes with Steinberg interfaces. The key is to dial in the right balance between the live vocal and the recorded backing tracks. If your gear allows you to add reverb or a little delay to headphones without it getting recorded, that can also help set the mood for the singer. Spend a little time at the beginning of a session making sure the vocalist is comfortable with the headphone mix, and be willing to tweak it until they are happy.
Last but not least, always ALWAYS make sure to record every word the vocalist sings — whether you’re ready or not. An old producers’ trick is to surreptitiously start recording when you’re ostensibly “still adjusting levels.” Sometimes the singer will be more relaxed and deliver a better performance when they think it’s just a level check and not an actual take.
Produce It
When you’re producing a singer, give only constructive criticism, or better yet, just be encouraging. Too much critique can cause a singer to tighten up and the vocal performance will suffer for it. If you’re recording your own vocals, stay positive.
Thanks to the quality and accuracy of modern pitch correction software such as the Vari-Audio feature built into Steinberg Cubase, a singer no longer needs to nail every note. Better to go for the most exciting, dynamic or emotional performance, and don’t focus too heavily on pitch. You can always tune a vocal after the fact, but you can’t make a low-energy or boring performance more exciting.
DAWs make it easy to put together the best bits from various vocal takes in the form of a “comp.” We’ll cover that process next month, in Part 2 of this article.
Check out our other Recording Basics postings.
Click here for more information about Steinberg Cubase.


