Genos MIDI Recording, Part 1
This is the first of a two-part series on MIDI recording — a powerful feature offered by the Yamaha Genos arranger keyboard that allows you to quickly capture musical ideas as well as do complex multi-track recordings.
Before we get started, it’s important to understand the difference between the two MIDI recording modes offered by Genos. The first is called Quick Recording. This is great for capturing anything from one instrument (such as a piano) to creating a full-blown arrangement with up to 16 tracks playing back simultaneously. Whenever inspiration strikes, Quick Recording has got you covered.
The second mode is called Multi Recording — great for anyone who wants to build a song track by track. For example, let’s say you want to lay down a piano first, then add drums, then some bass, etc. We’ll be talking about this mode in Part 2 of this series.
Right now, let’s jump in and do some Quick Recording. For this first exercise, I’m going to recreate a real-world situation I find myself in more often than not, where I just want to sit down, play the piano and record an idea.
The first thing we’re going to do is to make sure that your Genos is set up to just play a single instrument — in this case, piano … but not just any piano! Instead, let’s go for the glorious CFX Concert Grand.
1. Begin by assigning the CFX to the Right 1 Part. To do this, you can either touch the Right 1 graphic on the screen and select the CFX from page one of the Piano category, or press the Voice button (the white backlit button located to the right of the jog wheel, next to the Style button):
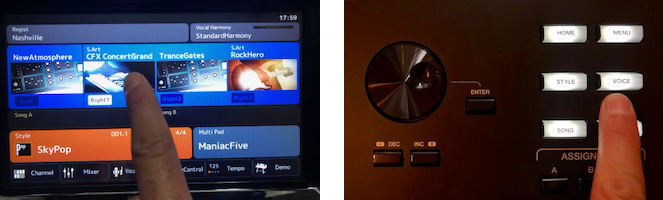
Pressing the Voice button will take you to the same category and voice selection screen as if you’d used the touchscreen:

2. Next, make sure that only the Right 1 Part is ON. (You could leave other Parts ON if you wanted to record layered or split voices, but for now let’s just stick with piano):

3. Then double-check that the ACMP button is off (that is, not lit):

When the ACMP button is lit, you generally won’t hear a single instrument across the full range of the keyboard unless your fingering mode is set to one of the “FULL” keyboard modes. (See my blog article “Mastering AI Fingered Mode” for more on this.)
4. Now that you’re set up with your single CFX Concert Grand, we’re ready to do some recording. It’s as simple as pressing the RECORDING button, located just to the right of the SONG B area on the left side of the panel:

5. You will now see the Song Recording Menu pop up on the screen. Go ahead and touch Quick Recording:

6. The main MIDI Quick Recording screen will appear:

NOTE: If you like playing along to a Metronome you have the option of turning that on now by pressing the Metronome icon on the screen. Changing the tempo or even tapping a tempo in is achieved by the Tempo + & – buttons as well as the TAP TEMPO button, as shown below:

7. Now Genos is ready to start recording when you are — metronome or not. You don’t even have to hit any other button; as soon as you start playing, Genos will start recording.
Go ahead and record something — it doesn’t matter how long — and when you’re finished, press the Stop icon on the screen.
8. Now you can press the Play/Pause icon to listen back. Sound good? I hope so.
At this point, you can either choose to Save your song or try again. To save, simply press the save icon at the top of the screen:

9. Finally, you get to choose where you want to save your song: to the internal User memory, or to a USB device. (Note: A compatible USB drive must be inserted into one of the “To Device” ports in order to save to a USB drive.) Select either the User icon or the USB1 icon and a name selection screen will appear, allowing you to name your song:

Simply type the name of your new masterpiece into the character field. You can even assign it a cool icon by pressing the Icon icon (see what I did there? ;-)) and then selecting from the pages of unique icons available to you. I’m going to go with the sunglasses:

After you’ve named your song, press OK (you may have to press it twice if you’re in the Icon Select screen) and voila, your new masterpiece is named and saved. At this point, you can confidently power down your Genos and not worry about whether or not your song has been saved.

If, however, you decide that your newly recorded song is not to your liking and you’d like to try again, simply touch the Rec button on the screen and this message will appear:

By selecting Continue, you’ll basically go back to the beginning: It’s as if you’d just pressed the RECORDING button for the first time. On the other hand, if you touch Cancel, you’ll have the opportunity to Save and Name your song as just described.
Note that this exercise was just focused on recording a single part — in this case, piano — but you can also capture splits, layers and even full Style playing in Quick Recording mode by following the same recording steps.
All photographs courtesy of the author.
Click here for Part 2, in which we discuss Multi Recording mode.
Click here for more information about Yamaha Genos.
Keep reading