Using Registrations
This handy feature is a real time-saver.

Registrations (or “Registration Memories,” as they’re sometimes called) have been around for decades on a number of Yamaha keyboards. They allow users to quickly save nearly all panel settings to a Registration memory button, which can then be instantly recalled with the press of that button. The Genos arranger keyboard offers ten Registration Memory buttons. What happens when you’ve filled up all ten? Well, you can save those together as a Registration “Bank,” and you can have an almost unlimited number of Banks. You can then create a folder (or folders) to store your Registration Bank files.

The beautiful thing about a Registration is that it can recall something as simple as an instrument voice you play regularly, or you can create more complex Registrations that include tempo, Style Control settings, Vocal harmony settings, and more.
So let’s go ahead and save and recall a Registration. First press the MEMORY button (located just to the right of the ten Registration buttons):

The Registration Memory window will appear, allowing you to select which items you’d like to save. For example, if you want to save Vocal Harmony or Mic settings to a Registration, the Vocal Harmony/Mic Setting box must be checked; if not, Genos will not save those settings. Conversely, you can deselect items that you don’t want included in your Registration:
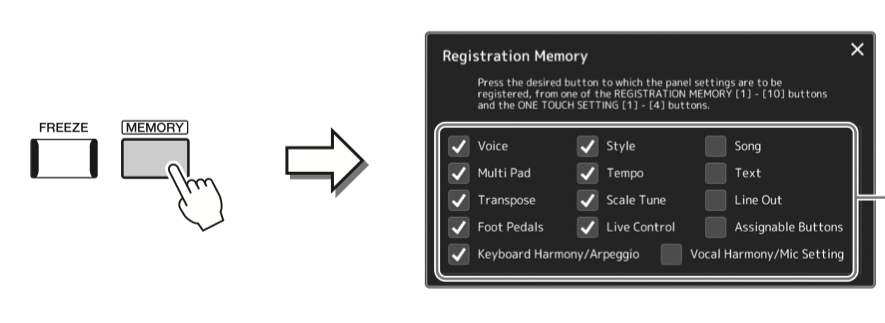
Once you’ve done your selecting and deselecting of the items you want to include in the Registration Memory, simply press any one of the ten registration buttons and voilà, you’ve just saved a Registration.
Let’s assume you’ve filled up all ten Registration buttons (as indicated by the fact that they’re all glowing blue). It’s now time to save those ten to a Registration Bank. To do so, press the REGIST and BANK buttons simultaneously. The Regist Bank Display screen will appear:
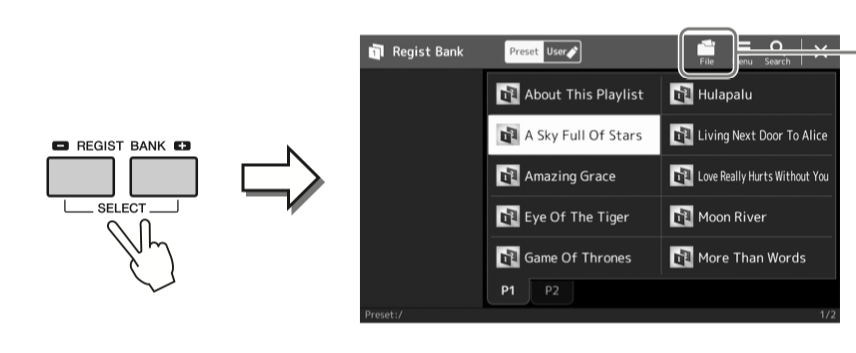
Simply touch the File icon at the top of the screen and select SAVE. Genos will now ask you where you want to save it.
Important note: Don’t be afraid to select an existing registration memory as a save location. As long as you change the name of the Registration, it will be saved as an entirely new Registration. This is a concept that can trip some people up as you obviously don’t want to overwrite any existing saved registrations.
Recalling a Registration Bank is just as easy: Simply press the REGIST and BANK buttons together, then select the Registration Bank you want to recall. Alternatively, you can use the REGIST BANK Plus or Minus buttons to cycle through the existing Registration Banks, thus bypassing the Registration Bank screen altogether.
It is also possible to edit an existing Registration bank. To do so, once again press the REGIST and BANK buttons simultaneously. In the resulting Regist Bank Display, touch the Menu icon at the top of the screen (located next to the File icon), then touch Regist Bank Edit. The Regist Bank Edit display screen will appear:
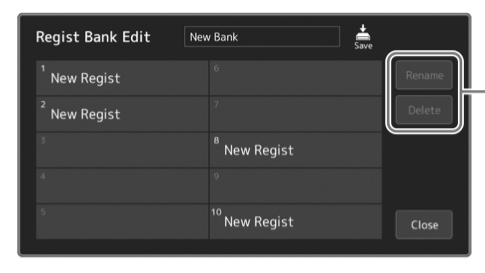
You now have the option of either Renaming or Deleting an existing Registration. Cool tip: delete all ten Registrations in a Bank to give yourself a clean slate to work with. After you’ve made your changes, don’t forget to touch the Save icon.
It’s well worth spending time creating and saving Registrations, because in live performance it’s a total time-saver. Thanks for tuning in, and as always, don’t forget to keep practicing!
Check out these related blog postings:
The Magic of Wireless LAN and Chord Tracker
Click here for more information about the Yamaha Genos arranger keyboard.


