MONTAGE Arpeggio Making 101, Part 1
Creating your own arpeggios can be fun – and rewarding.
Creating arpeggios for general use is an art. This two-part article will prepare you for making your own arpeggio data with the Yamaha MONTAGE. Knowing the rules will allow you to bend them – fighting the rules only leads to frustration. With that in mind, let’s begin with Part I of Arpeggio Making 101.
The Phrase Factory Factor
“In addition to its fresh and globally infused sound set, the Motif introduced keyboard players to arpeggiator patterns that added realism and musical interest to sequences and live performances. “Arpeggiator” is an understatement, as the word makes us think of robotic up-and down synth patterns. By contrast, even the original Motif offered tons of musical phrases suitable for its myriad instrument sounds, and made it fairly straightforward to drop those phrases into a sequence or Performance setup – or to go in the other direction, recording your own phrases in the sequencer, then triggering them from the keys as arpeggiator patterns. Yamaha called this approach “Phrase Factory,” and it gave the Motif an edge over workstations whose sequencers worked in linear, tape machine fashion. It also offered a degree of instant inspiration that won favor among many musicians.” – Keyboard Magazine (“A Decade of Motif”)
MONTAGE is able to load Arpeggio data (.X3G) made for the Motif XF directly to its internal USER Arpeggio bank. Creating your own arpeggios on MONTAGE (a feature that was added with firmware 1.20) is accomplished by using data that you record (or load) to the internal recorder as MIDI data. Once in the internal recorder, it can be converted into a User arpeggio. In general, you will be able to convert the data into one of three different general Types:
- Arpeggios for musical instrument Parts (note/chord intelligent).
- Arpeggios for Drum/Percussion Kit Parts (fixed note).
- Arpeggios containing non-note events (controller data).
What is often difficult to understand about arpeggio creation is:
Not all data that you can play makes for a good arpeggio – and not all data can be made into a good arpeggio. The rules for creating them require that you understand the purpose of the arpeggio and also requires that you create data which lends itself to that purpose. Since an arpeggio is interactive, it differs from data that simply plays back.
The rules are simple enough: A maximum of 16 different (unique) MIDI note numbers can occupy an arpeggio phrase. The Convert Type will dictate the behavior of the arpeggio phrase. Because arpeggios can adjust notes in the phrase dynamically in response to keys you are fingering, there have to be specific rules/requirements restricting the number of unique note numbers, as follows:
- Those arpeggios intended for musical instrument Parts will adjust according to the notes triggering them (chord intelligence).
- Those arpeggios intended for Drum Kits (fixed note) will play back exactly the same every time with no adjustment, according to the note or notes used to trigger them (no chord intelligence).
- Those arpeggios that are Controller data (which are not notes at all) are MIDI data that is applied to the Direct sound output made by the triggered notes – so instead of notes, you hear these controllers applied to the direct sound. For example, if the Controller is Pitch Bend, the chords that you hold will be bent by the arp phrase data, so without a “direct” sound to which the data is applied, there is no sound generated by Controller data.
Basic definitions
Arpeggio Phrases are most often Note data, but may also be Controller movements that can be triggered by the keyboard to play in looping or one-shot fashion. They reference the MONTAGE clock tempo, and can play at multiples or sub-divisions of that tempo. They can Swing, and can be adjusted as to timing and duration, where applicable. Controller Arps require that the KEY MODE be set to one that allows “direct” notes to be triggered, so that the Controller movement can be applied to the sound. (i.e., “Direct”, “Sort+Direct”, “Thru+Direct”).
An arpeggio phrase is somewhat different from a typical sequencer phrase, specifically in the way in which you get it to play back. When you record notes to a sequencer you simply press the Play button and the notes that you recorded are played back. In contrast, an arpeggio’s ON button does not cause the notes to “play back.” Instead, you must also press a key, or arrangement of keys, within a specific range on the keyboard in order to trigger the start of playback; those conditions must exist for you to have the arpeggio play. It does not simply start when you turn the ARP ON/OFF button ON or you simply press a button – it requires being armed as well as real time input via the keybed of the MONTAGE. That input can be simply to start it and/or to tell it what pitches to access if the arp is ‘chord intelligent.’ It’s ‘alive’ in that it can respond to change. A sequence just plays back as recorded. Arpeggios can react.
Later we’ll learn that you can even control dynamics (i.e., how loud or soft) the arp phrase plays. An arp phrase can continue automatically, or be set to play only when you are engaging the keys. It can reset to the top and begin again, or be set to continue running in silence when you lift you hands from the keys. You can also re-engage the phrase in place when you press the keys:
- The Arps created for musical instrument Parts will respond according to what you voice on the keyboard – they will change what they play by recognizing chord qualities such as Major, Minor, Dominant, Diminished, and Augmented chords.
- The Arps intended for Drum/Percussion Kits (generated by a Convert Type called “Fixed Note”) generally do not change – you simply control when the phrase starts and whether the phrase continues.
- Controller Arps contain non-note events that influence the sound that you are playing. For example, a ‘pitch bend’ arp would result in the sound you are playing varying pitch, as opposed to a dancing pattern of notes.
Convert Types
There are three Convert Types: Original Note, Fixed Note, and Normal. Before you can begin making your own arpeggio phrases, it will be important know what these Convert Types do, as well as the way the USER ARP creation feature uses its four tracks to create a single arp phrase.
Normal: The Arpeggio is played back using only the played (fingered) notes and its octave notes.
Fixed: Playing any note(s) will trigger the same MIDI sequence of data.
Org Notes (original notes): Basically same as “Fixed” with the exception that the Arpeggio playback notes differ according to the played chord or key.
The following experiment will help you clearly hear/understand the differences in these Convert Types. We will begin by setting up the MONTAGE to operate in sixteen-part multi-timbal mode and then record a musical phrase, convert it into arpeggio data, and observe how the different Convert Types do their thing:
Lesson 1: How Arp Convert Types deal with Note data – Phrases
From the PERFORMANCE (Home) screen:
- Press [CATEGORY SEARCH].
- Select “Init” > “Multi/GM” and return to the Home screen.
- Press the PLAY button to go to the PLAY/REC screen.
- Set a comfortable TEMPO.
- Record the first four measures of the song “Mary Had a Little Lamb” in the key of “C,” starting on the “E” above middle “C.”
What? Why? Well, it’s public domain and we all know it – and it’s what happens to it that will make the Convert Types completely clear. And you will get it right away:
Mary had a little lamb, little lamb, little lamb,
Mary had a little lamb,
Its fleece was white as snow.
If you create three Arps, one from each Convert Type, using this recording, your understanding of Arp Types will take a major step forward (pun intended). That’s because you will learn what to expect and you will immediately be able to hear/understand why the results are what they are.
So now:
- Use the “ORG NOTE” Convert Type for the first experiment – Create ARP 1.
- Use “FIXED NOTE” next for our second experiment – Create ARP 2.
- Use “NORMAL” Convert Type for our third experiment – Create ARP 3.
When you complete the recording of the phrase:
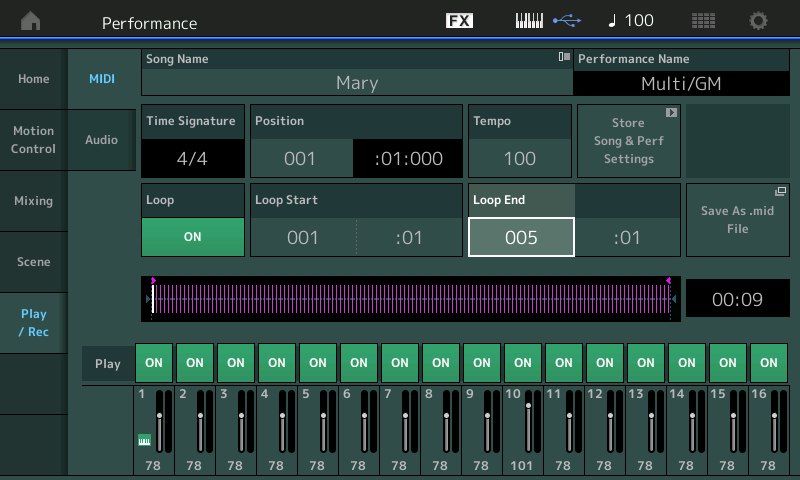
- Verify your work by setting LOOP = ON and set the Measure region you wish to Convert (make sure it can loop properly).
- As shown in the screenshot below, I recorded at a tempo of 100 BPM and set the Loop Start at Measure:001/Beat:01 and the Loop End at Measure:005/Beat:01 so as to capture four complete measures:
- Touch the screen area where the NAME appears.
- A pop-in will appear and allow you to convert data to create “User ARP”:
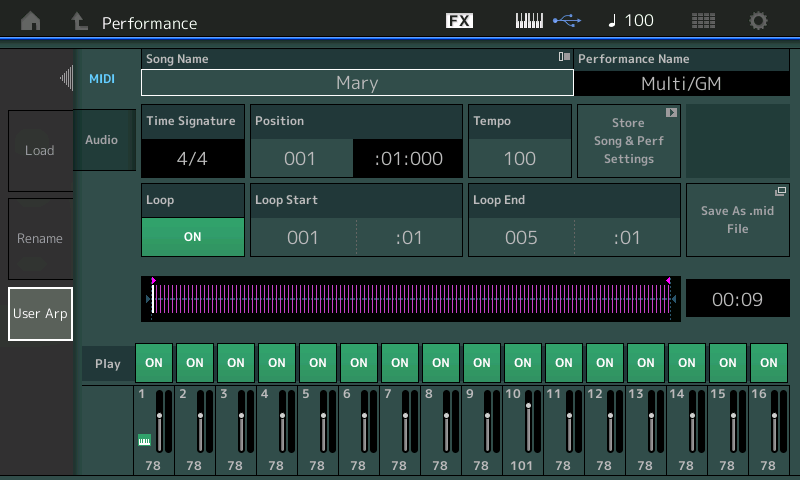
- Touch “USER ARP”.
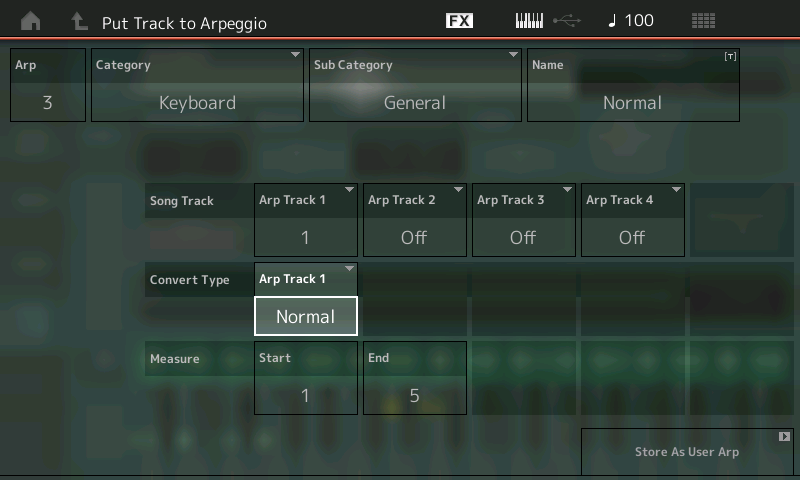
- A “Put Track to Arpeggio”dialog box appears:

- In the dialog, set the target USER location (upper left) for the ARPEGGIO to start with ARP “1”.
- You can also set a Category and Sub Category for the Arp data (this will help you find it later).
- You can also NAME the ARP – call it “ORG NOTE” (very important in finding it later). We’ll call it this because you are going to discard these – this is just for learning purposes.
- Set the Measure range:
Start = 1
End = 5
Which is: top of measure 1 through to the top of measure 5 (or 4 complete measures). - For “ARP TRACK 1,” set the SONG Track you used to record the phrase (we used Song Track 1) and set the “Convert Type” to ORG NOTES. (There are four Arp Tracks – we will cover the use for these other tracks in a later article, for now just use the first ARP Track Convert box.)
- When you set the Convert Type = Org Notes, the “Original Notes Root” parameter appears. Cursor over and set the Org Notes Root = “C3”. This setting sets the Key. Now, when we touch “C3” the phrase will play back at its original pitches.
- Touch “Store as User Arp” to execute (lower right corner of the screen). You have now created USER Arpeggio 1 that will be chord intelligent with the ability to recognize the lowest pitch as the ROOT – and it will play correctly when fed the correct chord quality.
Now that you have created your melodic phrase and converted to an ORG NOTE Arpeggio – it can be assigned for use by any PART in any PERFORMANCE. You do so by editing the PART’s COMMON parameters.
Go to the “HOME” screen and try it out by assigning it to PERFORMANCE PART 1:
- Press [EDIT].
- Press [PART SELECT 1].
- Touch “COMMON” lower left corner of the screen or press the dedicated lower [COMMON] button on the right front panel.
- Touch “Arpeggio” > “Individual”. Here is where you can select as many as eight Arp phrases for this PART:
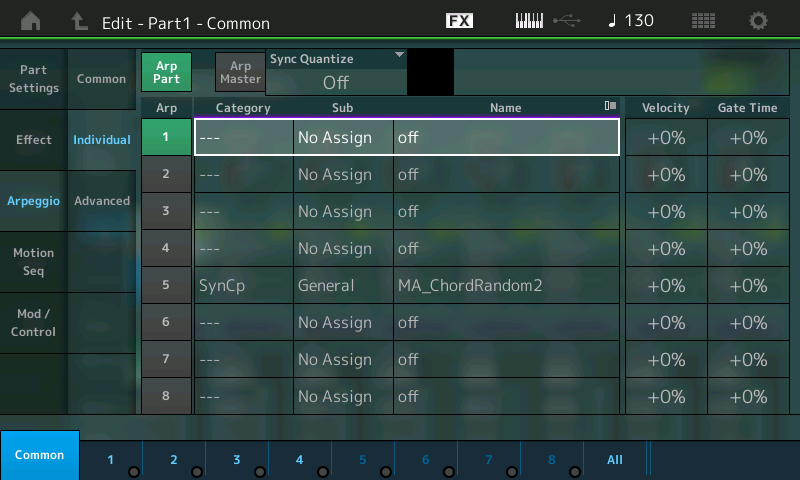
- Touch slot number 1 Name area (shown highlighted above) to see the pop-in menu.
- Touch “SEARCH” > set the search option BANK to “USER” and the Main Category to “ALL”.
- Assign your “USER” ARP to this PART:
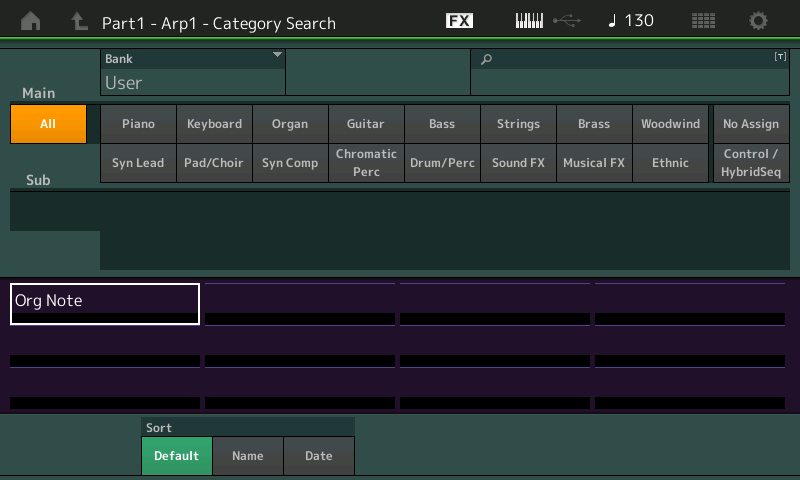
- Find “Org Note” > and highlight it > [ENTER] to make the assignment.
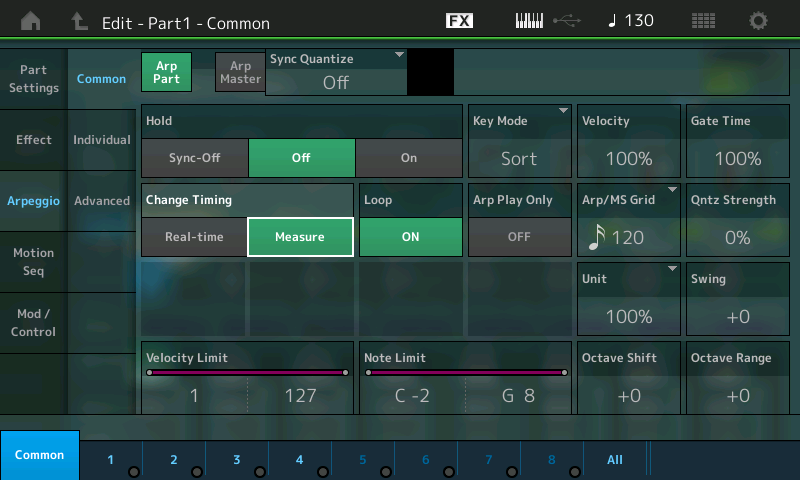
In the second column are two other pages of parameters: “Common” and “Advanced”:
- Touch “Common”.
- Here you can set the overall settings for the ARPs for this PART.
- Set “ARP PART” SWITCH = ON (green).
- Set HOLD = ON or OFF as you desire (SYNC-OFF is a special case that keeps the timing of the arpeggio running in the background even when you are not triggering the keys):
- Activate the “ARP MASTER” switch (green) – you can also press the dedicated ARP ON/OFF master switch located above the MW on the left front panel.
On this screen are also the Key Mode and Play Effects, as well as the Velocity Limit and Note Limit regions that define how these arpeggios will be controlled. In Part II of this article, we’ll dig deeper into these settings and the “Advanced” settings. For now, just go with the defaults.
Hearing what the ARP Type does
Try the following, one-by-one, and observe the results:
- If you play and hold just a “C” it will play the melody in the key of C.
- If you play just a “D” it will transpose the melody to the key of D.
- If you play a C minor chord it will play the melody with a Flat 3rd. (If you play just “C-Eb” that is enough to define the C minor chord.)
- If you play a D minor chord it will play the melody in D with a Flat 3rd.
- If you play a C diminished chord it will play the melody with a Flat 3rd and Flat 5th – etc. etc.
It is that simple… and that complex!
Now try the different HOLD settings: On, Off, Sync-off. Rinse and repeat the Convert experiment, this time assigning the “Convert Type” to “FIXED”. Here’s how:
- Go back to your PLAY/REC screen (press the PLAY button) and setup to create another “User Arp” from the same data by touching the SONG NAME box – and touching the “User Arp” option:

- With the same melody source (Arp Track 1) – this time using the “FIXED” type – notice the target in the dialog box automatically increments to ARP “2” (upper left corner). Name this second ARP “Fixed Note”. “FIXED” is similar to “ORG NOTE” in that it can play a specific melody, except: no matter what key you use to trigger playback the result is “fixed” – it does not transpose. This convert type is ideal, as you might imagine, for DRUM and PERCUSSION arps. (Drummers do not transpose nor adjust notes to the key you are playing in). The fact that “fixed” plays exactly what you play can be used in any way you see fit – but remember the sixteen unique note number rule.
- Go to the HOME screen and assign User Arp 2 so you can apply and hear it.
Finally:
With the same source song melody, use the Convert Type “Normal”. This is what a traditional arpeggiator normally does – it plays the rhythm of your source data and takes the information of the currently held notes to do its thing with it. It will probably never play the melody correctly on its own:
Remember: Arps traditionally did not do melodies. Instead, this (what you find in the Motif/MOXF and MONTAGE) is a re-invention of the traditional arpeggiator. Arpeggios traditionally did up, down, up/down, down/up, and random, etc. Later they were capable of producing more complex rhythmic effects; eventually you could create phrase-based melody arps, counter-melody arps, and the kind of guitar intelligent chord voicing arps that you find in the XS/XF/MOXF/MONTAGE.

It should be clear now what the CONVERT TYPES are designed to do. With this knowledge you can start to apply the tools for creating your own arpeggios. In Part 2, we’ll take a close look at some of the more detailed arpeggios, and the way they were made – for example, those used for strumming guitars, etc.
There are some 256 User Arpeggio locations. You discard unwanted arps by overwriting them, or you can manage them in UTILITY mode. They will be stored in their own internal FOLDER. Go to [UTILITY] > “Contents” > “Data Utility” > find the “ARP” Folder – this contains your USER ARPS. Access the “JOB” function to select/deselect ARPs.
Recording Drum Arps
As you know by now, the Fixed Note “Convert Type” is designed to play back the exact keys you have fed in. While this is ideal for drums, it also means you can use an Arp Phrase to play an exact music phrase. How you use the feature is up to you. Do remember the rule: 16 unique note numbers. This means your Drum Kit selection is limited to a 16-piece drum kit. You can hit each drum over and over again, but you are limited to 16 different drum instruments.
You can create drum tracks using the onboard recorder or an external DAW like Cubase. Create your drums by your favorite means (Groove Agent is a powerful Cubase plugin tool for creating drum pattern data), then export your creation as MIDI data and convert it into MONTAGE Arpeggio phrases using the User Arp convert feature.
In Part 2, we’ll take a look at how the different Convert Types deal with Chord phrases. Ready to start? Click here.
Keep reading