Tagged Under:
How to Use a Noise Gate
Get your PA system sounding better and reduce feedback at the same time.
As its name implies, a noise gate (often just called a “gate” for short) reduces or mutes low volume signals that can contain a significant amount of noise. In live sound, gates are typically used to turn down inputs that aren’t being used, so they can improve the performance of your PA system. By lowering (or turning off) microphones that aren’t needed in the mix, the system is better able to amplify without feedback. The rule “less open microphones equals more volume before feedback” is one to live by!
Gates were originally outboard gear that had to be physically inserted into the channel you needed to turn down (this was done by literally plugging in a patch cord). These devices had to be racked up near your console so you had easy access to all the controls, and they were fairly costly too.
Today, most digital consoles (including all models made by Yamaha) provide a gate on every input, so getting good results is way faster and easier than it used to be. In addition, you can save your gate settings (as well as all other settings) on the console, allowing them to be instantly recalled.
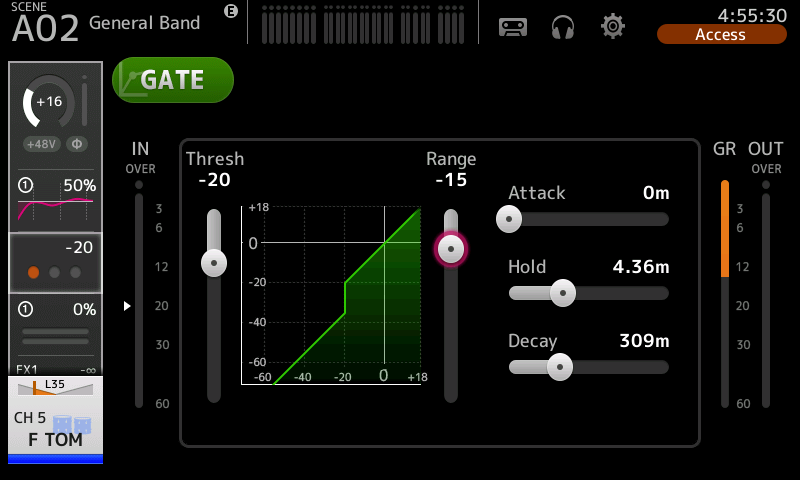
Here’s the basic gate page provided by Yamaha TF Series consoles:

Let’s take a closer look at each of these controls:
- Threshold. Once the input signal falls below the threshold level you set, processing starts and the gate begins to close. Generally, the threshold should be set fairly low so that the gate is open whenever signal is passing through it.
- Attack time. This is the time it takes for the gate to fully open once the signal exceeds the threshold level. You’ll want to experiment with attack time so as not to cause the gate to open too quickly. Setting the attack time correctly requires some practice. A fast setting might cause a click as the gate opens, but too slow and the audio might not be attenuated quickly enough. Practice makes perfect here!
- Hold time. This is the time that the gate remains open after the signal level has fallen below the threshold; this is also the minimum time that the gate will remain open. It can usually be adjusted between zero and several seconds. On Yamaha digital consoles, an indicator is provided that lights up during the hold phase.
- Decay time, sometimes referred to as Release time, is the opposite of attack time. This is how long a gate takes to go from its open, unprocessed state (i.e., no attenuation) to the processed state where the signal is attenuated or muted. Decay times are typically considerably longer than those available for attack, since longer times allow a more natural trail-off.
- Range. This sets the amount of attenuation you want applied to the signal. Instead of either being completely on or off with no in-between, setting the range control somewhere in the middle can help if you have instruments or vocals with long decay times. This helps avoid the disruption of having sounds cut off mid-performance.
There’s also both input and output metering. The meter under the GR (for “Gain Reduction”) output shows the amount of attenuation the gate has applied to the signal.
Since gates use VCA (voltage-controlled amplifiers) or, in the case of digital consoles, DCA (digitally controlled amplifiers), they add no color at all to the sound, which allows them to adjust level only. Very stealthy…
Gating Applications
Here’s an example of how to use gating on drums. A floor tom commonly resonates in the lower midrange EQ region and when it is not being played, those resonances can rumble throughout the entire performance, thus causing unwanted “decrease in gain before feedback.” Since damping the floor tom might color the sound, using a gate here will protect the integrity of the desired tone. Other toms can benefit from gating as well, since you can decrease the bleed or leakage of nearby drums into that input. Drums have a fairly fast attack, so you should set that accordingly on your gate. In practice, lower frequency drums require a longer release time than, say, a high rack tom.
Another place where gates are very helpful is background vocals, where the backing singers often sing just parts of the chorus and not the rest of the song. Applying a gate here will help keep the main vocal more prominent in the overall mix. Gates applied to vocals should have a slower attack setting than those used with drums, and rather than a sharp attenuation, sometimes just 10-15 dB can be very helpful.
When Not to Use Gates
There are also times not to use gates. Don’t use them on:
- Vocalists with very wide dynamic range.
- Keyboards and other direct instruments. These inputs are already nice and quiet, so there is no need for gating.
- Electric guitars. They have such long sustain and decay that a gate is of little help. If there is a noise issue with the pickups on an electric guitar, moving the instrument will often relieve (or at least reduce) the problem, and you’ll still get the full decay of a long, sustained note.
Remember also that gates are level-dependent, so if the ones used on drums are set for a hard playing rock style song, and for the next tune the drummer uses brushes on a ballad, you’ll need to adjust accordingly. This is a lesson I learned the hard way!
Check out our other Tools of the Trade postings.
Click here for more information about Yamaha TF Series consoles.


