Tagged Under:
Using Pitch Correction Effectively
Here’s how to tune your vocal tracks.
Thanks to the continuing advances in digital audio technology, tools for correcting the pitch of audio (a process generally called “pitch correction” or “tuning”) have become more powerful, easier to use and more affordable. Pitch correction is now commonly part of the workflow in both home and commercial studios. While there are various standalone software products dedicated to this task, several DAWs, including Steinberg Cubase Pro, include their own pitch correction features.
Pitch correction (which is usually used for vocal tuning but can also be applied to monophonic instruments) is sometimes used not only correctively, but creatively as well. You’ve probably heard pop or R&B songs in which the singer’s voice seems to glide from note to note. That sound is sometimes called the “Cher Effect” because it was first introduced by the singer Cher back in 1998 and used heavily on her hit single “I Believe.”
Some pitch correction software is designed for real time application, allowing it to be used during recording or even live performance. Depending on how badly the singer is out of tune, that approach can work. But it’s more often used off-line (that is, applied during mixing), which takes a lot more effort but allows for more precision and subtlety.
For this type of pitch correction, the small details vary from one brand of software to the next, but the basic concepts are pretty much the same. In Cubase Pro, the pitch correction tools are found in a feature called VariAudio.
Segmented Reality
The first step for any pitch correction software is to analyze the audio track (vocal or monophonic instrument) you want to process:
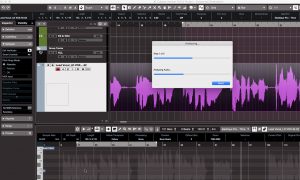
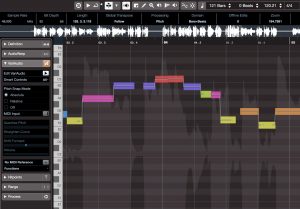
Once the analysis is complete, the software represents the notes in the track as a series of rectangular segments. Similar to what you’d see in a MIDI piano-roll-style editor, each segment’s horizontal length is based on its duration, and its vertical placement corresponds to its pitch.
However, the similarity ends there, because you’ll notice that many of these so-called “pitch” segments are a little off from center, lying closer to one note but not dead on. What’s more, you’ll see squiggly lines running through each segment. These indicate the pitch variations leading into, within, and at the end of each note. In Cubase Pro, these are referred to as pitch curves. They’ll be present with any singer, but can get extreme with an inexperienced vocalist whose pitch is less than accurate:
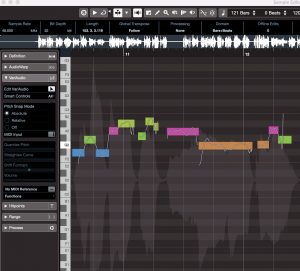
Pitch correction software lets you move the pitch segments to the center of their corresponding pitches (thus tuning them), and also makes it possible to straighten out the pitch curves. Generally, you don’t want to completely straighten them or you’ll remove the singer’s feel from the recording. If you do correct all the segments and completely straighten the pitch curves, you’ll end up with something a lot closer to the “Cher Effect:”
It’s a Snap
Your pitch correction software will most likely have a feature called “pitch snap” or “pitch quantize.” This constrains the segments you’re tuning — whether you’re dragging them individually or through some global process — so that they can only be moved to the center of a note’s pitch.
Cubase Pro offers two types of pitch snap: Absolute and Relative. In Absolute mode, when you move a segment vertically (that is, from one pitch to another), you’ll only be able to drag it to the pitch center. Relative lets you move a note to a different pitch (for example, from B♭ to C), and have it stay the same relative distance from the pitch center as it was on the original note.
Alternatively, you can turn pitch snap off entirely so that the segments can be moved around freely. If you have a good ear, this can be an effective way to work … if your software allows you to hear the pitch of a note when you click on it (in Cubase, this is done by turning on the Acoustic Feedback option), and you check your work against a reference instrument from the song.
It’s critical to understand that a pitch correction display shows two variables: the segment’s vertical position vis-a-vis the pitch center of the note, and the degree of variation in the pitch curve. Often, you’ll quantize the segments but still hear notes that sound wrong. That’s because the singer’s pitch is wavering or moving during the note, as shown in the illustration below:
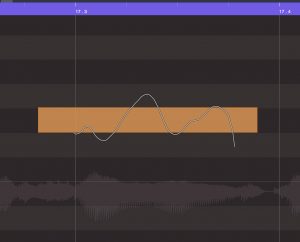
Most of the time, you’ll want to fix pitch issues with as little processing as possible. The pitch curve represents the nuances of that performance, so you have to be careful how much you straighten it.
Step by Step
Here’s a suggested workflow for pitch correcting a vocal track:
1. Have your software do its analysis of the audio to be corrected.
2. Mute all tracks except the one you’re correcting, along with one reference instrument.
3. Make sure your DAW is set to let you hear a note when you click on it. (In Cubase, that means turning on the Acoustic Feedback feature.)
4. Zoom in so that the notes are pretty big on the screen, so you can see what you’re doing.
5. You can first try a global correction, which is much faster but not as accurate because it doesn’t impact the pitch curves. Turn on pitch snap (in Cubase Pro, use Absolute mode), select all the segments, and apply the selected pitch quantization to all of them at once.
6. Listen to the entire part, with your reference instrument (or all the tracks) on, and see how it sounds. Most likely, global correction won’t be enough, so you’ll have to go through the song one phrase at a time. The problem notes will be the ones that have the most extreme pitch curves.
7. Assuming your pitch correction software lets you split segments, divide the notes that are still out of tune into smaller segments, cutting at the apex or bottom of the pitch curves. (The new segments created are often higher or lower in pitch than the original notes.) The splits won’t be audible, but they allow you to individually tune the separate parts of a wavering note without affecting the in-tune parts:
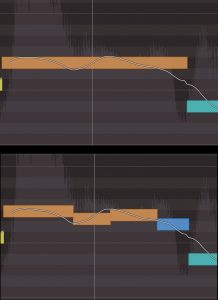
8. Drag the newly created segments to the center of their target pitches and listen again.
9. If some notes still sound wrong, straighten their pitch curves by a small amount and see if that helps. If not, go a little further with the straightening. Sometimes you can get away with completely straightening a small segment — one that you split from a longer note — without it sounding weird. That should be a last resort, however.
10. Work your way through the part, tuning all problem notes until the entire track has been addressed.
Effective pitch correction can be a slow process — one that can’t be rushed. But if you do a careful and thorough job, it can be well worth the time expended, because the recorded vocal will often sound significantly better than it did before. If your goal is perfection, it’s a great tool to add to your arsenal.
Check out our other Recording Basics postings.
Click here for more information about Steinberg Cubase.


