Using Subgroups
A subgroup, sometimes called an aux group, aux track, aux bus, sub bus or Group Channel, is an auxiliary channel in your DAW’s mixer to which you can route any number of tracks. Think of it as a temporary destination for the selected tracks before they’re sent on to the master output (also known as the stereo output, master bus, master track or 2-bus). Subgroups allow you to adjust the level of multiple tracks — without in any way altering their relative balance — with the touch of a single fader. What’s more, they enable you to apply processing to all these tracks simultaneously.
Ready to take a deep dive into how this all works? Read on.
Why Subgroup?
Subgroups have their origin in analog mixing consoles. Because they were hardware components built into the mixer, there would only ever be a fixed number of them available. Their implementation in today’s DAWs is much more flexible. You can create as many of them as you need, and you can even route one subgroup into another for additional control (more about this shortly).
Nonetheless, you should avoid creating a routing scheme that’s too complex. That would defeat the purpose. You want your subgroups to simplify your mix, not complicate it.
Creating Subgroups
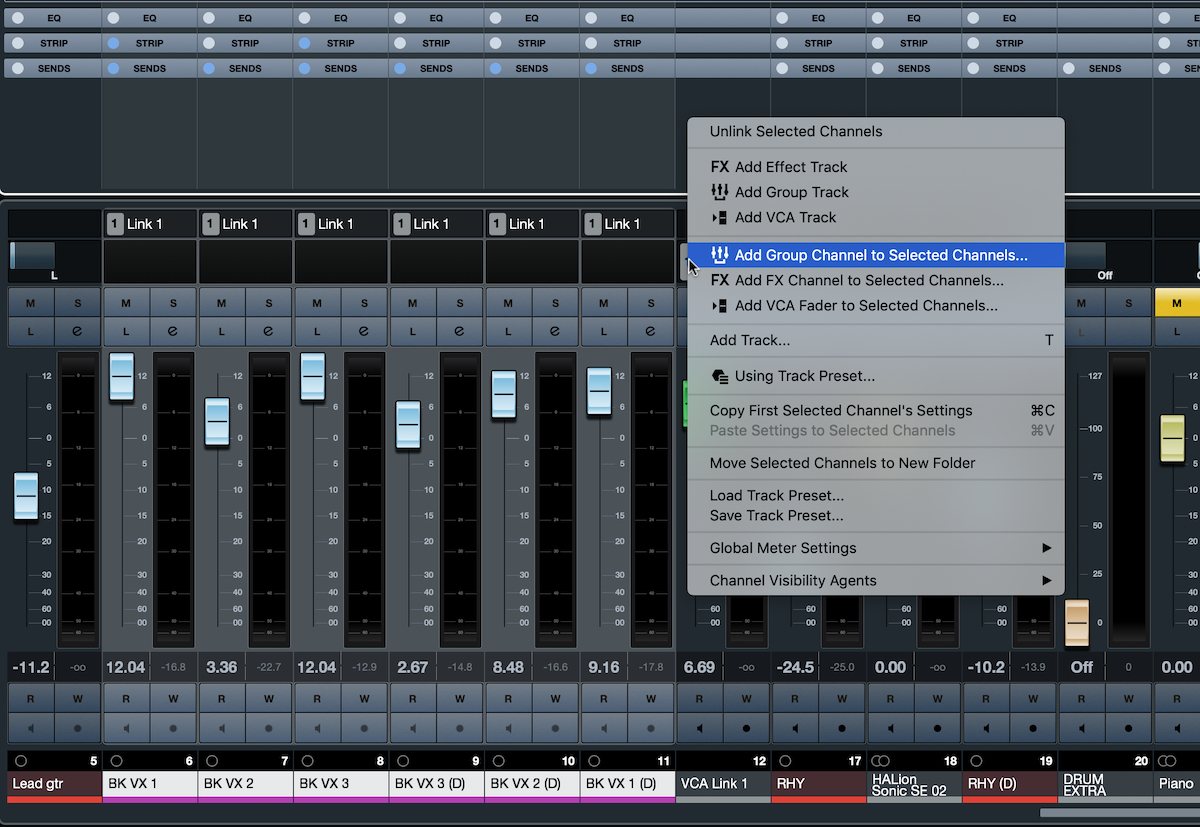
Before getting into how to use subgroups, let’s look at how you create them. In Steinberg Cubase, you generate a subgroup (called a “Group Track”) by selecting the channels you want included in it, then right-clicking and choosing “Add Group Channel to selected channels”:
There’s also a manual way to create a subgroup. This simple two-step process should work in any DAW:
1. Create an auxiliary channel (a “Group Channel” in Cubase). Give it a short descriptive name that will be readable on a single channel of your DAW’s mixer. (If it’s too long, the name will be truncated and hard to read.) For example, if you’re creating a subgroup for drums, you could name it something like “Drum Grp” or “Drum Sub.”
2. Change the output routing of each track that you want included the subgroup, so that instead of it going to the master output (or wherever it is currently routed), its destination is the input of the subgroup you just created.
Now, when you hit play on your DAW’s transport, the audio from the tracks you assigned will go to the subgroup instead of the master output. In most DAWs, the subgroup’s output will automatically be routed to the master output, although you can usually change that if you want to send it somewhere else (for example, to another subgroup).
Using Subgroups
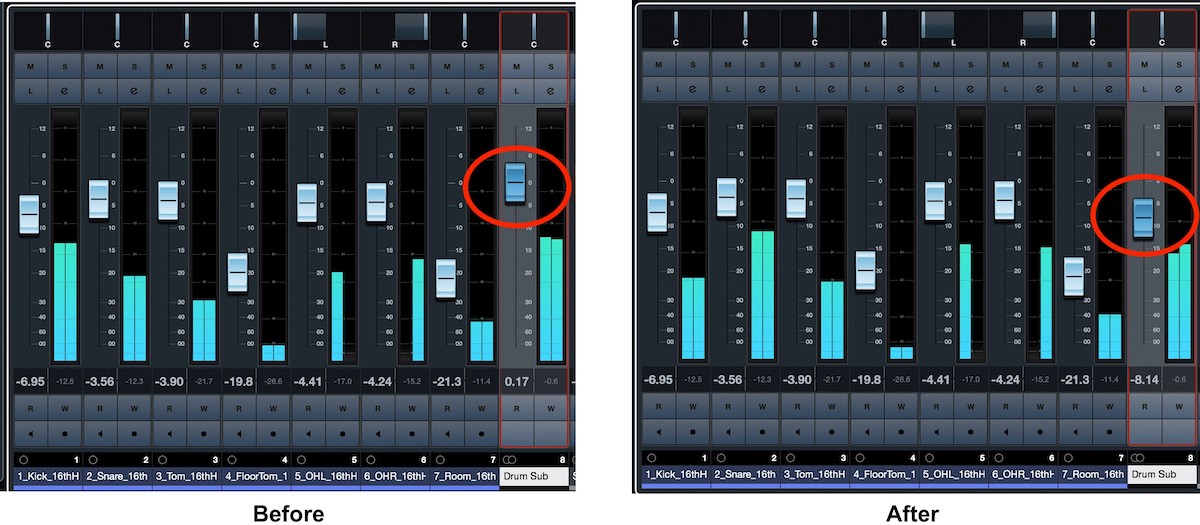
Now let’s look at some examples of how to use subgroups, starting with their most common application. Imagine you have a project with multiple tracks of drums, and you’ve adjusted the volumes of each individual track to get the overall balance you want. But after adding in other mix elements, you find that the entire kit needs to come down in volume. Sure, you could bring down each fader individually while trying to maintain the balance, but, believe me, that’s a tricky process. However, if those tracks are routed to a drum subgroup, you can easily alter the overall drum level with a single fader, leaving the overall balance unchanged.
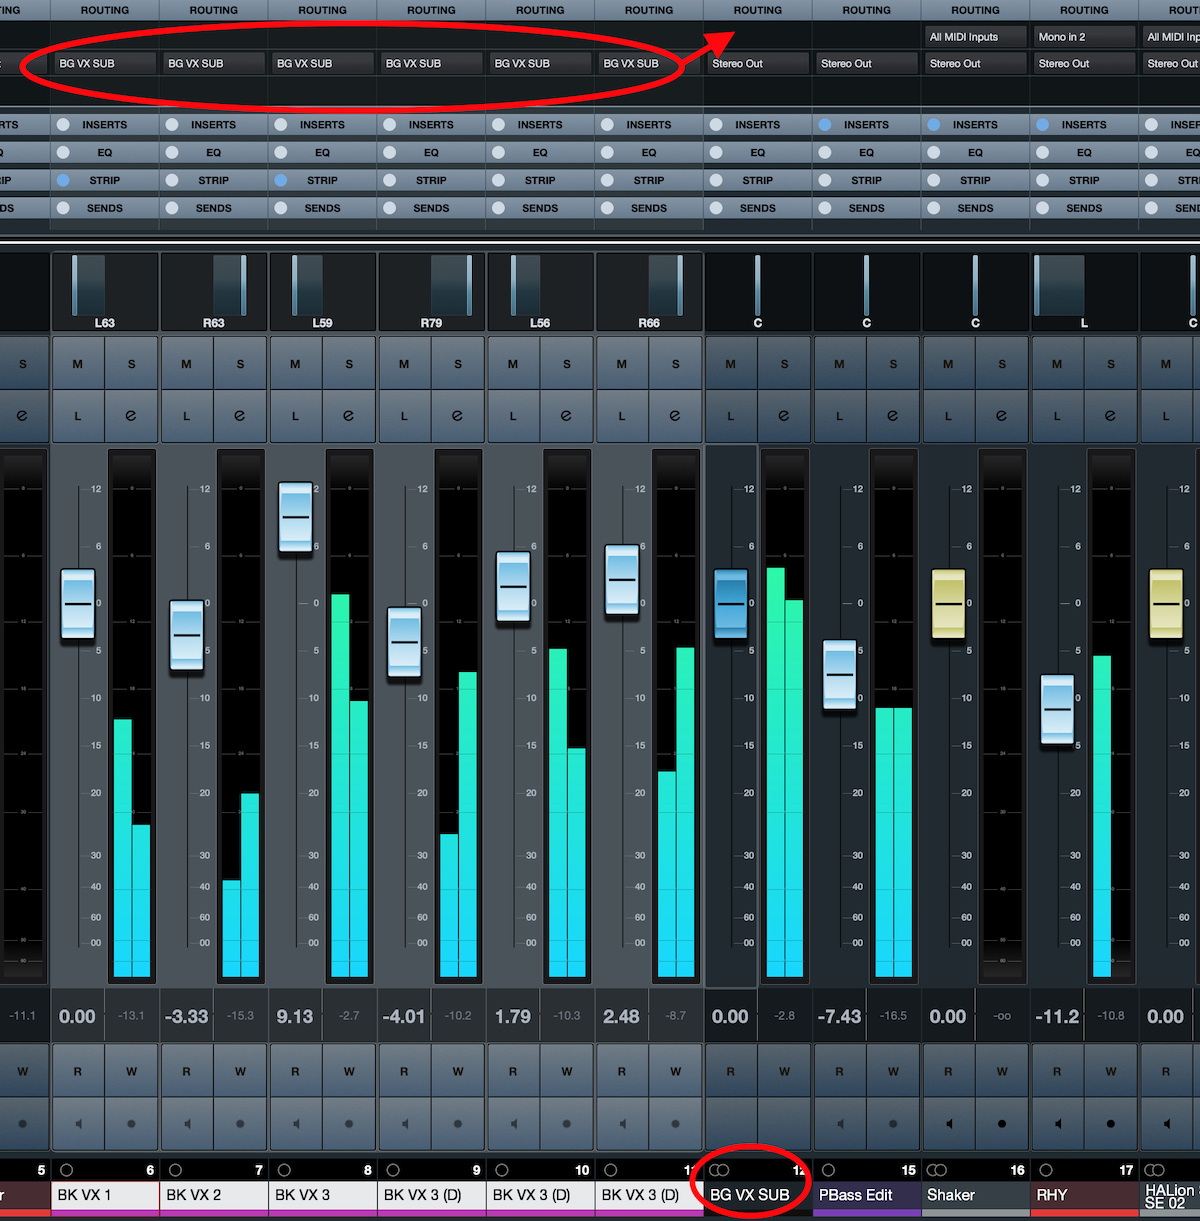
Or let’s say you have a number of background vocal tracks that you want to EQ and compress. Rather than inserting individual EQ and compressor plug-ins on each track, you could send them all to a subgroup, insert an EQ and a compressor on just that one channel, and process them all together. Not only will you save time, but you’ll use way fewer plug-ins, which conserves CPU resources.
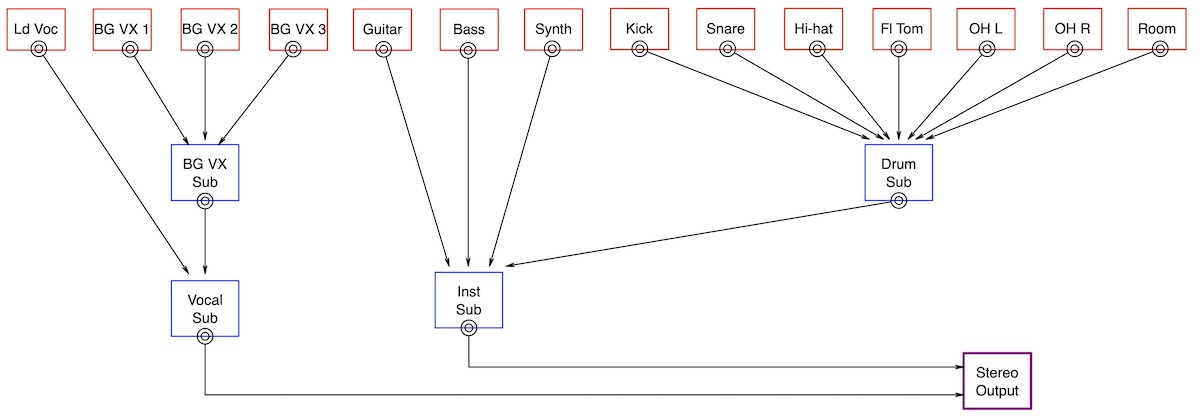
As shown in the illustration below, a technique I like to use when mixing is to create one subgroup for all the vocals (which I call “Vocal Sub”) and another one for all the instruments (“Inst Sub”). If I have multiple drum tracks, I might also create a subgroup for them (called “Drum Sub”) that is routed into the Instruments subgroup. Similarly, if I have several background vocals, I might make a subgroup for them (“BG VX Sub”) and route its output to the Vocals subgroup. This allows me to easily alter the balance between vocals and instruments (and also have control over drums and background vocals on one fader each), which is something I often end up doing in a mix. This is something that would take a lot longer if I had to move each individual fader!
VCA OK?
When you change levels with subgroup faders, there is one potential problem: If you send audio from any of the individual tracks in the subgroup to an aux effect (an “FX Channel” in Cubase) and lower or raise the subgroup fader, it changes the relationship between the volume of the tracks and the volume of the effects. The lower you move the subgroup fader, the higher the ratio of the processed-to-dry signal and vice-versa. In other words, moving the subgroup fader will change your effects balance. As a result, you may need to readjust the output levels on your FX Channels or the levels of the effects sends on the individual tracks to compensate.
One way around this is to assign a VCA fader to the target tracks instead of creating a subgroup. VCA stands for Voltage Controlled Amplifier, which is a type of analog amplifier. In a DAW, a VCA is a control that allows you to simultaneously adjust selected tracks for level, muting and soloing. Unlike a subgroup channel, no audio passes through a VCA.
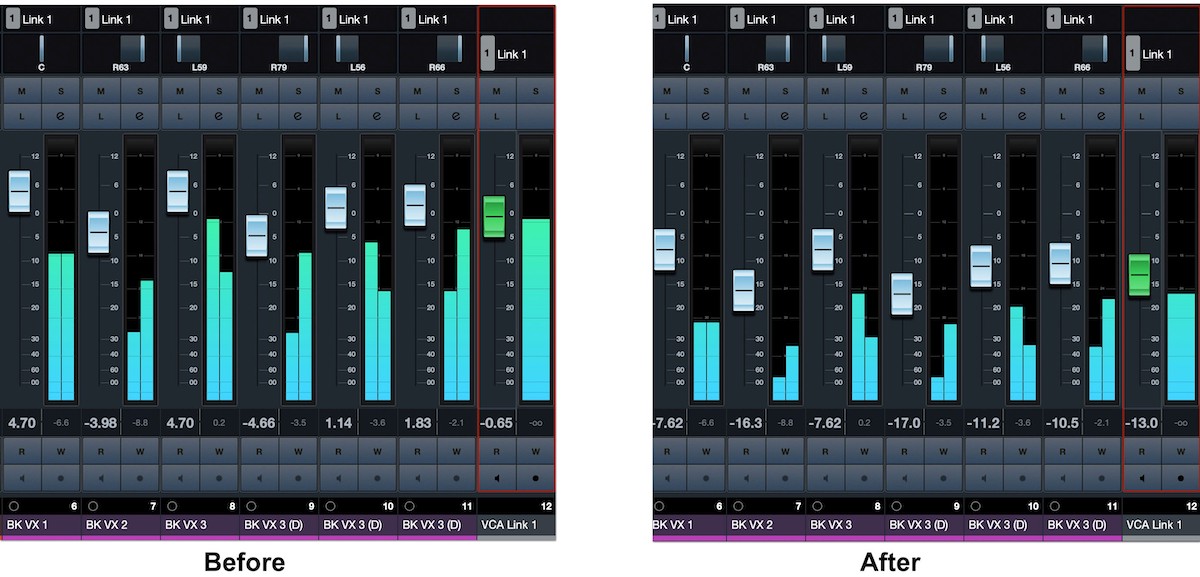
If you were to grab several channel faders and move them simultaneously and identically, you’d be doing the same thing a VCA does. Because it’s only moving individual channel faders, it doesn’t affect the wet/dry balance with any aux effects like a subgroup fader does.
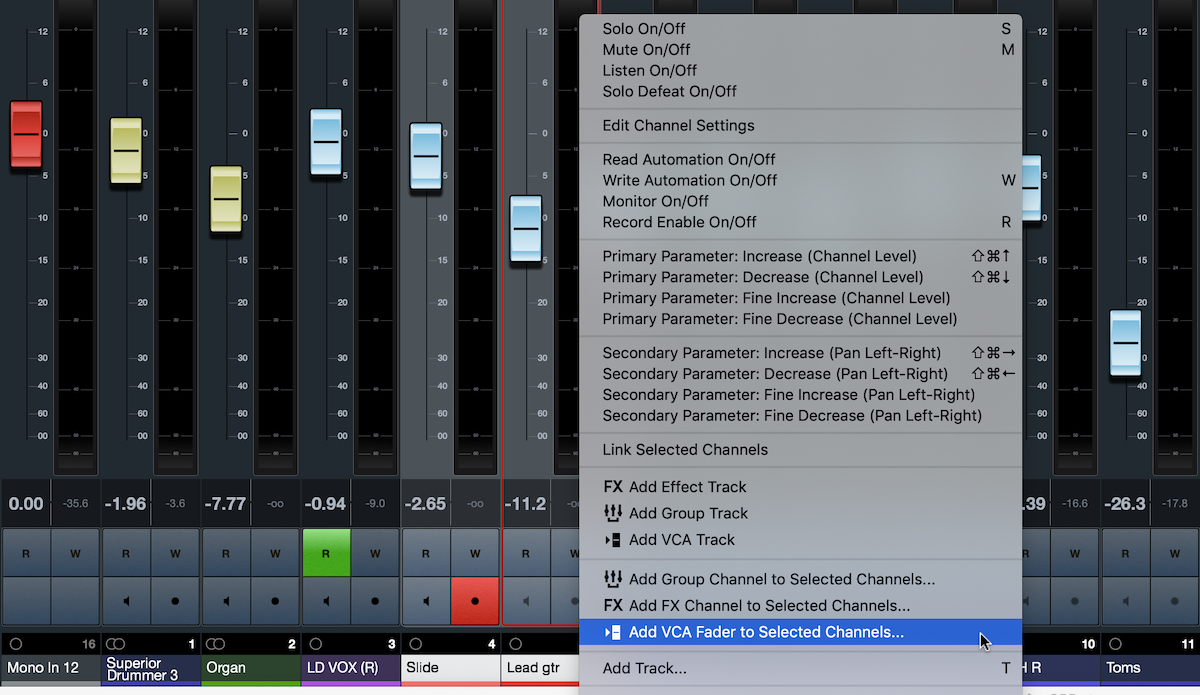
Each DAW that implements VCAs has its own method for creating and assigning tracks to them. In Cubase, it’s a simple matter of selecting the tracks to be controlled, right-clicking and choosing “Add VCA Fader to Selected Channels”:
The downside of a VCA fader is that it doesn’t allow you to add processing to the selected tracks the way a subgroup does. It is possible to create subgroups to process multiple tracks simultaneously, as well as VCAs to control the tracks’ volumes, but that might be excessive, depending on the situation and your computer’s resources.
As you can see, subgroups help you keep your mixes organized and efficient. If you haven’t incorporated them into your mixing workflow, you’re missing out on a powerful tool!
For more information about using subgroups in live sound, check out this article.
Check out our other Recording Basics postings.
Click here for more information about Steinberg Cubase.


