Setting Up a Mix Template, Part 2
In Part 1 of this two-part article, we described the importance of creating templates in Steinberg Cubase and walked you through the initial steps of how to do so, including creating “model” audio tracks. Now we’ll finish up the Template by adding effects, virtual instrument tracks and more.
Insert an Effect
Let’s start by adding the effects that are typically used on a track when mixing, such as a favorite compressor or EQ plug-in. (Cubase tracks already include a 4-band EQ, which you can use if you’d prefer.) By pre-configuring these essential plug-ins, you won’t have to load them into each track every time you record a new one. If you don’t have effects that you use regularly, don’t worry about it: you can always add them as needed later on.
There are a couple of different ways to add effects to a track. First, let’s Insert an effect. With the Left Zone open (Command+Option+L on Mac or Windows+Alt+L on PC), select a track in the Track List, click on the Inspector tab, and open the Inserts tab. There you’ll see empty insert slots for adding any effect(s) you’d like to have on your track:
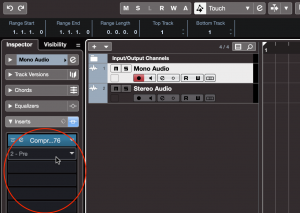
Now all you have to do is click and release the empty Insert slot to reveal the list of effects in your computer, sorted by manufacturer name. Click on the effect you want, and it will load into that slot.
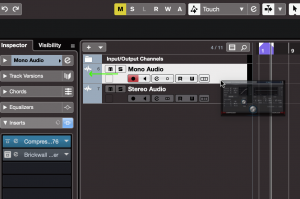
Another way to insert an effect is to open the Right Zone (Command+Option+R on Mac or Alt+Option+R on PC) and select the Media tab. You’ll see an Icon for VST Effects. Open it and choose the effect you want to add, then drag it into the middle of the track in the Track List (make sure the green arrow points inside the track header):
Set Up an FX Channel
Most likely you’ll want to include a reverb or two, and possibly a delay, in your Template. It’s usually best to put ambience effects like reverb and delay on FX Channels, which can be accessed from multiple tracks via a Send; this also has the advantage of saving CPU resources. (Reverbs, especially, tend to consume a lot of CPU.)
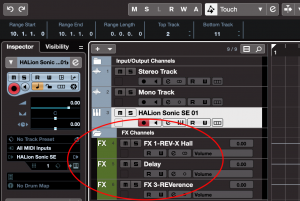
To set up an FX Channel, right-click in the Track List and choose FX Add Effect Track. That will once again bring up the Add Track window — this time set up for effects — where you can choose the effect you want and select its stereo/mono and output configurations:
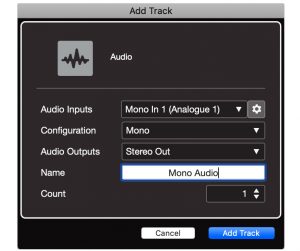
You’ll also see an option called Folder Setup. This allows you to choose whether you want your FX Tracks to be stored inside a dedicated FX Channels folder in the Track List (“Create Inside Folder,” where any subsequent FX Tracks would also be added), or outside as separate items (“Create Outside Folder”). Track Folders let you organize multiple tracks in a single container that can be collapsed to save space.
Next, open the Inspector for one of your audio or instrument tracks, and click on the Sends tab. (You can also use the track’s Sends tab in the Mix Console.) This will open a window that shows the name of the effects in the FX Channels you’ve created. Click on the one you want for that send, then right click on it and choose Activate Send. Repeat this process for any other send effects that you want on that track.
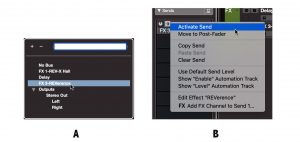
At any time during recording or mixing, you can click on the Send and drag upward to increase the amount of signal being sent, or downward to decrease it. Send levels can be saved in your Template too.
Virtually Certain
If you use virtual instruments a lot, it can be handy to have your “go-to” instruments pre-loaded in your Project Template. The setup options are similar to Insert effects: Right-click in the track List and select Instrument Track. This will open the Instrument Add Track window, where you choose the instrument and its output configuration:
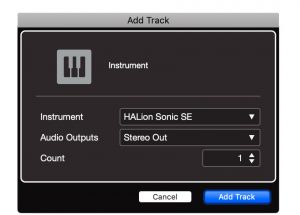
You can also add an instrument by clicking on the VST Instrument icon under the Media tab of the Right Zone and dragging the instrument to the Track List. Cubase will then automatically configure its track and output settings.
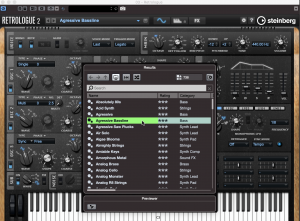
Whichever method you choose, once an Instrument Track has been created, you have the option to select any sound from the instrument’s collection, and it will be there, waiting at your fingertips, whenever you load a Project Template:
Ready to Rock
If you’ve been following along, you now should have a Template with your “model” stereo and mono audio tracks configured — which you’ll copy and paste as needed during recording or mixing — as well as your favorite effects and virtual instruments.
You can also configure your Project Template to open with a custom window setup. For example, if you want a separate Mix Console window to open in addition to the Project Window, simply open it, resize it (if needed) and place it where you want it to go, before you save the Template. When you next load the template, the windows will open exactly as you saved them.
Save It and Load It
As we described in Part 1, the save process for templates is simple: Just go to the File menu and select the Save as Template option. This will bring up the Save as Template dialog box, where you can name your Template, add a description and even assign it to a category. You can also rename the Template and delete the ones you no longer need.
When you’re ready to start a new project, simply choose File/New Project (or press Command+N on the Mac or Alt+N on the PC). The Steinberg Hub will open. Click the More tab, and you will see a list of your saved Templates. Select the one you want and press the Create button to get started.
Bear in mind that we’ve only scratched the surface in this two-part article: A Project Template can actually contain just about any customization you create, from special routing to track colors to mixer settings and much more. As you get more facile with Cubase’s deep feature set, you’re sure to find other items you want to include.
Check out our other Recording Basics postings.
Click here for more information about Steinberg Cubase.


