Tagged Under:
Aux Sends and Returns
Audio pathways that allow you to route multiple signals to the destination(s) of your choice.
In the first of our two-part series on using reverb and delay, we touched briefly on aux (short for “auxiliary”) sends and returns. In this article, we’ll take a closer look at these important controls.
Aux Sends
When doing live sound, microphone inputs are typically sent to the left/right or main mix. This makes a lot of sense because we want to hear those sounds in the PA system. However, there are times when you may also need to send a signal somewhere else — like, for example, to an effects processor such as a reverb or delay unit. That’s the primary purpose of an aux send. Aux sends are sometimes labeled with different names such as “effects send,” “FX send,” MON (short for “monitor”) or even “foldback,” but they all work the same way: They serve as a secondary output from a channel that routes the signal to a place other than the main left and right speakers.
Depending upon the mixer, aux sends may be “internal,” meaning that they send a signal to an onboard effects processor like the one in the Yamaha MG10XU. In other cases, aux sends are “external,” meaning that they feed signal completely out of the mixer to another device altogether. In the case of the latter, there will be physical output jacks on the mixer (usually on the rear panel) that enable you to connect whatever external devices you want to receive this signal.
Suppose you want to add reverb to a vocal microphone that’s plugged into your mixer. The channel it’s connected to is already feeding the vocal to the left and right speakers. It would be silly to take the left and right outputs from the mixer and connect them to a reverb unit because (a) it would be impractical, and (b) you’d get reverb on every channel — probably not a good thing. This is where an aux send comes in.
You’ve probably heard the term signal flow. It’s particularly apt because it implies that an audio signal is like water. Using this analogy, you can think of a mixer channel as the main pipe — the one that takes the signal from the vocal mic to the left/right mix. An aux send is like a small “tap” used to divert a bit of the signal — just like a plumber uses a valve and piping from the water main to get water into your kitchen … although, of course, once that valve is added, it can be connected via piping to anywhere in the house. It’s the same with an audio signal. Just like the valves on a water main, one channel can feed many aux sends.
Let’s take a look at a simple example. The illustration below shows part of a channel in the MG10XU. You can see at the top that there is a knob labeled FX. This is an aux send dedicated to the mixer’s internal FX processor. When you turn up this knob, signal from the channel is routed into the mixer’s internal FX. The main LEVEL knob (the one on the bottom) still controls the amount of signal going to the left/right mix. If we turn up both knobs, the signal from that channel goes to two places at the same time.

It’s important to realize that the channels on a mixer share aux sends. For example, all of the channels on the MG10XU have access to the same FX processor “bus.” (A bus is an audio path that brings multiple signals to the same place at the same time — just like a city bus takes a lot of people to the same work location in the morning.) Even though all the channels share the bus, you use the aux send knobs to independently control the amount of effect for each individual channel.
Using Aux Sends to Create Monitor Mixes
As mentioned previously, some mixers have output jacks for the aux sends, allowing you to send signal to external devices. These devices could be effects processors … or they could be stage monitors.
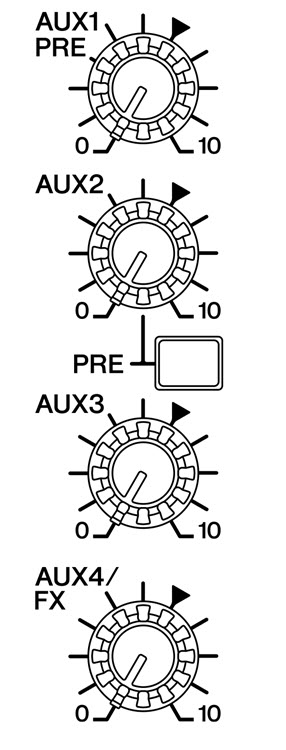
As shown in the illustration below, the Yamaha MGP12X offers four different aux sends, each with a separate TRS output on the rear panel of the mixer:
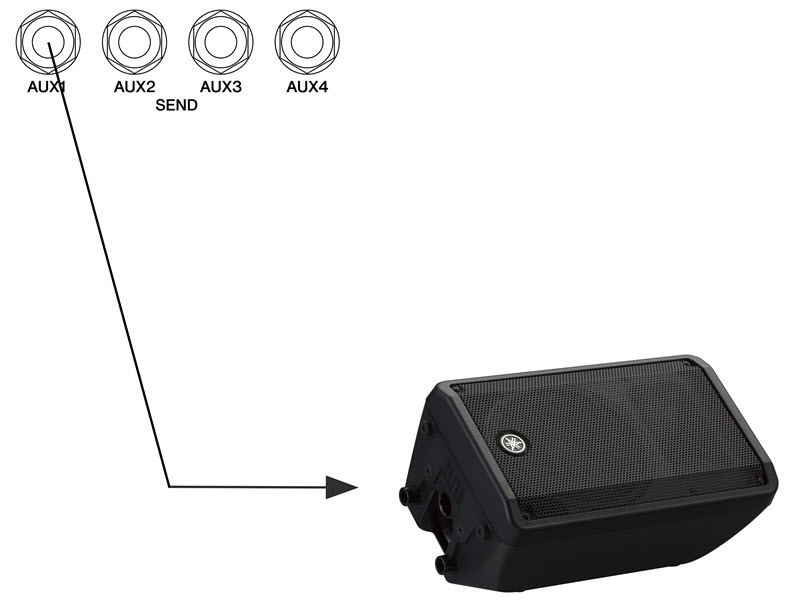
To set up an onstage monitor for, say, the lead singer, simply connect a cable from the MGP12X Aux 1 Send output jack to the input of a powered speaker such as the Yamaha DBR10:
When you then turn up the Aux 1 knobs on different channels, they “get on the bus” and go to the Aux 1 output jack, then to the monitor:
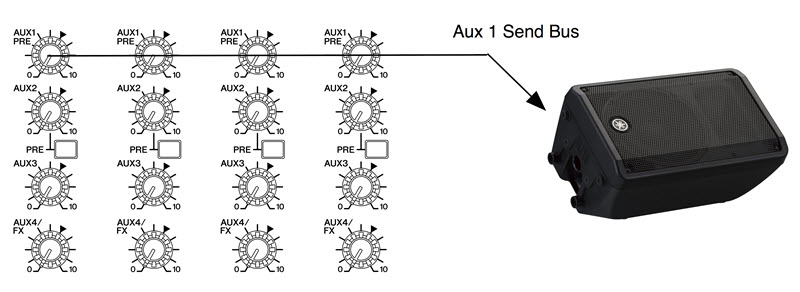
If your mixer has multiple external aux sends, you can create separate monitor mixes for different musicians, as shown below:
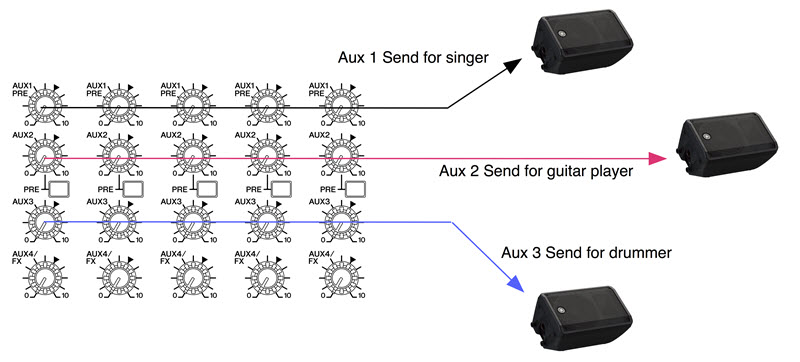
Aux send 4 on the MGP12X is labeled “FX” and is typically used to feed external effect processors such as a digital delay or reverb:

Aux send bus to external effects processor.
As we’ll see shortly, the processor’s output must be connected to an aux/effects return or a spare input channel in order to add it back into the signal path.
Pre-Fader vs. Post-Fader
If you’re paying attention, you may have noticed that some aux sends have the word PRE next to them. This refers to whether the send is taking its signal pre-fader (i.e., before the fader) or post-fader (after the fader).
What’s the difference? Let’s go back to the water analogy. Imagine there’s a valve that turns the water on and off in your kitchen. If you turn off that valve you will never get any water from the kitchen faucet. If you crack open that valve just a little bit, you only get a trickle of water from the kitchen faucet. If you open the valve all the way, you can get a strong flow of water from the faucet. That’s how a post-fader send works. The valve is the fader, and the faucet is a post-fader send. If you shut off the fader (the valve), the send (the kitchen faucet) doesn’t work anymore.
Thankfully, the valve in your bathroom is in a different place. It’s before the kitchen valve, so even if you shut off the kitchen valve you still have water to shower with. That’s how a pre-fader send works. Even if you lower the fader all the way down, you can still turn up a pre-fader send.
So why have both?
Generally, post-fader sends are used for effects, so that when you raise or lower the fader, the effect send level is also raised or lowered. In other words, the effect stays in proportion to the “dry” sound.
Pre-fader sends are usually used for monitor (or headphone) mixes so that when you raise or lower a channel in the left/right mix, the monitor mix does not change. This is important because a musician may want their monitor mix to be different from the mix that the audience hears. A musician might, for example, hear enough guitar from a loud onstage amp and not need it in their monitor, but you still might need to put a little bit of guitar in the PA system for the audience to hear it clearly.
Sometimes an aux send can be switched to be pre- or post-fader (for example, Aux 2 on the Yamaha MGP12X), making it usable as either an effects send or a monitor send. However, most of the time sends are “fixed” to either pre- or post-fader and you can’t change that — so you’ll want to choose carefully which you use for effects (again, usually post-fader) and which you use for monitors (usually pre-fader).
Finally, most aux outputs have a Send Master knob that controls the overall level of the bus, making it easy to adjust the volume of the mix without disturbing the balance between the different channels:

Aux Returns
Of course, after you send signal into a processor (whether it’s an internal one or an external device), you still have to bring it back (return it) to the left/right mix so that you can hear the effect. That’s the purpose of an aux return (sometimes called an effect return or FX return), which you can think of it as being a kind of mini-input. In some cases, it may have only a knob for level and an on/off switch, as on the entry-level Yamaha MG10XU mixer. Here, all you have to do to hear the effect is raise the FX RTN LEVEL knob:
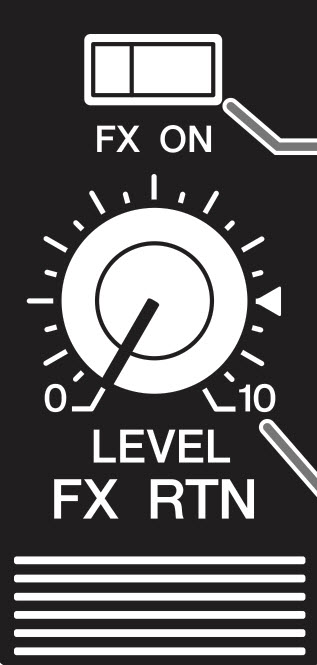
(FX Return).
Contrast this with the FX return on the more advanced MGP12X:

Here, a fader is used for more accurate level control, plus there are on/off and bus assignment switches (we’ll discuss these in a future Tools of the Trade blog posting) and three Aux Send knobs: Aux 1, Aux 2 and Aux 3. Yes, these aux send controls enable you to send the FX return itself into any or all of the three different aux sends. Sound crazy? Not really. This configuration allows you to add effects into the monitor mixes — a really nice feature for singers who like a bit of reverb or echo in their monitors.
Note that aux returns can also be used as spare inputs. If you have a smartphone, tablet or computer at your FOH (Front Of House) position that you want to use to play music in-between sets, an aux return is a good place to connect it since it leaves all your input channels free for microphones or instruments onstage.
Check out our other Tools of the Trade postings.
Click here for more information about Yamaha mixing consoles.


