Tagged Under:
Grouping In Live Sound
What it is, how it works and when to use it.
Every mixing console provides a number of faders that allow you to change the level of incoming signals on the fly. They’re usually colored white or yellow so they contrast with the darker color of the board itself, making them easy to see in the low-light conditions of clubs, churches and other venues.
In addition to these individual channel faders, there’s also always a master fader (typically located to the right of the channel faders) that enables you to alter the overall mix volume at a touch. But many times there are also two, four or more faders near the master fader, sometimes colored differently. These are called group faders. What do they do? In this article, we’ll provide you the answer and explore this important tool for mixing live sound.
What It Is and How it Works
Groups (sometimes called “subgroups”) are a great way to organize your mixes and make them easier to manage. They also provide the ability to route signals to additional devices so that you can record or send audio to multiple locations.
As an example of the way grouping is implemented, Yamaha mixers such as the MGP12X have a feature called “Bus Assign.” This consists of three small buttons labeled “ST,” “1-2” and “3-4” located next to each channel fader, as shown below:
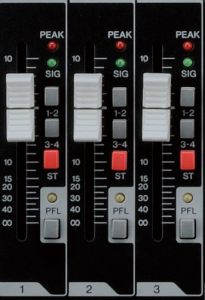
As described in our blog posting about aux sends and returns, a bus is an audio path that takes a signal from point A to point B. When you want to travel to a specific place, you need to get on the right bus — like going to work. And like public transportation, you get on a bus with other people and everyone rides as a group to the same destination. On a mixing board, a bus takes a group of audio signals to the same place.
The simplest mixers have only a left/right stereo bus which eventually makes its way to the speakers. See that red button labeled “ST”? When pressed, it assigns (connects) the input channel to the L/R stereo bus and master fader. You can then use the pan control to position the sound from left to right. But here’s the important thing: If you don’t assign the channel to a bus, you’ll never hear it.
The other buses are groups. The MGP12X buttons labeled “1-2” and “3-4” assign the input channel to stereo group faders, not to the master fader. They serve as a sort of “local” bus that groups a bunch of channel faders together. The group fader can then assign the signals anywhere you like, including to the main stereo bus.
Why would you want to do that? One reason would be to make mixing a lot of channels more manageable.
How to Use Groups
Let’s suppose that you have three people singing, each into their own microphone. Each microphone is connected to its own input on the mixing board, so now you have three vocal channels that you can balance for a good blend. Obviously, once you’ve got the balance set you won’t want to disturb it, but let’s suppose that over the course of the performance the band gets louder and the vocals become difficult to hear. The problem is that, if you raise each vocal fader separately — no matter how carefully — you will inevitably alter the blend you created between the three microphones. Sure, you can try to raise each fader equally to maintain the balance but that’s not likely to happen because faders are not linear — they don’t behave in a manner like, “if you push up each fader a half-inch, they all get louder by the same amount.”
This is when you need a group. Instead of assigning the vocal channels directly to the stereo bus, assign them to groups 1 and 2. This way, the vocal channels take a detour in the signal path — they go to group fader 1-2 on their way to the stereo mix. If you want to make the vocals louder or softer, all you have to do is raise or lower that one group fader. The balance between the vocal mics stays the same and you can alter the level of all three channels with one finger.
But you’re not done yet! The vocals are now on the group 1-2 buses, but those buses haven’t left the depot. Here’s what the group faders on the MGP12X look like:
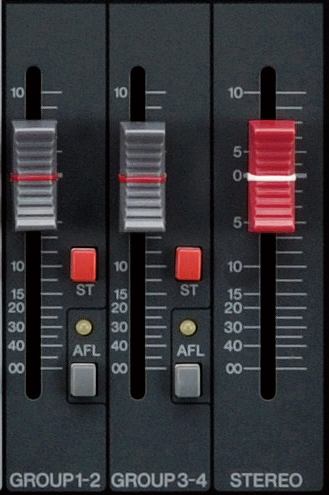
As you can see, next to each group fader is a red ST assignment button, just like the ST button found on the input channels. This is what connects the groups to the stereo bus. If you push that button, the groups are sent to the stereo fader and you will be able to hear them. (The odd-numbered groups — 1 and 3 — are automatically connected to the left side of the stereo bus, and the even-numbered groups — 2 and 4 — are automatically connected to the right.) When you use the pan control on the input channel, you are actually deciding whether to route the signal to group 1 (left) or group 2 (right) or both (center).
The group faders on the Yamaha MGP24X are a little more sophisticated:
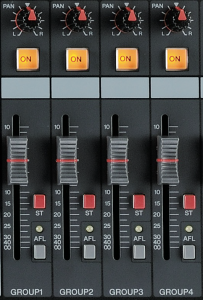
For one thing, the groups on the MGP24X are mono, not stereo. You still have to assign the group fader to ST in order to hear it, but here you can actually pan it from left to right. A mono group panned to the center would work fine for the vocal channels in our example above because you’d probably pan the vocals to the center anyway (you don’t want the audience on one side of the room not hearing the vocals because they’re panned to the opposite side). You could then use group 2 for bass, maybe blending a bass DI channel with a microphone on the bass amplifier.
That would leave groups 3 and 4 for a bunch of drum mics. By panning group 3 to the left and group 4 to the right you would create a stereo pair. The pan controls on the individual drum mic channels would then move a signal between groups 3 and 4, while the pan controls on the group faders would determine where (left to right) the sounds will be heard. If the group faders are panned center and you pan a signal between groups 3 and 4, you’ll still hear the sound in the center.
The groups on the MGP24X also have on/off switches. You could use these to turn off those drum channels on a song where the drummer doesn’t play (in order to reduce mic leakage or rumble) — but don’t forget to turn them back on!
Once you’ve assigned a channel to a bus, whether it be to a group or the master stereo fader, the signal is on its way out of the mixing console.
Group Output Jacks
Mixers that provide grouping often also have dedicated group output jacks on the rear panel. Here’s what they look like on the Yamaha MGP12X:
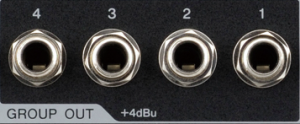
Why in the world would you want the group signal to go to a separate jack? One example would be for making a live recording of your band. For example, you could put the drums on group 1, the bass on group 2, guitars on group 3 and vocals on group 4. Then you could connect the group output jacks to a recording interface such as those made by Steinberg and record the instruments to separate tracks. At the same time, you could also assign the channels to the ST bus so that the audience can hear those sounds in the PA system. After the show, you’d have the ability to mix the recording of your band, with separate control over levels and EQ for drums, bass, guitar and vocals.
Another use for group output jacks would be if you needed to route your mix to a second set of speakers placed in a different room at your gig. You could assign the input channels to groups 1-2 and ST at the same time, use the stereo outs to feed your main speakers, and then use group outs 1-2 to feed a second set of speakers.
When you think about it, grouping — especially when combined with aux sends and returns — provides a slew of new options and a great deal of additional flexibility when it comes to mixing live sound.
Photographs courtesy of the author.
Check out our other Tools of the Trade postings.
Click here for more information about Yamaha mixing consoles.


