Tagged Under:
Home Studio Troubleshooting Tips, Part 2: Computers and Software
Overcome crashes, corrupted files, and other digital glitches.
Digital recording gives us massive power to record, edit, and manipulate audio. But with all that power comes the instability inherent when using a computer and software. We have to learn to navigate the crashes, corrupted files and other gremlins that are an annoying but inevitable part of the process.
In Part 1 of this two-part series, we talked mainly about troubleshooting issues with your audio gear. This time around, we’ll focus on how to navigate problems with your DAW and the platform it’s running on.
Troubling Results
Just like with audio hardware, it helps to use troubleshooting techniques to narrow down the possible causes of computer- and software-related issues. For example, let’s say you’ve opened an existing project in your DAW. When you hit play, the transport and meters — including the main output — are moving, but you hear no sound.
Here’s a step-by-step approach to identifying the cause of this common problem:
1. Confirm that your speakers and audio interface are powered up and connected.
2. Assuming they are, try opening a different audio app on your computer, like an editor or even Spotify. Do you hear audio now? If you do, you’ve eliminated your computer, speakers and interface as being the cause of your trouble. You can therefore deduce that the problem is in your DAW.
3. Check your DAW’s output assignments and make sure that you’ve selected your interface as the active one.
4. Check to see if perhaps you’re sending the audio to the wrong output(s).
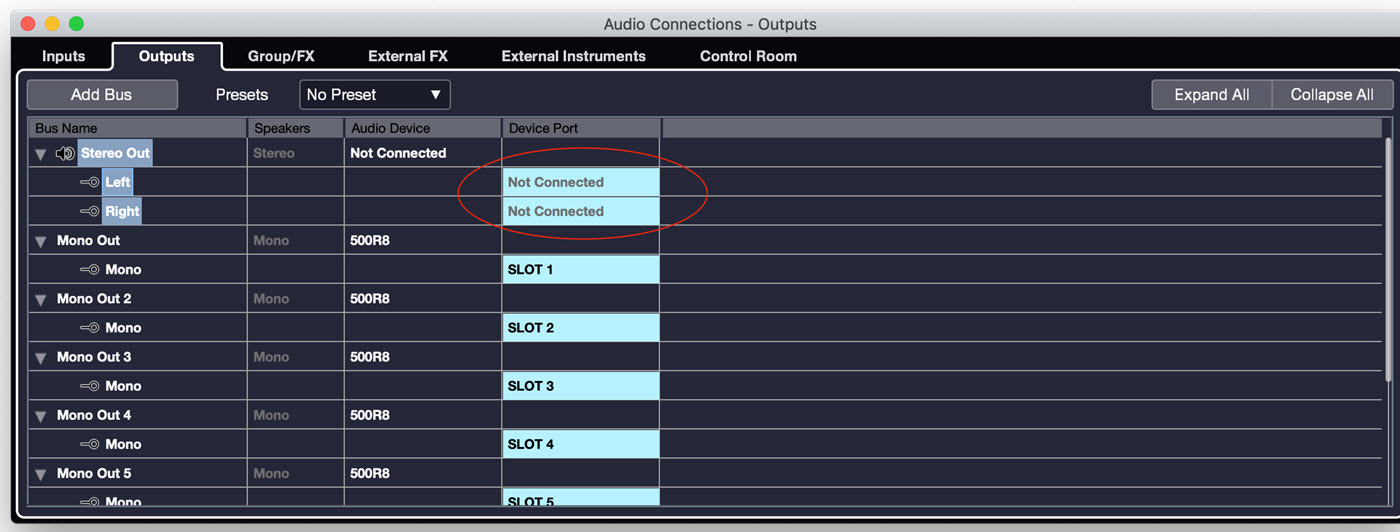
5. If you still haven’t found the problem, try opening another project. Does it play back normally? If it does, then there’s something specific to the original project file that’s causing your troubles.
The All-Purpose Fixer
If you’re working in your DAW and it starts acting glitchy, try these steps:
1. Save the session and quit the program. Then reopen them both. Sometimes restarting the application is all you need to fix your glitch.
2. If you’re still having issues, the next thing to try is rebooting your computer by selecting Restart. It’s amazing how many problems, both big and small, completely disappear with a reboot.
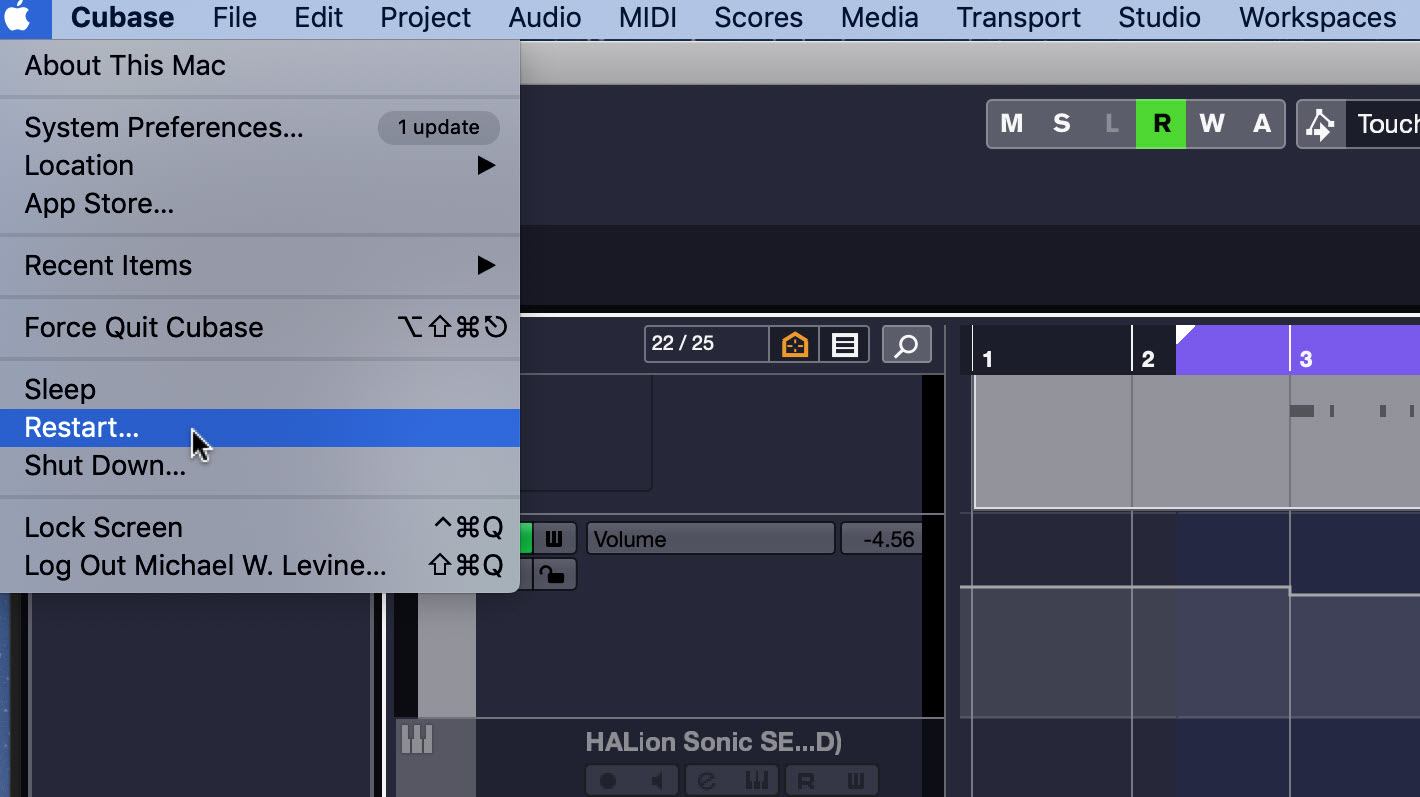
Glitchy performance often happens after you’ve been running your computer for awhile and have been opening and closing lots of applications. Sometimes, after you close them, programs or utilities fail to free up the RAM they’ve been using (RAM stands for Random Access Memory, which is the short-term data storage your computer needs to run any applications). That failure causes what’s referred to as a “memory leak,” and your computer stops functioning at 100%. Rebooting restores the memory to its default state and wipes away problems related to memory leaks.
After you’ve rebooted and everything’s running normally, minimize the number of applications you have open when using your DAW. That will leave more RAM available for it.
Plug and Not Play
If you’re experiencing frequent crashes when using your DAW (or perhaps are unable to open a particular project file), the problem likely stems from a conflict between your DAW and a third-party plug-in (or plug-ins). Try these steps:
1. Update your DAW and plug-ins. Sometimes problems happen when you haven’t updated some component of your software for awhile.
2. Also check with the developers’ websites to see if new versions are available. Depending upon the operating system of your computer, you may find greatly improved performance when running newer software.
3. Ensure the firmware and driver software of your audio interface is up-to-date (on Mac computers, most USB interfaces are class-compliant and don’t need drivers).
In the case of a project that crashes when you attempt to open it, try this:
1. Open an older version or backup of the project, starting with the most recent one.
2. If it doesn’t open, try the next oldest until you find a version that will open.
3. When you find a version that opens, think about whether you’ve installed any new plug-ins after that version was created. There’s a reasonable chance one or more of the new plug-ins could be the culprit.
4. Make sure your DAW and plug-ins are updated to the latest version.
5. If that doesn’t help, consult the plug-in’s manual to see how to temporarily uninstall it, and do so.
6. If the project now opens, the plug-in was the issue.
Freeze, Unfreeze
Another issue that DAW users face is maxing out their CPU. This can occur from having too many tracks, virtual instruments and/or plug-ins open. It’s not a glitch, as such, but it means you’re overusing your processing resources. If that’s happening to you, here’s what to do:
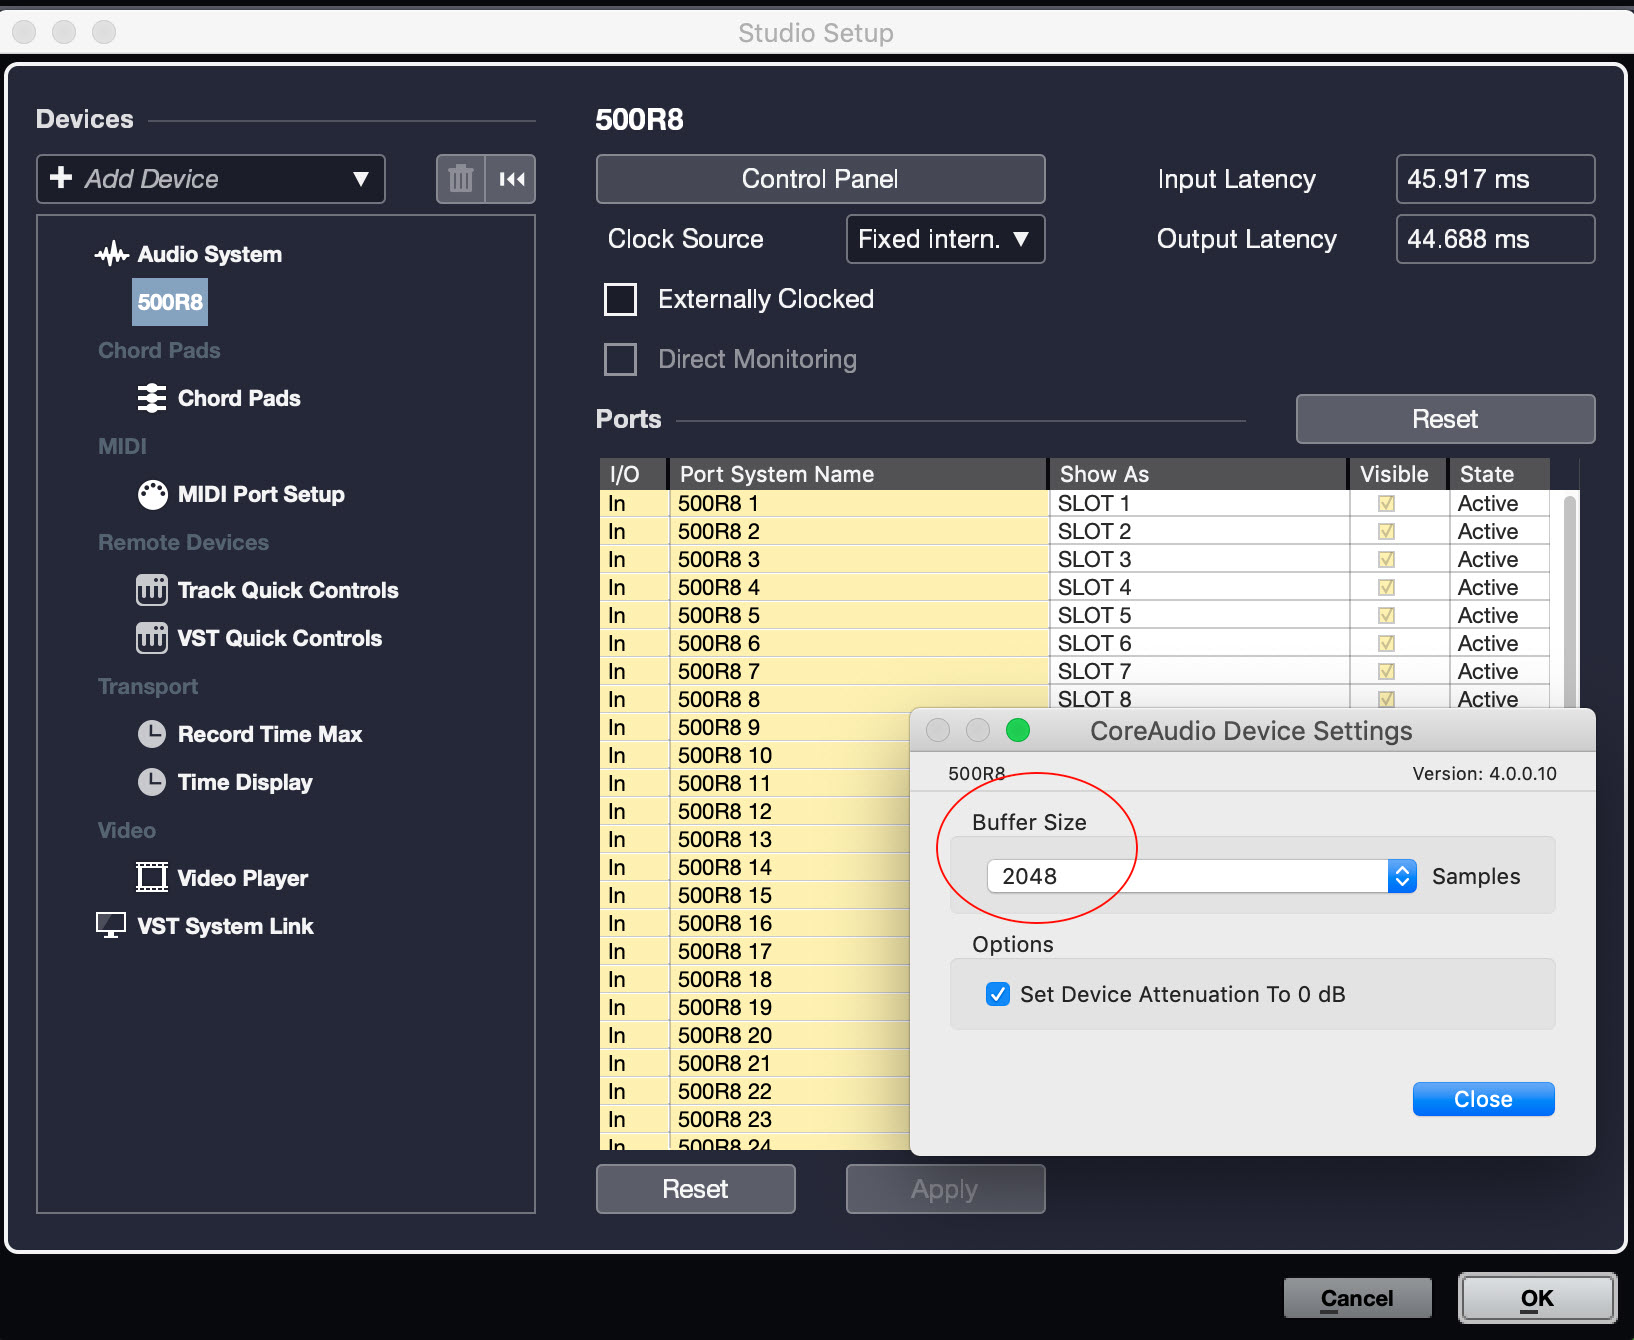
1. Increase the size of the audio buffer. Lower buffer settings give you less latency (delay) when recording but tax your CPU more. If your CPU is getting overwhelmed, it can degrade the quality of the digital audio, or the transport might stop altogether and display an error message.
2. As a general rule, use a low buffer setting when you’re recording and a higher one when you mix. In Steinberg Cubase, you can access the buffer setting by opening the Studio menu and then choosing Studio Setup. When the window opens, press the Control Panel button, and you’ll see a pull-down for setting the buffer size, as shown in the illustration below:
3. If you’re still having CPU issues after increasing the size of the audio buffer, try freezing some of the tracks. This option, which is available in most DAWs, temporarily renders the track as an audio file that includes the processing of any plug-ins that were on it. You get the CPU savings because it disables the plug-ins.
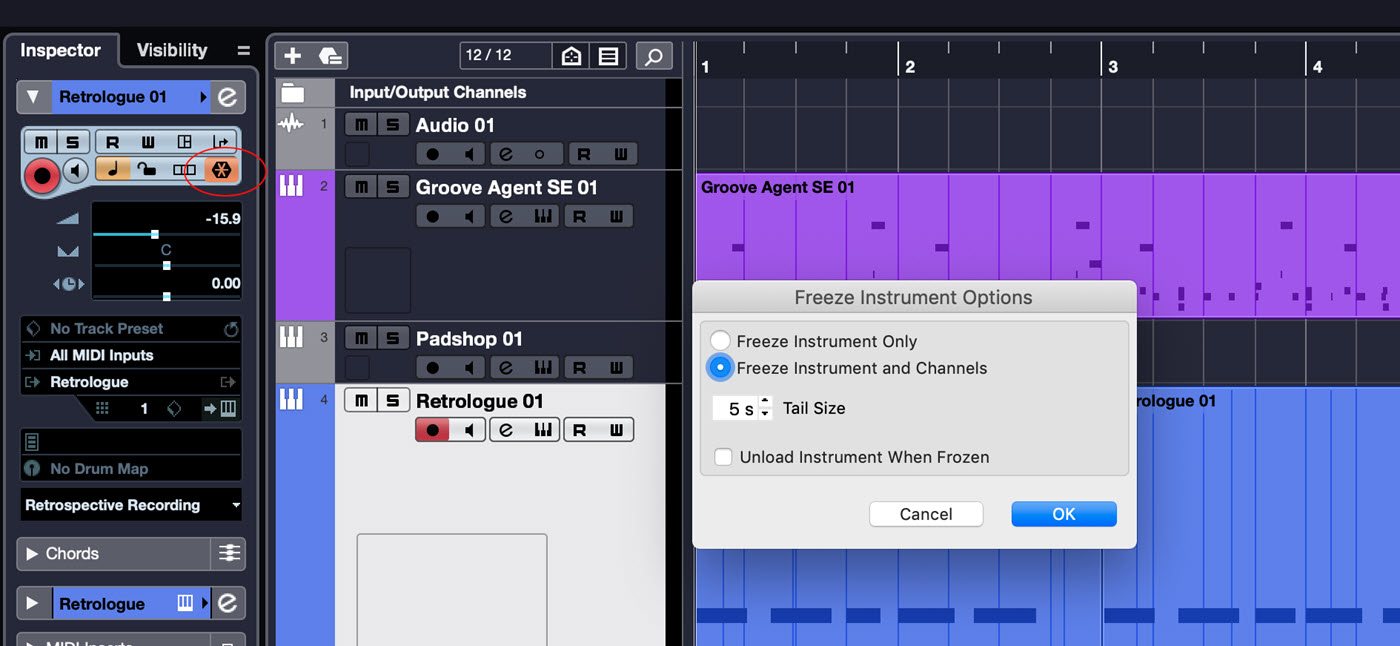
Once a track is frozen, you can still change its volume and panning, but you can’t edit it or change the plug-in settings. A frozen track uses only a fraction of the CPU that it did in its unfrozen state. If you need to edit it later, you can always unfreeze it.
In Cubase, when you freeze an Instrument Track, you have the option of freezing the entire track or just the instrument. You can still adjust processing plug-ins on its channel if you do the latter, but not the instrument itself.
Above All, Stay Calm
The tips offered in this two-part series should help you handle some of the most common technical issues you’re likely to face in your studio.
Of course, there are countless other potential gremlins specific to the particular combination of gear and software you have in your setup. Whatever the issue, the most important thing is to stay calm and assess your problem logically.
If you’ve followed the troubleshooting suggestions above and are still stumped, it’s time to do some online research, starting with FAQs from your software and/or computer manufacturer. Also be sure to check out the many online forums out there, where you can find out if other users are having the same problems you’re experiencing and what the solutions might be. (Steinberg maintains forums for all of its products — just click here.) If all else fails, you can always call or email tech support for your DAW or computer manufacturer. In some cases, that process can be tedious and/or time-consuming, but sometimes it’s the only option. But the bottom line is this: If you’re patient, careful and methodical, you can fix most problems that you’ll encounter.
Check out our other Recording Basics postings.
Click here for more information about Steinberg Cubase.


