Tagged Under:
What Is Loudness?
A guide to the measurements that are critical when preparing your music for streaming.
If, like most of us, you listen to music from streaming services, you’ll notice that each song seems balanced, volume-wise, with the ones that are played before and after. That’s because all major streaming services employ proprietary loudness normalization algorithms that automatically adjust the level of a song before it’s streamed.
Why is this important to home recordists? Well, if you’re hoping to share your music with the world, streaming is pretty much the only way to go these days, so knowing how those algorithms work is critical to getting your music played. Here’s a guide to the measurements that make up what we call “loudness,” along with step-by-step instructions for getting your music prepped so that it will sound its best when streamed.
LUFS
The term “LUFS” (pronounced “luffs”) is one that you may have come across when reading articles or watching videos about music production. It’s an acronym for Loudness Units Relative to Full Scale, and is a relatively new type of loudness measurement for music and other audio — a measurement that’s more accurate than those used previously, such as peak and RMS.
A Loudness Unit (LU) is roughly equal to 1 dB, though measured somewhat differently. Full Scale refers to 0 dBFS (Decibels Full Scale), which is as high as you can go in a digital audio system without clipping. (Another, less commonly used but functionally identical term of measurement is LKFS, which stands for Loudness, K-weighted, Relative to Full Scale.)
All major streaming services, including Spotify®, TIDAL, Apple Music® and Amazon Music, along with radio, television, and movies, have switched to using LUFS because it’s currently the best measure of loudness over time. In addition to virtually eliminating the need for listeners to adjust their volume control from song to song, the adoption of LUFS has pretty much ended the so-called “loudness wars,” where artists or producers tried to master their music at high levels so that their songs would stand out from those of competitors when played back to back. Nowadays, with all songs set to a specific LUFS target, the need to radically increase the volume when mastering has been eliminated. The result has been better-sounding music.
What’s in a LUF?
LUFS get measured in three different ways: Momentary, Short-Term and Integrated. If you look at a LUFS meter, such as the primary meter in Steinberg Cubase Pro (when set to LUFS), or the SuperVision plug-in in Cubase Pro or Artist, you’ll see those categories and more.
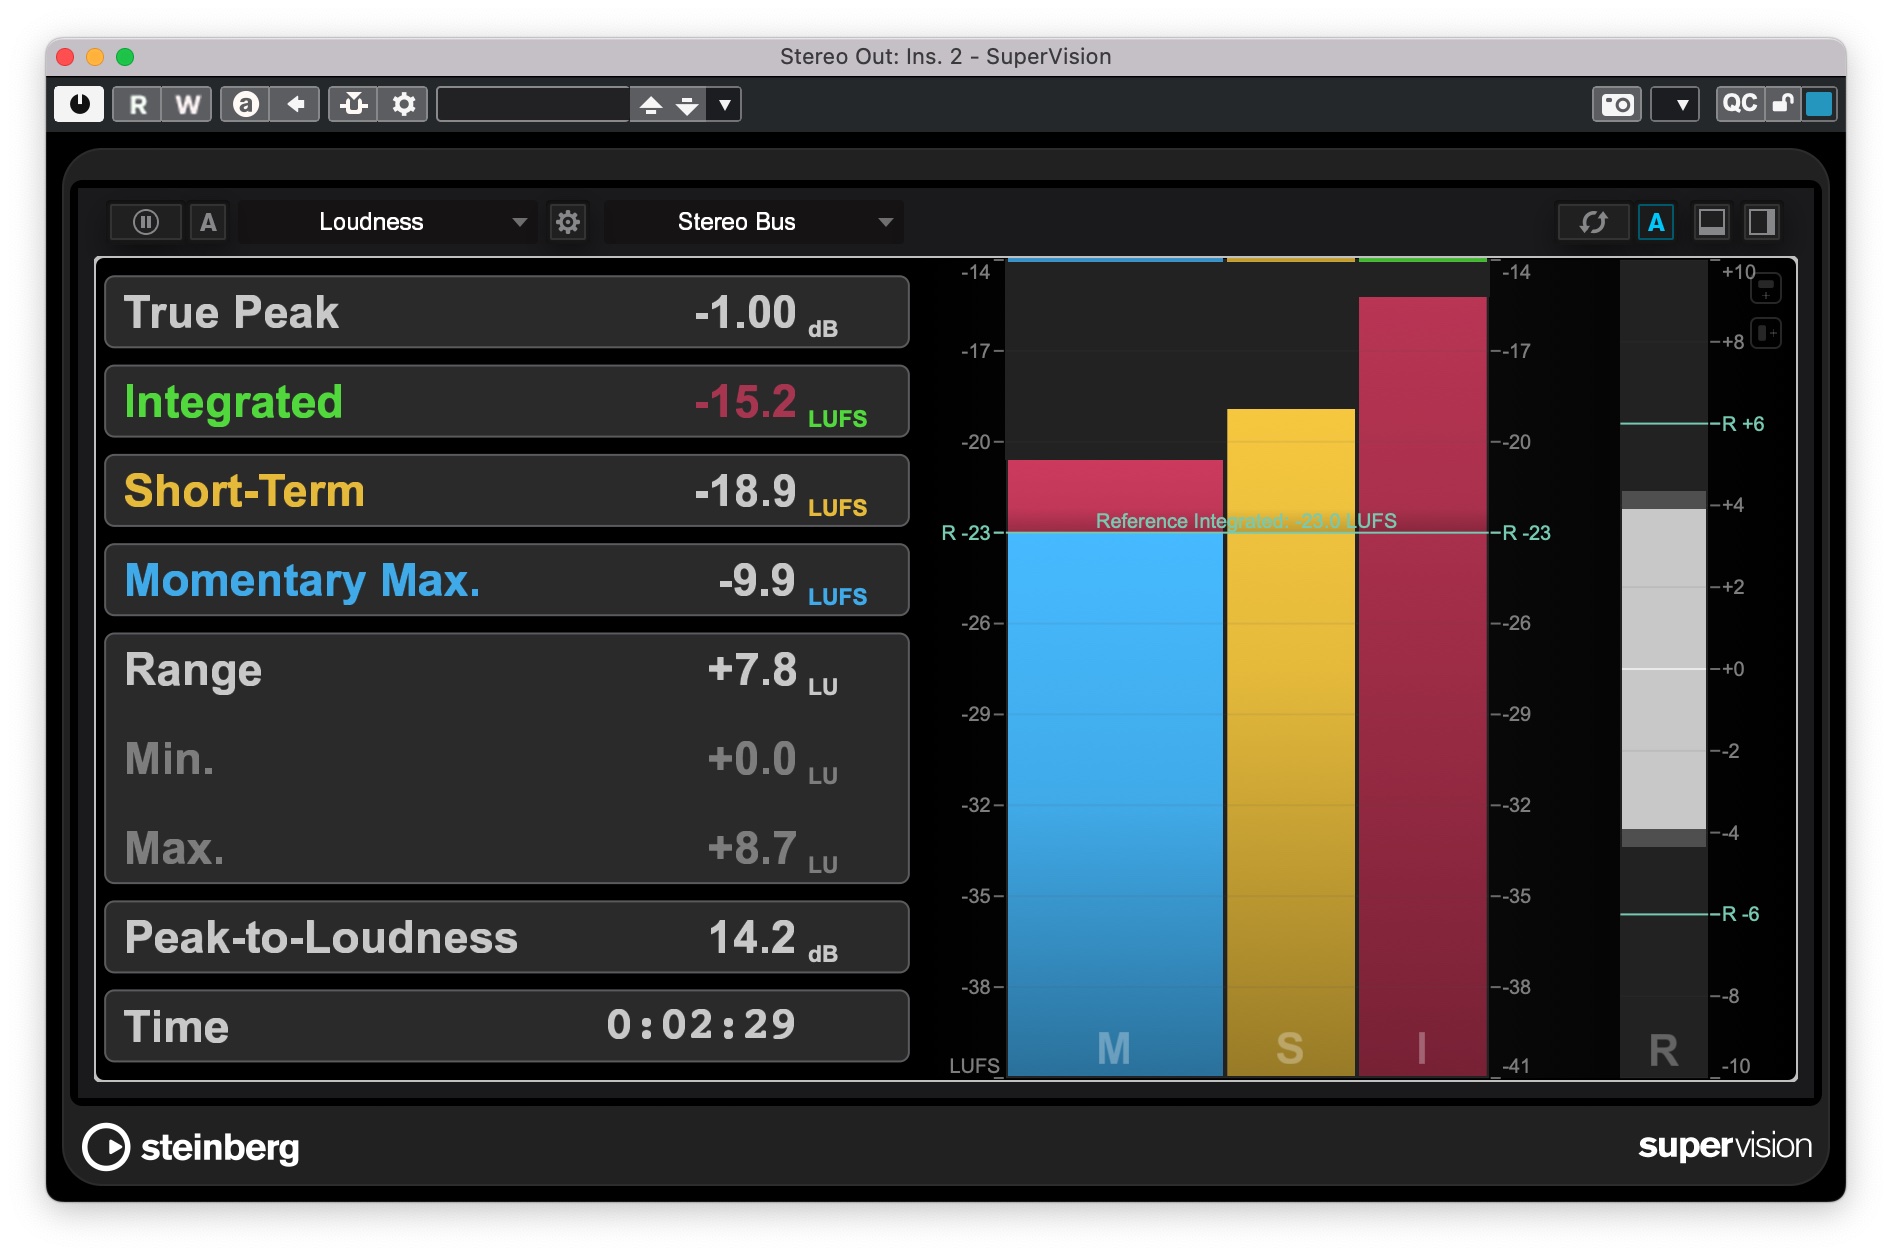
It’s not as complicated as it appears at first glance. Momentary LUFS get measured every 400 milliseconds, which is a little less than half a second. Because they capture such short periods, they function more like the readings from a dB peak meter, showing you loud transients (spikes) in a song.
Short-Term LUFS get measured every three seconds — a considerably longer period of time. They’re good for seeing the level changes between song sections.
The most important are Integrated LUFS, which the streaming services use for their loudness targets. Integrated LUFS provide an average level over time. Measuring them over an entire song is the best way to get accurate results.
True Peak
Another standard term of measurement is called True Peak. It’s particularly important because it’s the value that gets regulated by the streaming services’ loudness normalization algorithms.
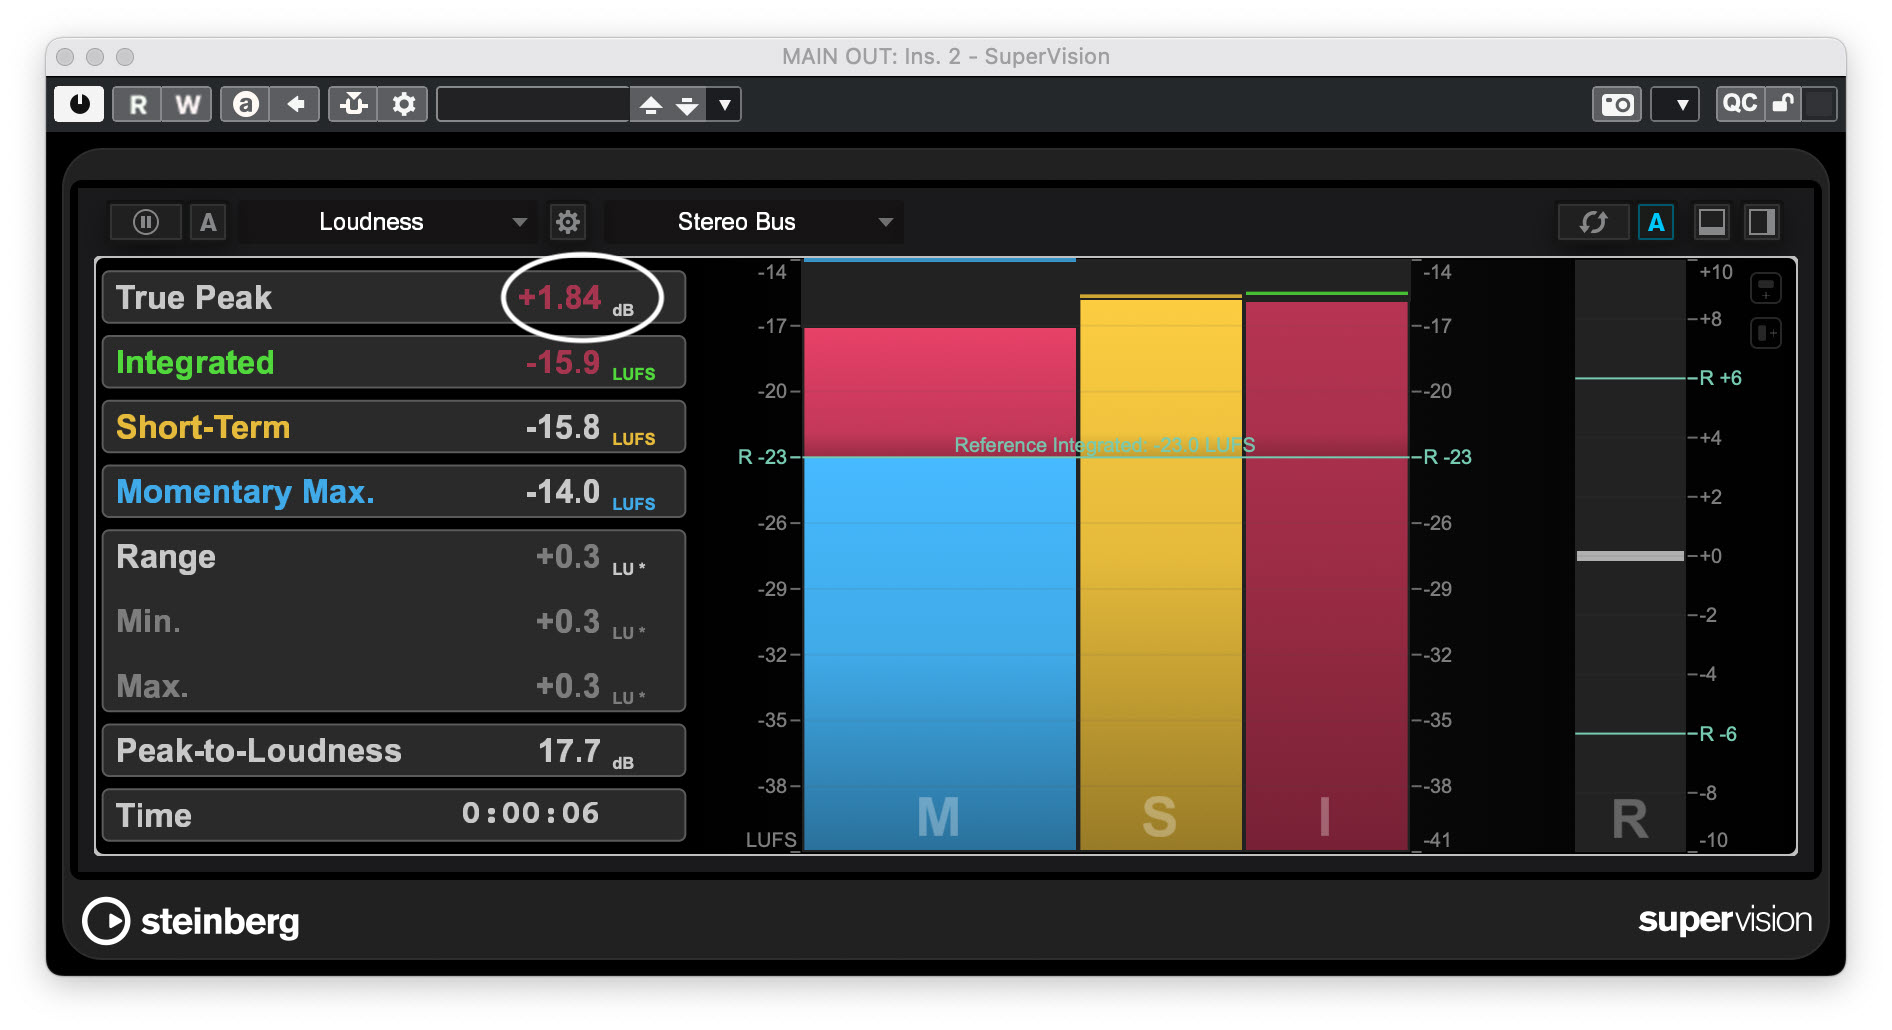
True Peak is measured using a standard called dBTP (decibels true peak). Unlike LUFS, True Peak not used for assessing overall loudness. Instead, it measures the peaks in your song, making it a vital tool in preventing distortion.
If the True Peak reading for a song is too high, it can cause inter-sample peaks. These occur because of a phenomenon that can happen when a digital signal gets converted back to analog. The peaks get slightly higher after conversion back to the analog domain. If they start out too close to 0 dB, the peaks in the analog audio can exceed 0 dB, which can cause distortion. Often, such distortion is not audible until your WAV or AIFF files are converted to MP3, AAC or some other compressed (aka “lossy”) codec for streaming.
The possibility of distortion from inter-sample peaks is the reason the steaming services are so careful about True Peak. If a song has a True Peak value that exceeds -1 dBTP, the loudness normalization algorithm will turn down the overall volume of the song, which you don’t want to happen.
Dynamic Range
A song’s dynamic range is defined as the difference between the quietest and loudest moments. Loudness meters don’t all use the same scale for it, but they all measure it in some way.
The Steinberg SuperVision plug-in uses the Loudness Range (LRA) scale, which computes a ratio between the loudest and softest points using Loudness Units (LU). The lower the LRA (or other dynamics measurement), the more constant the level because there’s less variation between the loudest and softest points. The higher the reading, the more variation.
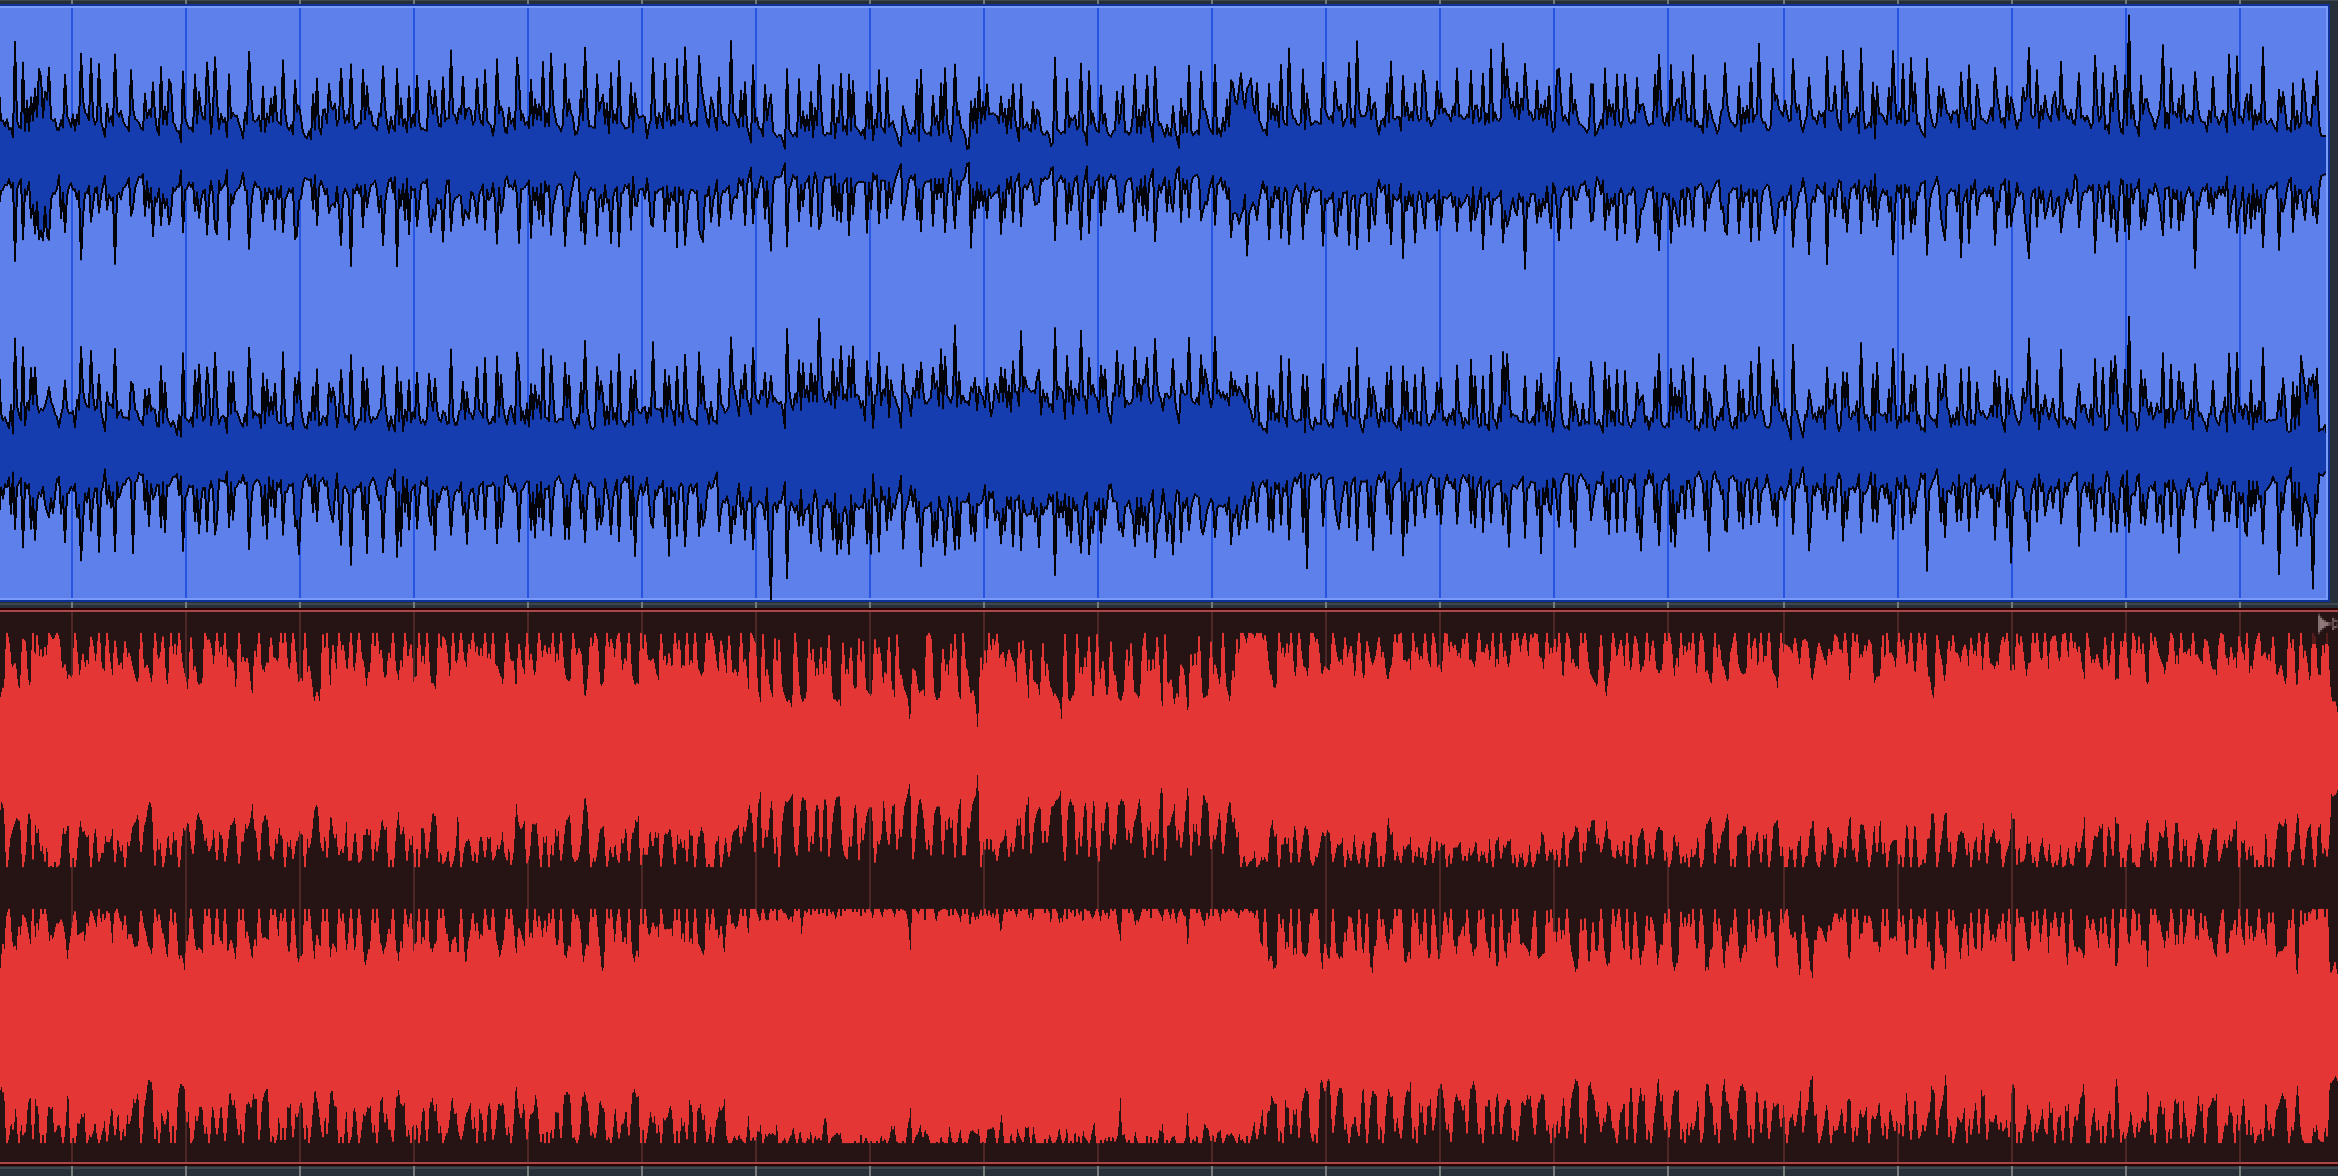
That being said, if your song’s arrangement has some extremely quiet and loud parts, you will want to reduce the dynamic range with a compressor or limiter so that listeners don’t have to adjust their volume controls when the song gets too soft or too loud. In the days of the Loudness Wars, songs would get limited to the extreme. Music that’s squashed like that can sound fatiguing. Conversely, leaving more dynamics provides a more open and airy sound.
In the graphic below, you’ll see the same song’s waveforms stacked one over the other. As you can see, the lower one (in red) was limited too heavily.
Dynamic range varies from one style of music to the next. Classical has the widest, generally, followed by jazz. Pop and rock have smaller dynamic ranges, usually between +5 to +7 LU on the LRA scale. EDM is more heavily compressed and can have readings closer to +4 LRA.
How to Adjust Loudness
Adjusting loudness is a controversial issue. Some experts say that you shouldn’t get hung up on the loudness level; you should just make your song sound good, and the streaming services will adjust it to their standards anyway. That said, it’s desirable to at least be in the ballpark so that the algorithms won’t have to use extreme processing to get your music into compliance. That’s because such processing could potentially affect your song’s dynamic range.
There’s a relative consensus that shooting for about -14 LUFS (the Spotify target) and a True Peak reading no louder than -1 dBTP will get you close. It’s probably easier to mix your songs a little quieter (many say aim for about -23 LUFS) and do the mastering as a separate step afterward.
Mastering level adjustments are generally made using a limiter such as the Steinberg Maximizer plug-in provided by Cubase. You typically increase the LUFS level by turning up the input gain, which in the case of Maximizer is done with the Optimize parameter. True Peak is reduced by turning down the Output control.
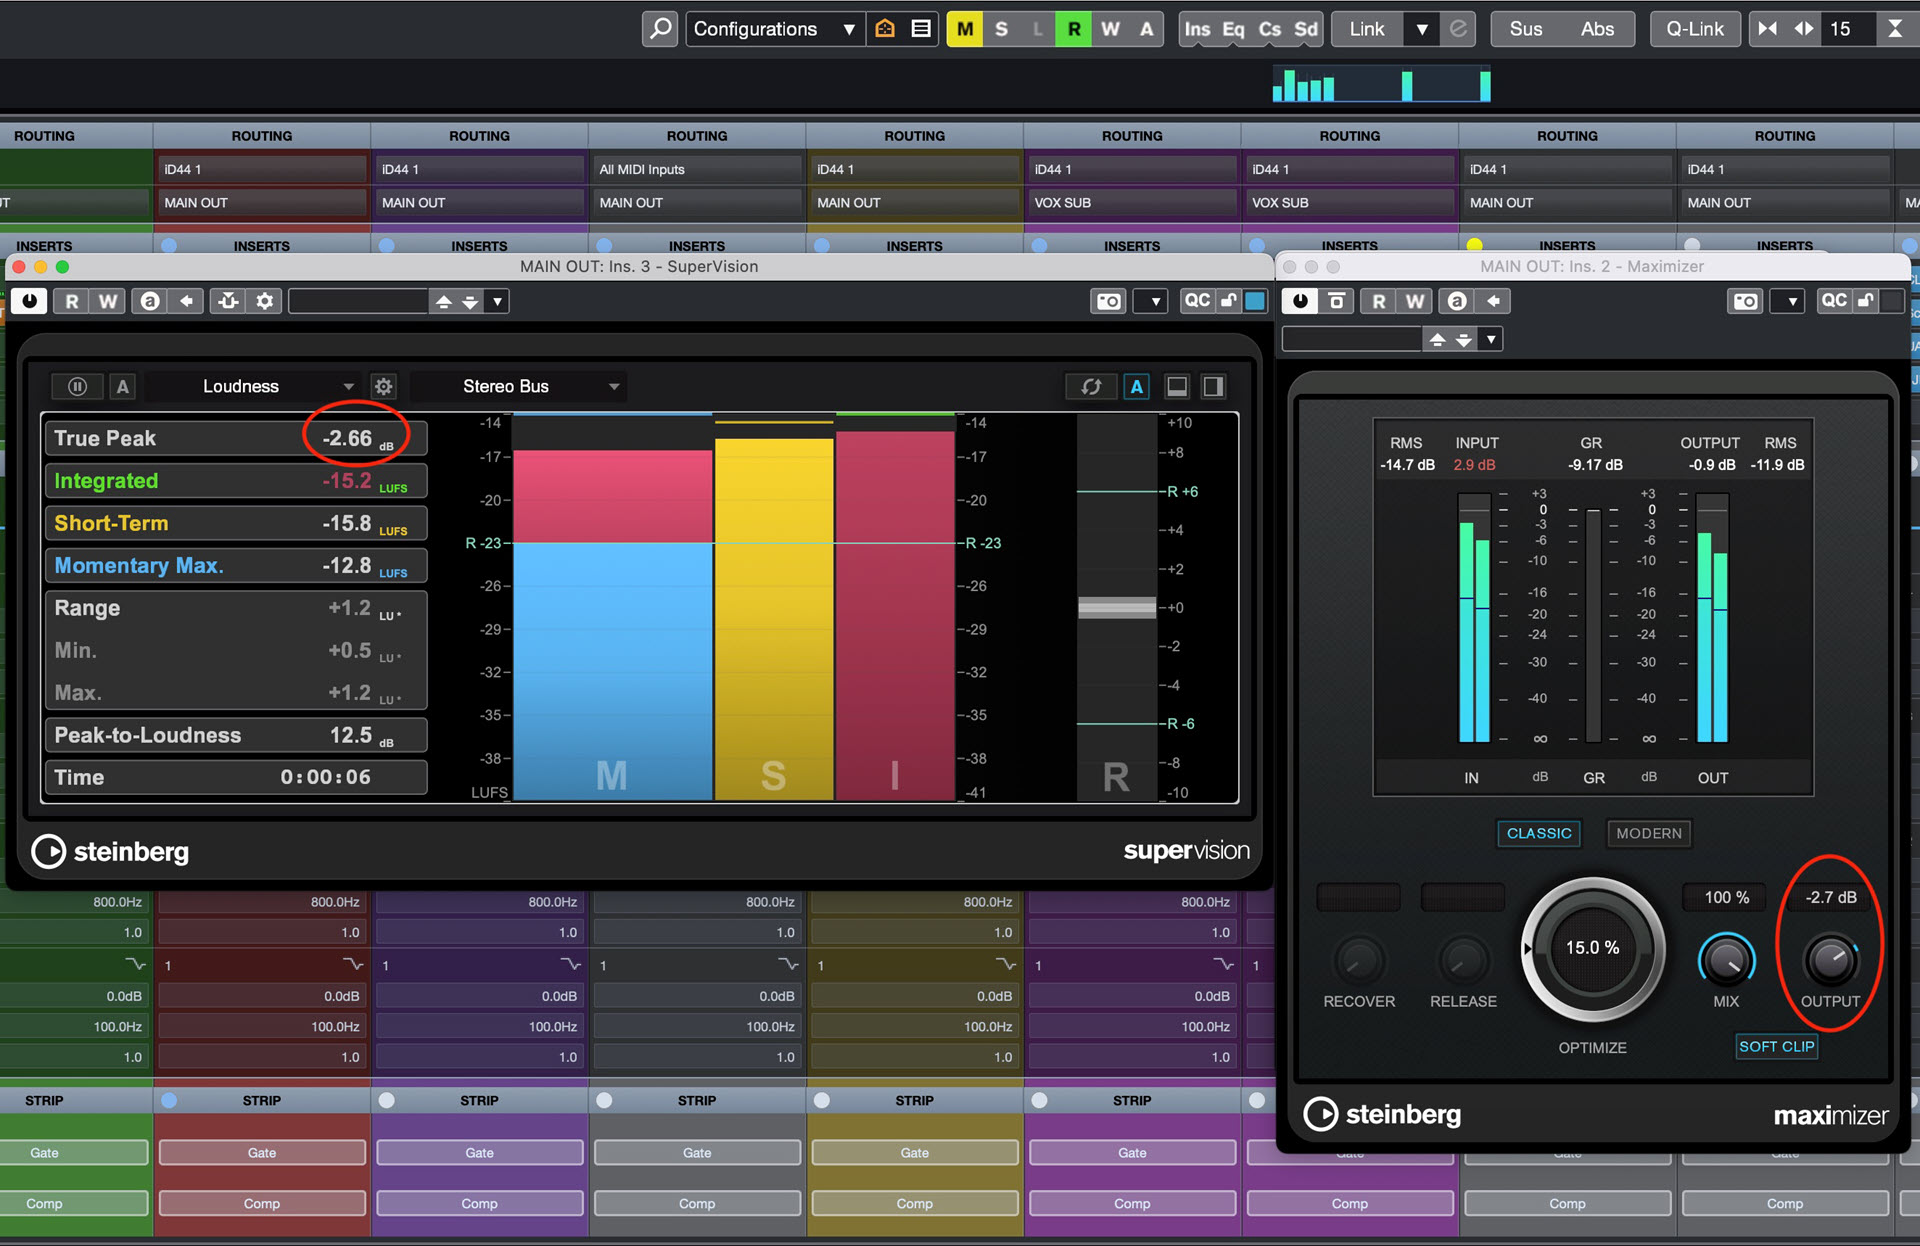
Here’s a basic step-by-step for getting your song’s loudness up to about -14 LUFS and at or below -1 dBTP. For the purposes of this exercise, we’ll describe using Cubase for this purpose, but the same basic procedures will apply to any DAW.
1. Import your song into a stereo track.
2. Insert a limiter on one of the insert slots on either that stereo track or the main Stereo Out.
3. Insert SuperVision or another LUFS- and True Peak-capable meter as the last plug-in on your Stereo Out.
4. Set the meter to measure loudness. In SuperVision, this is done via a dropdown menu:
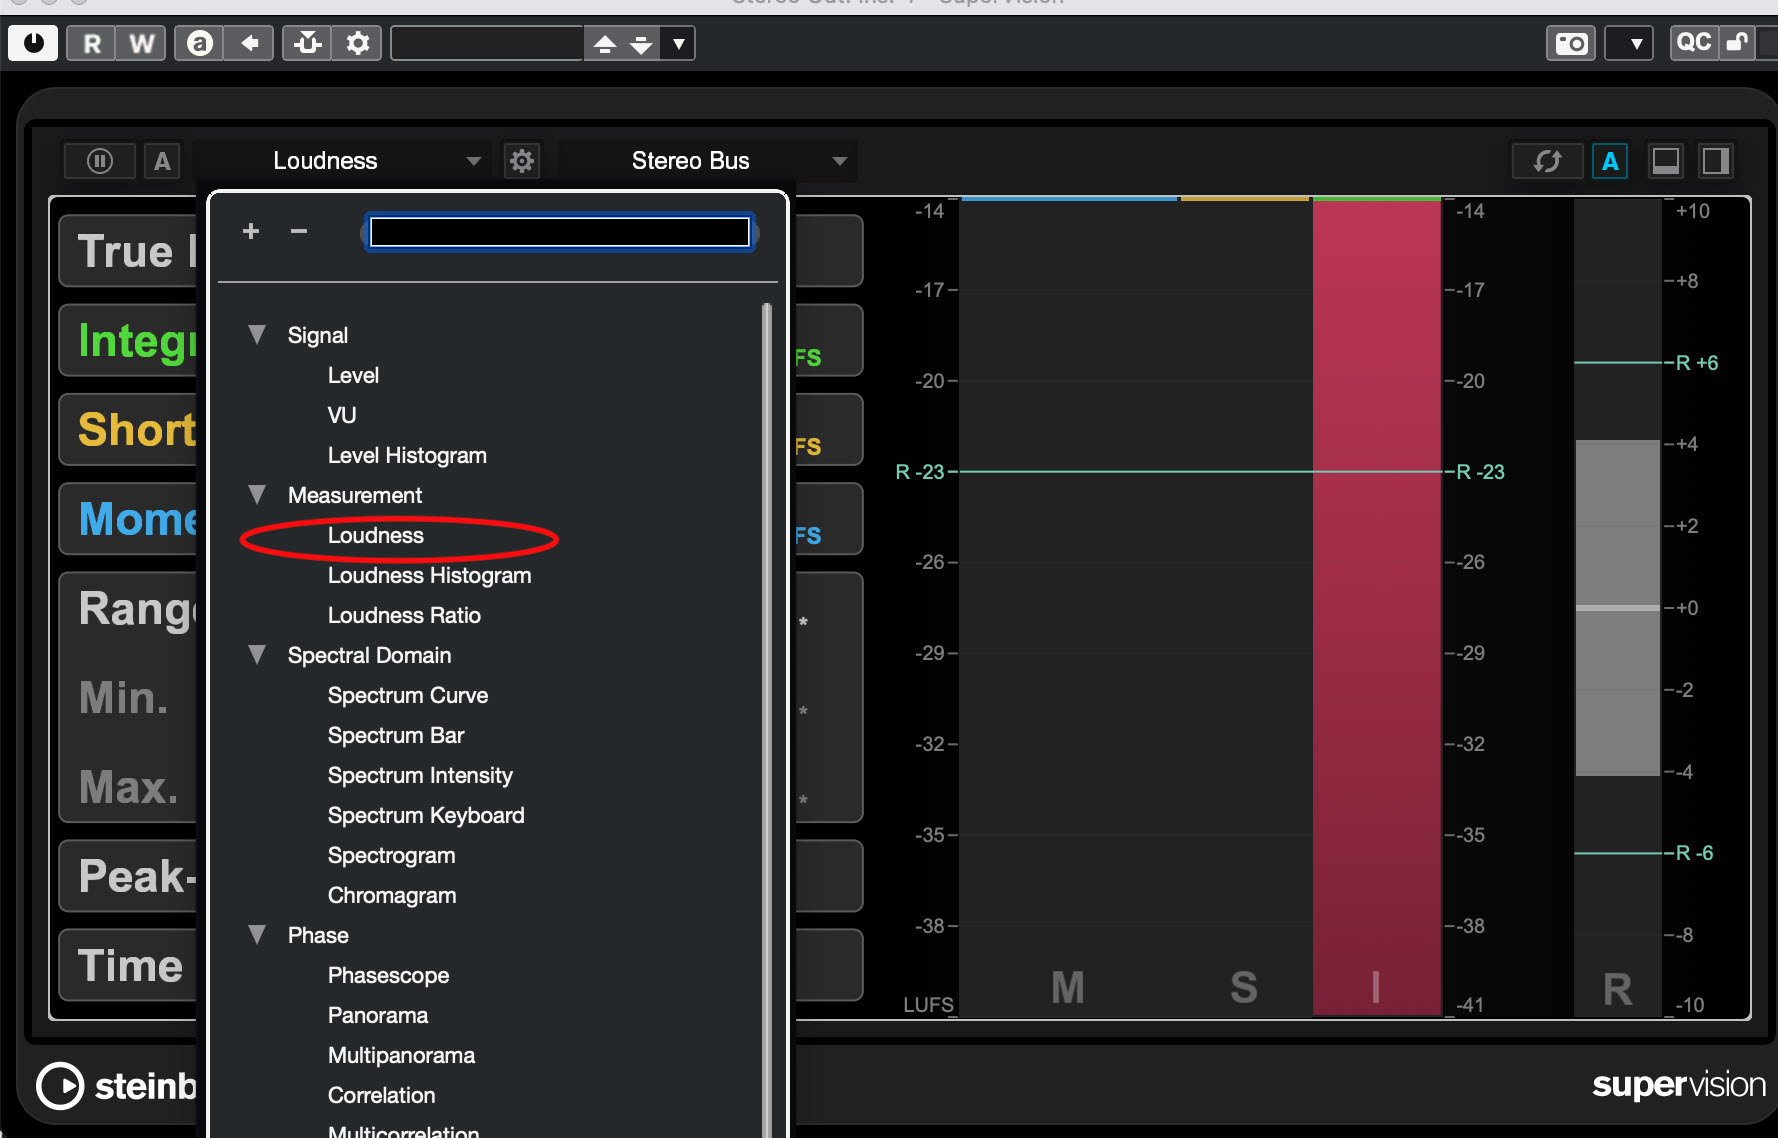
5. Play your song all the way through and observe the results for Integrated LUFS and True Peak.
6. Hit reset on the meter (the button with circular arrows) and start playing the song again. If you need to increase the Integrated LUFS (which you probably will, depending on how loud you mixed it), turn up the Optimize knob until the LUFS reading gets to approximately -14. Anywhere between -13 and -15 LUFS is close enough. If you don’t see any changes, try resetting the meter again and letting the song play for a while so that SuperVision sees both the quietest and loudest parts of the song.
7. If the True Peak is above -1 dBTP (-0.99 or higher), reduce the output knob by a small amount, hit reset again and let it play past the loudest point in the song. You should see the True Peak reading drop.
8. Because you lowered the output, the LUFS reading may now drop below the -13 to -15 LUFS range that you’d set. If that happens, push up the Optimize knob a little more. Remember to reset the meter each time. Finesse the Optimize and Output parameters until you get the Integrated LUFS and True Peak to approximately -14 LUFS and -1 dBTP, respectively.
9. If the dynamics on your song (the Range measurement on Super Vision) are below about +4 LU, you may want to revisit your mix and take off any master bus compression or limiting you used. Then try the whole process again. Once you’ve got the various loudness measurements to where you want, bounce the song out of your DAW as a 24-bit WAV file.
It might seem tricky, but after you adjust a couple of songs, you’ll get the hang of it. Trust me, it’s worth it. The result will be better-sounding music and a greater chance of getting your songs streamed out to the world.


