How to Fight Feedback, Part 2
In Part 1 of this series we talked about how speaker placement, microphone pickup patterns, and mic technique can help reduce feedback. This time we’ll discuss how you can use EQ to help in the never-ending battle against squawks and squeals!
Let’s assume that you’ve followed all the suggestions we gave in Part 1, but are still having some feedback issues. Maybe your PA is “ringing” a little bit at times, or perhaps when you raise the volume you get a howling sound. That’s where equalization comes in handy. Let’s look first at how to use EQ to reduce feedback in the house speakers, and then we’ll explore how it can help with stage monitors.
High Pass Filtering
As Scotty once said to Kirk on Star Trek, “Captain, I cannot change the laws of physics.” One of the immutable laws of physics when it comes to sound is that low frequencies tend to spread out in all directions. Couple that with the fact that vocals usually need to be the loudest thing in the PA, and you have a situation that could promote feedback in the low- or low-midrange frequencies even when you carefully place speakers using the guidelines described in Part 1.
A great way to combat this is to apply a high-pass filter (HPF) to vocal channels. By rolling off low frequencies (while allowing higher ones to pass, hence the name), this kind of filter helps eliminate rumble and handling noise from the microphone … while at the same time reducing the chances of low-frequency feedback.
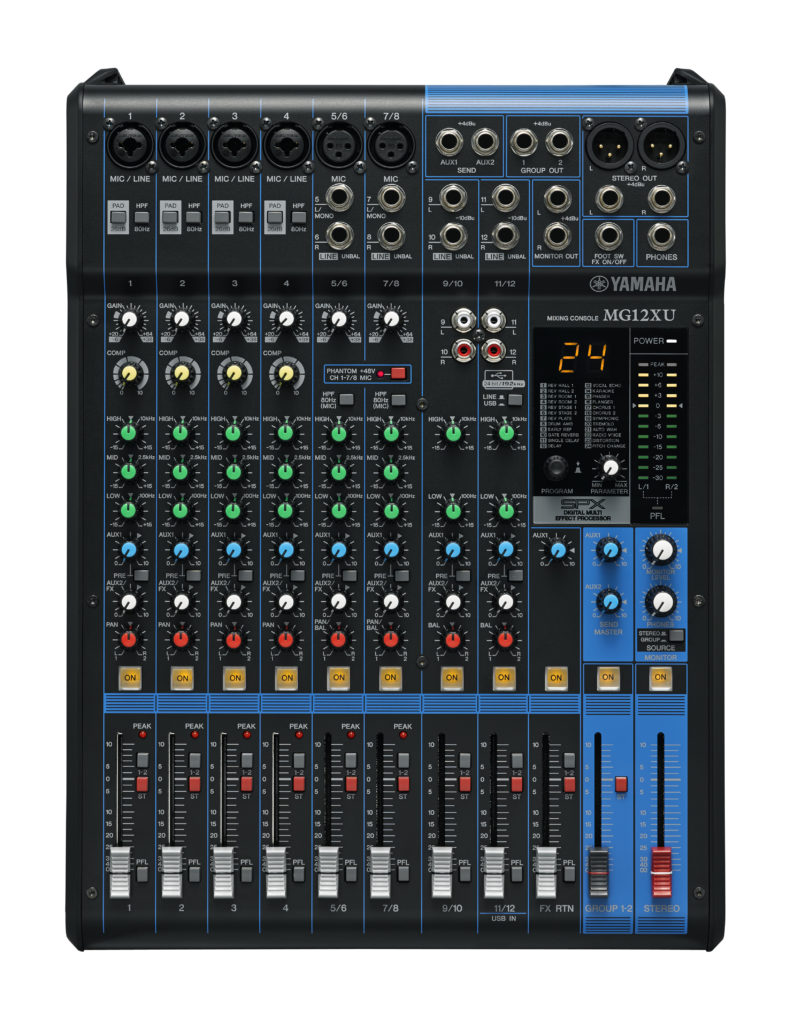
Some mixers — such as the Yamaha MG Series and TF Series — provide an HPF on each channel, making this easy to do. If the frequency of the HPF is adjustable (as it is in TF Series mixers), you have even more control. Have the singer speak or sing into the microphone while you listen to it over the main PA speakers. Turn on the HPF and slowly raise the frequency. Listen to how the voice changes. Depending upon the singer’s voice you may not hear a change until the roll-off frequency is set as high as 200 Hz or so. When you hear the voice start to thin out, move the frequency down to restore the lows. You may be surprised to learn how high you can set the filter before you hear it working.

But you’re not done yet! With the singer continuing to speak or sing into the microphone, slowly raise the main volume of the PA system. When you begin to hear a low or low-mid howl, back off the volume until the feedback stops. Now it’s time to “ring out” your PA, using something called a graphic equalizer.
Using a Graphic Equalizer To Fight Feedback
This kind of equalizer provides anywhere from 5 to 31 “bands” of frequencies that you can boost or cut. Those frequencies are usually fixed, meaning that you can’t change them. Each has an associated slider (hardware or software) for boost or cut, and after you’ve made your adjustments, these sliders present a graphic picture of the overall frequency response (thus the name). The good news is that you can choose from a lot of frequencies; the bad news is that sometimes you may need to get to a frequency that falls between the ones provided.
A graphic EQ can be an outboard hardware device or it can be software such as the 9-band digital version provided by the Yamaha EMX Series of powered mixers.
Here’s what a typical 15-band graphic equalizer looks like:

And here’s a screenshot of the 9-band digital graphic equalizer built into the Yamaha EMX 5016CF powered mixer:

How To Ring Out a PA
Start with all of the sliders at 0 or “flat.” Have a helper speak into the microphone while you slowly raise the volume of the microphone in the PA system. When you begin to hear feedback or a ringing sound, stop. Look at the graphic EQ and make a guess at which one frequency you think is ringing. Typical suspects are 400 Hz, 630 Hz, 1.6 kHz and 4 kHz. Don’t be scared if you’re not sure; you’ll get good at this with practice. Slowly raise the slider for that frequency and listen. When you’ve found the correct frequency, raising the slider a few dB will cause the ringing to get worse. If nothing happens, bring the slider back to “0.” Try another frequency. The key is to move only one slider at a time, and move the slider slowly so that you don’t create any loud squeals or howls.
Now that you’ve found the problem frequency, use the slider to cut it by a few dB. You can then make the microphone a bit louder and try it again. You may find that a different frequency starts to ring. Repeat the process until you can get the speakers louder than you think you’ll need, then lower the volume using the fader on the input channel. This is not a perfect process and you’ll reach a point of diminishing returns where the volume of the PA is just too loud to avoid feedback — but hopefully that level will be far louder than you need. Best of all, ringing out a PA allows you to achieve “maximum gain before feedback” — meaning that you’ll be able to make the speakers louder without feedback than you could before ringing them out.
Automatic Feedback Suppression
If you’re not comfortable ringing out the PA manually, you can use the Automatic Feedback Suppression feature that’s built into some mixers, such as the Yamaha EMX Series models. A Feedback Suppressor analyzes the stereo L/R mix, detects ringing frequencies and automatically applies notch filters to eliminate the feedback. These are filters with a very narrow bandwidth. Their purpose is to pull out a small “slice” of frequencies without changing the entire overall sound:

How To Ring Out Onstage Monitors
The process for ringing out monitors is the same as for ringing out the PA, but you’ll need to apply a graphic EQ to the Aux Output that feeds the stage monitor — a feature provided by Yamaha TF Series mixers:

Using a Parametric Equalizer To Fight Feedback
A parametric equalizer is an even finer tool for locating a ringing frequency. The advantage of a parametric EQ is that, unlike a graphic EQ, you can choose the frequency to be cut or boosted. Using a parametric EQ is a bit more difficult than using a graphic EQ but the idea is the same: Make your best guess as to the ringing frequency, then slowly raise the gain until you hear the ringing. If you don’t hear ringing, slowly sweep the frequency from low to high. When you hear the ringing, stop.
One word of caution: the default (starting) setting for the width of each parametric band (usually referred to as the band’s “Q”) is often fairly wide, and may look something like this:

So after locating the offending frequency, you should use the bandwidth (“Q”) control to make the bandwidth narrower, as shown in the illustration below. That way, you can better zero in on the feedback frequency while changing the sound of the vocal as little as possible.

Once narrowed, again slowly sweep the frequency back and forth just a little bit to see if the ringing gets worse. Once you’ve identified the frequency that’s causing the ringing or feedback, cut it by 5 or 6 dB, as shown below. This is similar to using a notch filter, but the difference is that you’re able to choose the specific frequency you want to attenuate.

At this point you should be able to make the PA and/or stage monitors louder without any ringing. Yamaha TF Series mixers even allow remote control using an iPad. This allows you to ring out monitors while you are standing on the stage in front of them, which really speeds up the process.
The idea of ringing out speakers can be a little daunting at first but over time you’ll get faster at finding the frequencies and correcting them. Just remember to work slowly!
Check out our other Tools of the Trade postings.
Click here for more information about Yamaha PA speakers and stage monitors.
Keep reading