Tagged Under:
The Advantages of Parallel Processing
An alternate way to apply compression and saturation.
We’ve covered the basics of compression and saturation in previous Recording Basics blog postings. This time around, let’s look at an alternative way of applying such effects — a technique called parallel processing. We’ll discuss how it works and when it’s good to use it, and we’ll provide step-by-step instructions for setting it up yourself.
Not All Wet
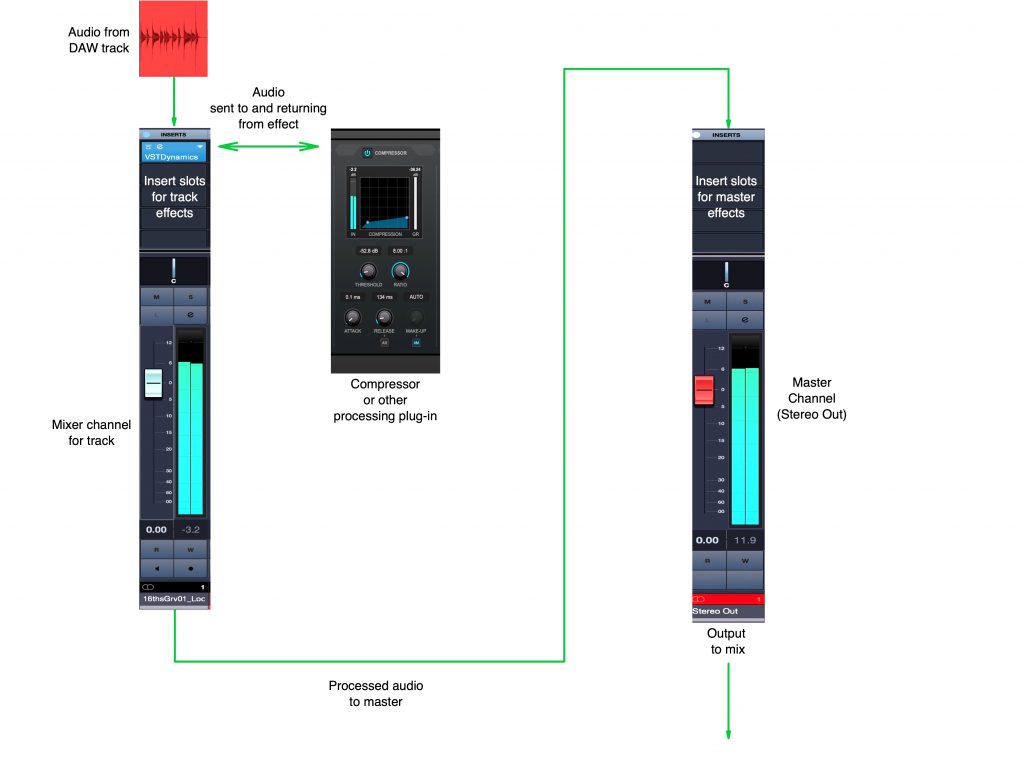
When you apply an effect to a track or group of tracks (a Group Track in Steinberg Cubase), you have a couple of different ways to do so. One option is to open the effects plug-in on an insert slot on the track itself. That’s referred to as serial processing. The term comes from the fact that audio is fed directly from the track through the effect, which processes 100 percent of the signal, as shown in the illustration below:
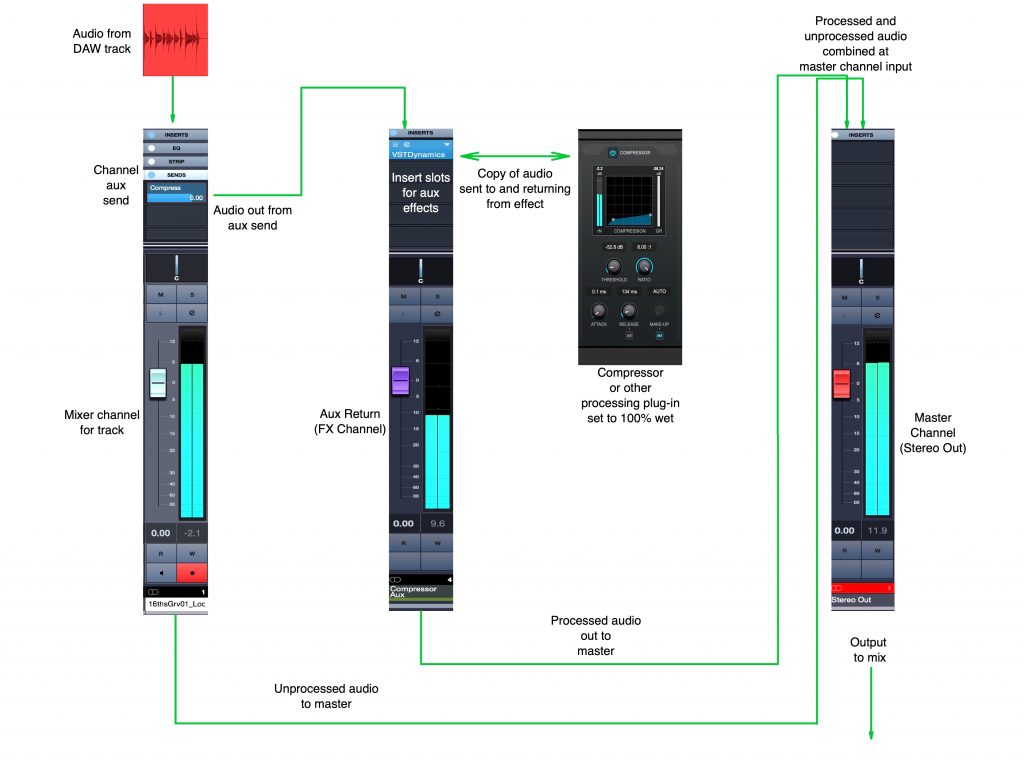
Alternatively, you can use an auxiliary send (a feature found in all DAW mixers) to route signal from the source channel to a dedicated effects channel called an auxiliary return (also known as an “aux” return or, in Cubase, an FX channel). Here, unlike an insert, you’re not processing 100 percent of the audio. Instead, you’re able to use the send and return controls to blend in as much or as little of the effect as you want along with the original dry track:
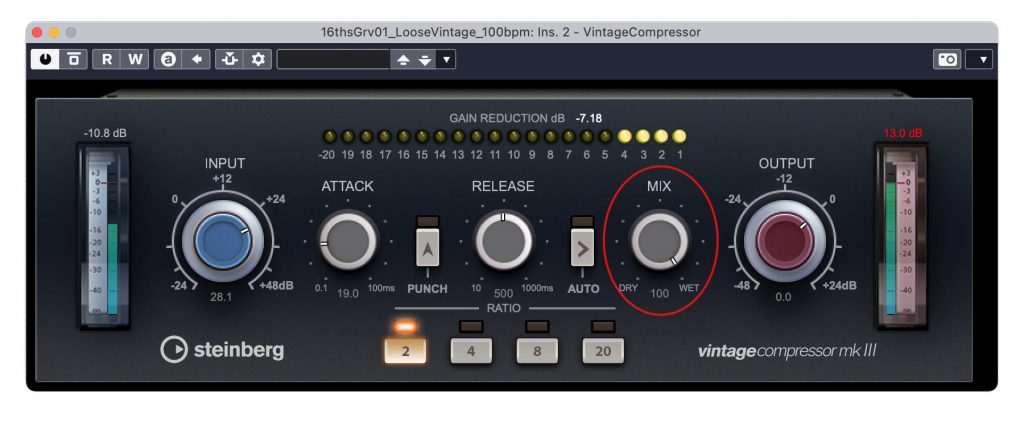
In a parallel setup, if the plug-in you’re using has a mix control (wet/dry knob), be sure to set it to 100 percent wet:
Things like compression and saturation are most commonly configured as serial effects because they’re meant to change the character of the entire sound. Reverb, delay and modulation effects are more likely to be applied in parallel because you typically want to blend only a little bit of their signal along with your source track. However, that’s not always the case. Let’s take a look at the exceptions to this “rule.”
Parallel Compression
Parallel compression — sometimes called New York Compression because it originated on the New York City studio scene — is a simple enough concept. Instead of inserting a compressor directly on a track, you put it on an auxiliary return like you would with reverb or delay. That means you’ll be blending the uncompressed dry audio with the compressed version rather than compressing the entire signal.
The basic purpose of compression is to attenuate any audio that goes above a certain level, known as threshold. By squashing down the peaks, you’re reducing the track’s dynamic range — the difference between the loudest and softest parts. Doing so lets you turn the track up higher because the reduced peaks are no longer as loud in comparison to the rest of the track.
Those peaks are the transient portion of each sound or hit — the “attack” portion of an audio event like a note or a drum hit. With the transients lowered, the sound will be less punchy and, therefore, less impactful … but with the reduced dynamic range, you can turn the instrument higher in the mix and accentuate the more “roomy” parts of the sound that occur after the transient. However, particularly if the attack time of the compression is too fast, the sound can almost get a little “mushy,” When applied to drums, they can start to sound as if they were being played by a soft beater rather than a hard wooden drumstick.
Parallel compression helps alleviate this issue. By blending heavily compressed audio with uncompressed audio, you can reduce the dynamic range while maintaining more control over the transients. When applied to percussive sources like drums, you can create a more aggressive and ambient sound.
Let’s have a listen to how this works, starting with an uncompressed stereo drum mix:
Compare it to this clip, where the drums are processed with parallel compression. Notice that the sustain portion of each hit is accentuated without losing the punch of the transient:
Three Parallel Compression Configurations
There are three different ways of setting up parallel compression. The first, as previously mentioned, is by using an aux send and return. This is a good approach to take if you want to parallel process multiple tracks. Here’s how to do it:
1. Create an aux return track (FX track in Cubase) and insert a compressor on it. Set the compressor for extremely heavy compression (low threshold, high ratio, fast attack time).
2. Configure an aux send and route it to the aux return track on the channel or channels that you’re going to compress. Many DAWs have the aux sends already configured; you just have to route them to the aux return channel you’re using.
3. Turn up the aux send until you’re hearing the desired amount of compression.
The second way of achieving parallel compression is to use a duplicate track. This is the preferred method if you’re applying the effect to multiple signals, where using aux sends could create a clutter of extra tracks. Here’s how to do it:
1. Make a copy of the source track and start with its fader down all the way.
2. Insert a compressor on the duplicate track and crush it with a heavy setting.
3. As you’re playing back the song, slowly raise the level of the compressed track until you hear the desired sound.
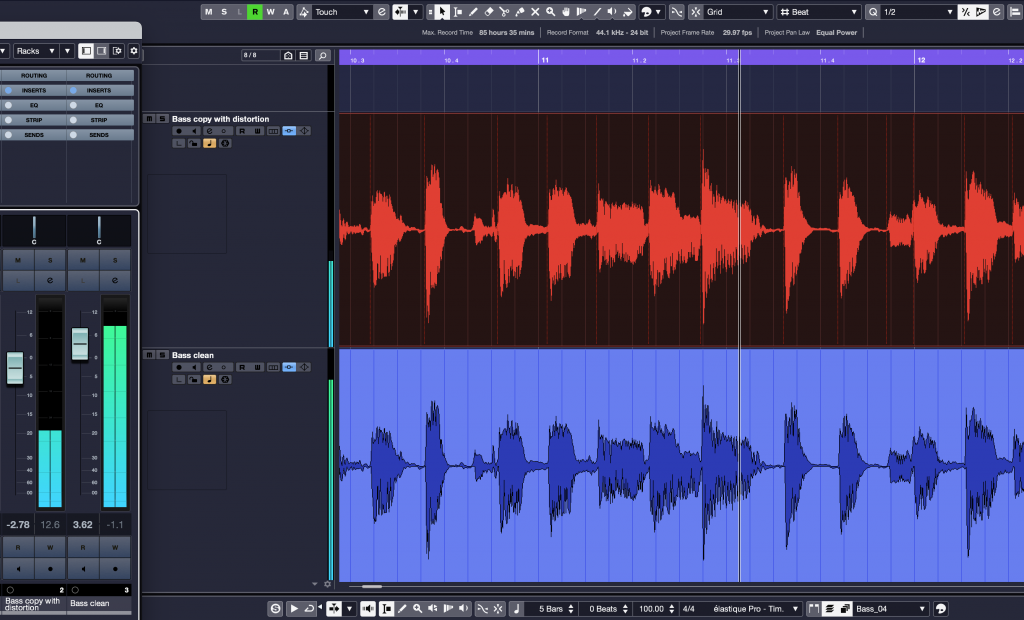
Finally, if your compressor has a mix control, such as the Vintage Compressor in Cubase, you can accomplish parallel compression by following these steps:
1. Insert the compressor on the track.
2. Create a setting that’s overly heavy with a lot of gain reduction (try -15dB to -20dB) and a relatively fast attack.
3. Turn down the mix control as the song plays until the balance between the compressed and uncompressed sound is to your liking.
This “mix knob” method is particularly handy for parallel processing an entire mix on the master bus.
Parallel Saturation
Saturation effects such as overdrive, distortion or fuzz benefit from parallel processing in much the same way: they allow you to keep more of your transients while still bringing in the saturated sound.
The setup is identical to parallel compression, except that you’ll be using a saturation plug-in instead. Note that saturation by its nature reduces transients to some degree, so you’re getting some compression as well.
Here’s an example using a recording of a cajón — a box-shaped wooden percussion instrument played by slapping the front or rear faces with the hands. This first audio clip is without any distortion:
Here’s that same track with a distortion plug-in inserted:
Finally, here’s the track with parallel distortion from a plug-in on an aux track:
It’s a subtle difference, but you can hear more of the transients on the parallel distorted version — especially if you listen on headphones.
Another place you might want to try parallel saturation is on the master bus. This will give your whole mix just a tiny bit of saturation to make it feel more energetic. However, you have to go easy when using it that way, or your mix will lose punch.
Over and Out
Parallel compression and saturation aren’t superior to their serial counterparts, they’re just different. Sometimes the difference is subtle, but sometimes — particularly when you’re trying to preserve transients — it can be significant. Experiment with both methods, and you’ll get a feel for which approach works best in various mixing scenarios.
Check out our other Recording Basics postings.
Click here for more information about Steinberg Cubase.


