Tagged Under:
Recording Acoustic Instruments, Part 3
Capturing the sound of piano, brass, woodwinds and hand percussion.
In Part 1 of this three-part series about recording acoustic instruments, we described the various microphone types and presented general tips for mic placement; in Part 2, we showed you how to best capture the sound of guitar and bass. Here, we’ll conclude by looking at how to mic an acoustic piano, as well as some common brass, woodwind and hand percussion instruments.
Before getting into the specifics, though, here are a couple of general points about instrument miking: First, in most situations, if you’ve got one mic that’s by far the best one in your collection, you should consider using it, even if it’s not the “type” suggested for a specific source. And secondly, patience is critical. Spend time moving the mic (or mics’) around — even if it’s only by small increments — until you find the placement where the instrument sounds best.
The Ivories
How you go about miking a piano varies greatly depending on the type and quality of the instrument, the room acoustics, and whether the pianist is featured in the arrangement or is just playing a background part.
You can get pretty elaborate with setups that include combinations of close and room mics, but we’ll keep it simple here and talk about practical two-mic configurations, which can yield an excellent sound if executed correctly.
The typical method for capturing the sound of a grand piano involves a spaced pair of microphones, one for the lower range and one for the upper. (If possible, use condenser mics because pianos have a vast frequency range.) If you have mics that offer omni polar patterns (which pick up sound equally from all around), you’ll get a more representative sound and more accurate bass response (with no proximity effect) than with a unidirectional mic … but you’ll also pick up more reflections and less direct sound.
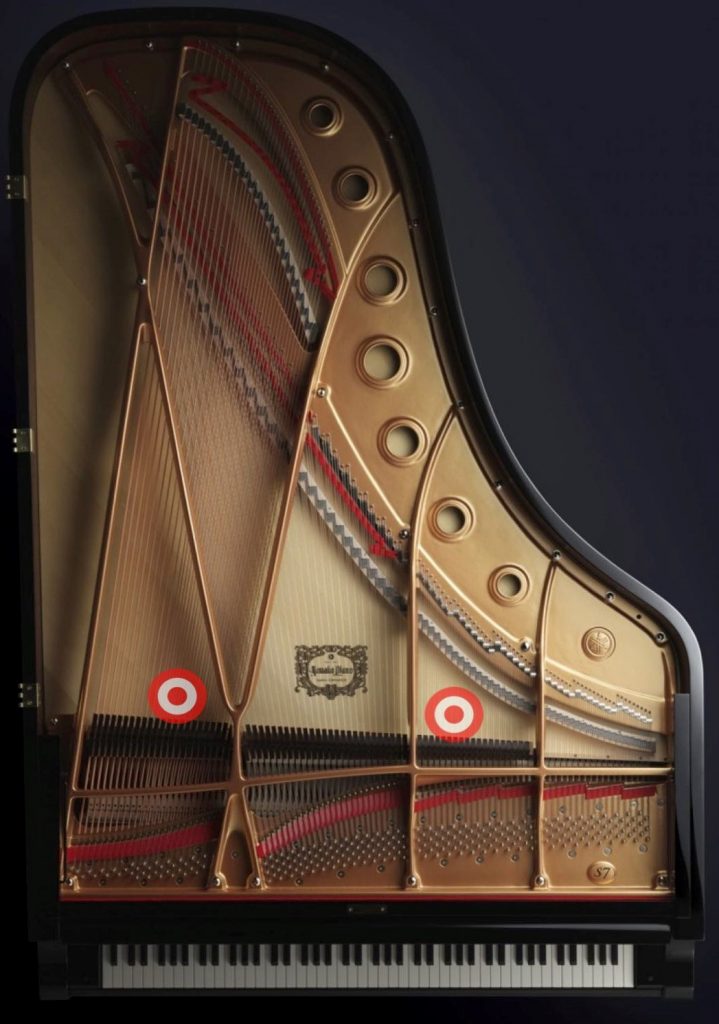
Use boom stands to position the two mics 8 to 12 inches above the strings, near the hammers, and start by spacing them roughly 15 inches apart, as indicated by the “bullseyes” in the illustration on the right. You can experiment with the distance between the mics; however, be sure to follow the 3-to-1 rule. If you want a more focused stereo sound, try a configuration like X-Y or ORTF, with the mics aimed at about the center point of the hammers.
If you’re trying to get more attack in the sound, try lowering the mics a few inches. The closer they are to the hammers, the more direct sound and transient energy they’ll pick up. The higher they are, the more reflected sound coming off the lid and from the room will get picked up, creating more ambience.
Although you’ll probably end up recording your piano in stereo (with the final mix usually made from the player’s perspective — that is, with the lows on the left and highs on the right), you should always check the signal in mono. If you hear significant phase cancellation, try reversing the polarity on one of the mics.
Because of its physical differences from a grand, an upright piano requires a modified approach. Some people like to take off the entire bottom panel under the keyboard and place the mics there, spaced a foot or more apart. You can also get good results by opening the top lid and using boom stands to place the mics inside. Use a similar concept as with the grand piano: one mic for lows and one for highs in a spaced pair. Move the mics lower inside the lid for a more direct sound, or higher up for more room sound.
Horns of Plenty
The two brass instruments you’re most likely to encounter are trumpet and trombone. Both are relatively uncomplicated to record because virtually all of their sound comes out of the bell at the end. They’re also quite loud.
Considering those two factors, a cardioid dynamic mic is a good choice because it has a directional polar pattern and can handle high sound pressure levels without distortion. A large-diaphragm condenser can work well too, although you’ll probably have to engage its built-in pad switch. (A pad cuts the input level by a specified amount, making microphones more suited for loud sources.) You could also use the pad switch on your console or interface, but if the mic is getting overloaded, the sound will be distorted by the time it gets to the preamp in those devices. Alternatively, many engineers like to use ribbon mics on brass, so if you’ve got one (or the budget to rent one), you might want to experiment with it.
If you’re overdubbing a single trumpet, start with the mic pointed directly at the center of the opening in the bell, about 10 inches away. For trombone (which is even louder than trumpet), start at about 14 inches away.
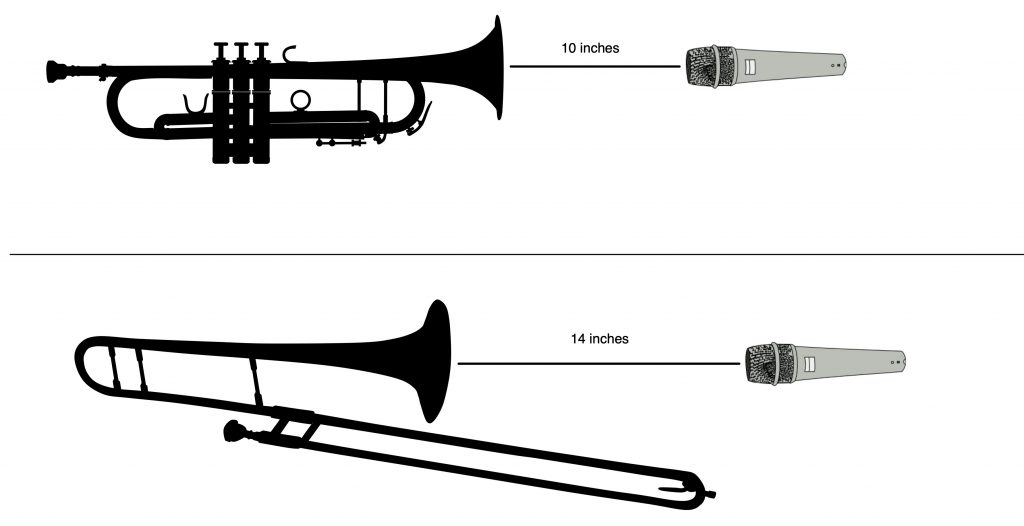
You don’t want to get too close for a couple of reasons. First, you don’t want to pick up a lot of wind noise. Second, you want to capture some of the reflected waves in the room, which loud instruments like trumpet or trombone are sure to create. Ideally, you want to record trumpet in a relatively “live” room; that is, one with a number of hard surfaces.
Experiment with the distance and angle (and mic, if you can) until you get a good, full sound without distortion. Pointing the mic straight into the center of the bell will give you the brightest results. You’ll capture less high-end if you angle the mic to one side or the other (i.e., off-axis).
As with other instruments, your miking strategy will depend on several factors. Particularly with trumpet, pay attention to the frequency range of the part. If the player is hitting many high notes, the trumpet may sound shrill, and so you may need to angle the mic off-axis. You also might opt for a dynamic or ribbon mic in such a situation, because condenser mics tend to capture more high-end and could accentuate the shrillness.
If you’re recording a brass or horn section, you’ll get the best results if you record all the instruments at the same time (as opposed to overdubbing each part individually). After all, a well-arranged horn section should meld the various instruments into what sounds like a single entity. Horn players are also used to playing together, and so you might get a superior performance that way. A single good-quality omni mic can be used to capture the sound of a horn section in mono, or you can try a pair of mics in a stereo configuration such as X-Y or ORTF; individual microphones for each instrument are rarely needed. Either way, have the players stand at least three feet back from the mic (or mics) as a starting point.
Also experiment with the placement of the musicians in order to get the optimum blend. Bear in mind that you won’t have any way to change the individual instrument levels when you’re mixing, so make sure you’re happy with the balance you’re getting. If you’re capturing the sound of the horn section in mono, consider recording two passes of the part, panning one left and the other right during the mix to add width. Even if you’re recording in stereo, doubling will make the section sound bigger.
A Mighty Woodwind
Unlike trumpet and trombone, where the sound comes mainly from the bell, woodwinds such as saxophone and clarinet create sound throughout their bodies. As a result, you don’t want to aim the mic directly at the bell; instead, start by placing the mic about 18 inches away from the instrument and aim it over the bell so that it’s pointed at the approximate center point of the keys.
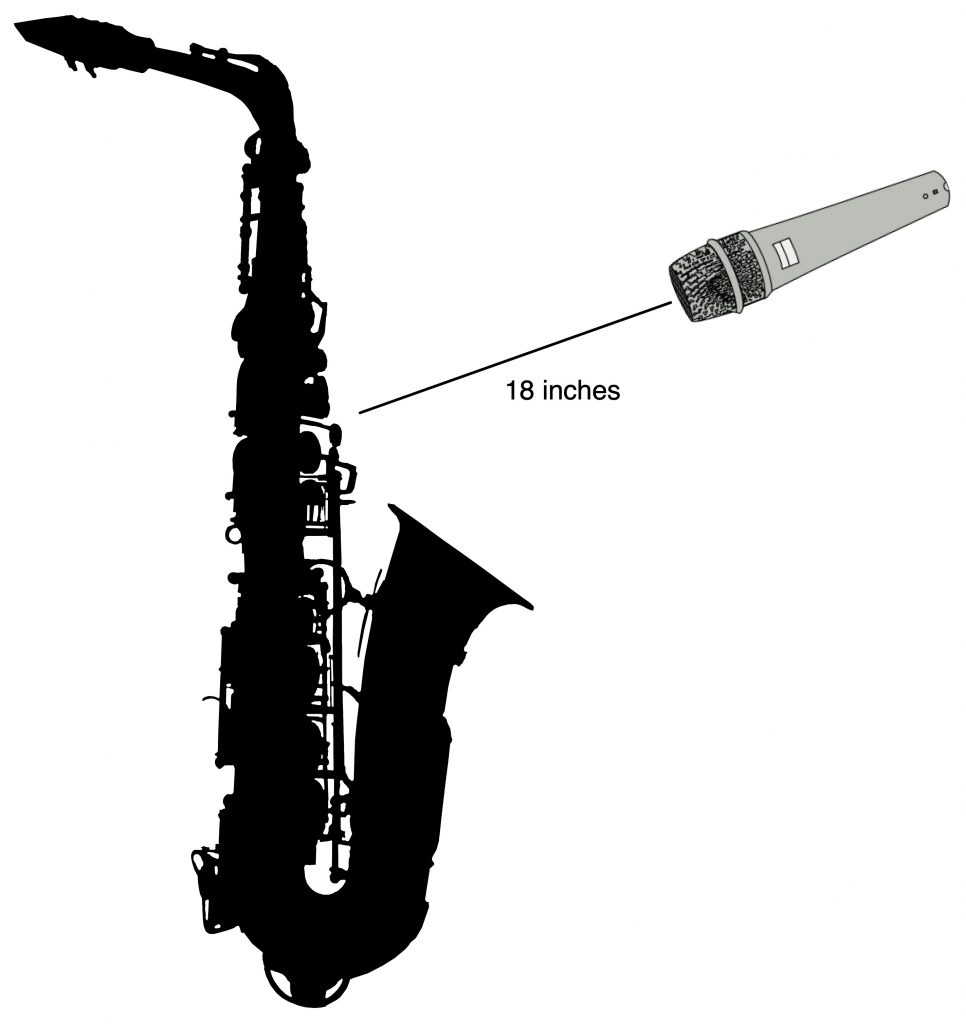
The best mic to use will depend on the instrument, the sound you’re going for, and what you have available. Both condenser and ribbon mics do a good job of capturing the sound of all varieties of sax, as well as clarinet and flute.
Shake It
Hand percussion instruments such as shaker, maracas and tambourine create sounds consisting primarily of upper midrange and high-frequency energy. Because they’re percussive, they also tend to have very loud transients. Those transients are also of such brief duration that many standard VU meters are too slow to display them — a leading cause of distortion, and a good reason to use Peak Program (PPM) meters instead.
There’s a divergence of opinion about which mic type is best for recording hand percussion, but you should do fine with either a small- or large-diaphragm condenser, both of which excel at capturing transients. If the sound you’re getting is too cutting or piercing, you could try a ribbon or dynamic mic instead, since they capture fewer high frequencies. As with other instruments, the closer the player is to the mic, the more present and “in your face” the sound will be; the further away, the more ambient.
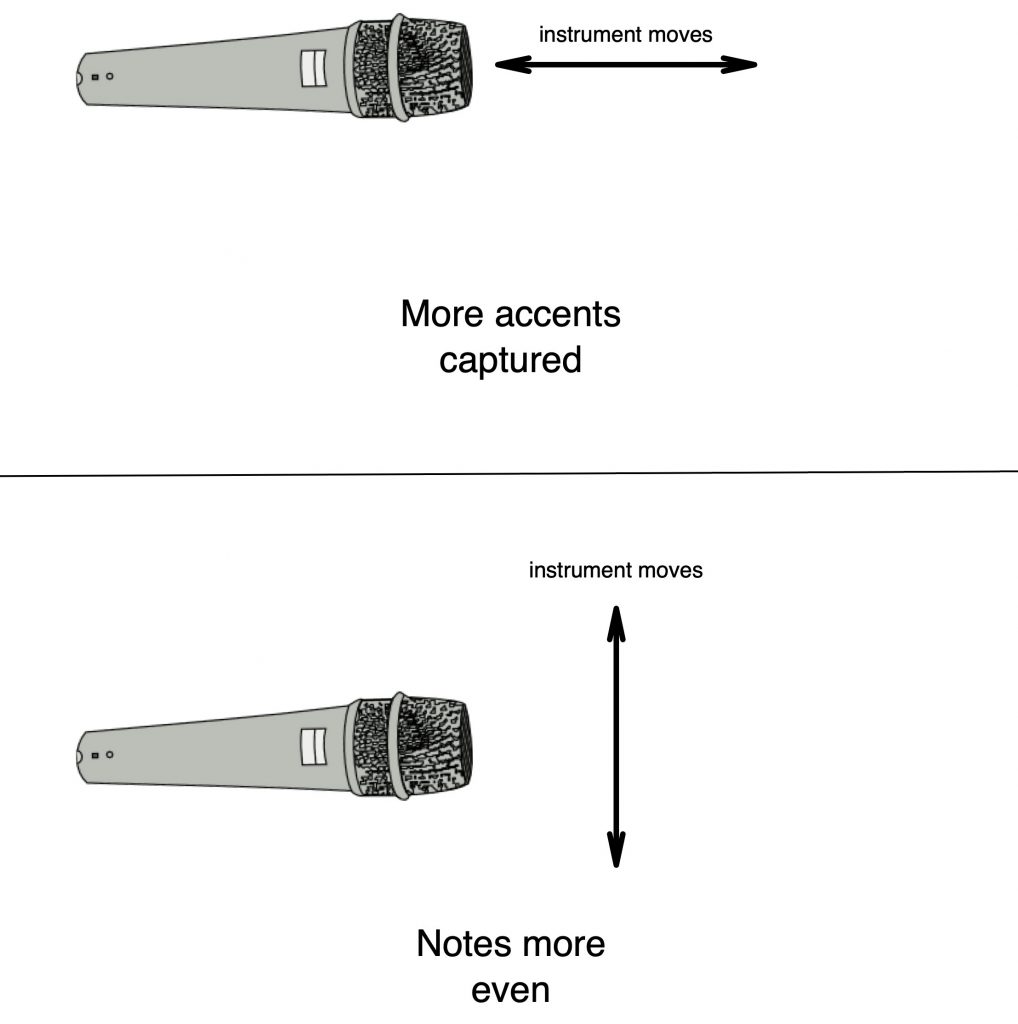
A good starting point is to have the player stand about eight inches from the mic. Because hand percussion instruments have to be physically shaken to create sound, the direction of the movement relative to the mic will impact the results. If the player moves it forward and back from the mic, the forward sounds (typically the accents) will be louder. If you’d prefer to minimize accents to get a more even-sounding part, have the player move the instrument from side to side relative to the mic capsule.
Tambourine is not only capable of jangly sounds but may have a drumhead on it too, in which case it will generate low and midrange frequencies as well as high ones. With or without a drumhead, tambourines have a very wide dynamic range and so can easily overload the input. Therefore, you should make sure to set its level relatively low so that you have some headroom. Otherwise, you could end up with clipping that makes the track unusable.
Most of the time, you can get a good result recording hand percussion in mono. It’s usually better to have the percussion instrument coming from a single point in space rather than being too spread out across the stereo soundstage. In addition, when you’re mixing a shaker, maraca or tambourine in a song with a drum kit, you typically want to pan it away from the hi-hat, or their parts (which are in similar frequency ranges) may mask each other.


