Starting a new job is exciting, but it’s also stressful! You must familiarize yourself with your new school and forge relationships with administrators, staff and fellow faculty members, not to mention your students, parents and the community. Then there’s concerts, competitions, lesson plans, assessments — the list is long.
Our 2022 “40 Under 40” educators offer tips to first-year music educators. Heed their advice as you start your career and remember that as demanding as the work may be, the rewards are limitless, especially when you consider the lifelong impact you will have on a generation of music students.
 David Amos, Director of Bands at Heritage Middle School in Painesville, Ohio, offers these three tips to first-year music educators:
1. Don’t get stuck focusing on the little things. Mistakes happen in performances and in classrooms. Teach students how to recover, regroup and try again. It’s easy to become myopic but when you’re running a music program, remember to look at the big picture.
2. Teach with compassion. Students come from every walk of life to your music classroom. Each student is dealing with something that you may not know about or understand. Let music class be a place of respite.
3. Show your students how you love music. If you demonstrate your passion for music, students will buy in. My college band director, Dr. Stephen Gage, always said to “LOVE MUSIC.” Not all students will play after they graduate or pursue careers in music, and that shouldn’t be the end goal. If you live with that love of music, students will learn it from you and carry it with them for the rest of their lives.
 Dr. Justin Antos, Director of Bands and Orchestras at Dwight D. Eisenhower High School in Blue Island, Illinois, recommends that first-year educators:
1. Worry less about what other music educators have done with their programs. Instead, channel your energy into discovering your niche and realizing how your attributes can foster a love of music-making in your students.
2. Being a content expert is fundamental to your success as a music educator, but it is not as important as being creative in your lessons, empathetic toward your students and inclusive in your teaching.
3. Do not let the rigors of the job consume you. Carve out time to relax, do something you love outside of teaching music, and spend time with friends and family to keep a healthy balance in your life.
 Dr. Cassandra Bechard, Director of Bands and Assistant Professor of Music at the University of Northwestern St. Paul in Minnesota, offers these three tips:
1. Set a time that you stop reading and returning emails. If there is a true emergency, your administrator will call you. Emails will ALWAYS be better composed after you take a break.
2. Realize that you cannot — and in most cases should not — change everything during your first year. Instead, create a working to-do list and slowly chip away at it over the years.
3. We all make mistakes on and off the podium. My greatest advice is to own your mistakes, apologize when necessary and reflect on what/why the mistake happened to gain clarity and hopefully not repeat the same mistake again.
 Stephen Blanco, Director of Mariachi Studies at Las Vegas High School in Nevada, says:
1. Work hard — nothing can replace that. I often get asked by peers, “What’s your secret? How are you doing what you are doing with this new mariachi program?” My answer is always that there is no secret. There’s just hard work. I instill that in my students as the only way to be successful because even winning the lottery can’t replace working hard and succeeding at your goals … Although the beach sounds nice sometimes!
2. Find out what drives you— that’s what will get you through the dark times. A few months ago, I was being interviewed for a new podcast by Mickey Smith Jr., discussing my recent semifinalist status for the 2022 Grammy for Music Education (Smith was a previous winner). We discussed that not every day is going to be a great day, but that by finding the things that can “get you through,” the hard days can be easier to manage. For me, it’s an afternoon coffee, listening to new music or taking a quick walk outside during lunch.
3. Be kind — your kids need you. This is something I often forget. We never know what our students are going through. My expectations of them are so high that sometimes I forget that they have many other things flooding their brains or fueling their emotions. I often have to ground myself and remember that a little bit of compassion goes a long way — yes, even for that kid who forgot their field trip paperwork for the 10th day in a row — because honestly, that kid was me 10 years ago!
 Dr. Robert Bryant, Music Education Coordinator and Assistant Professor of Music at Tennessee State University in Nashville, recommends that first-year educators:
1. Know your purpose. Understanding the “why” behind your motivation to teach music can help you to focus on what is really important, mitigate distractions and inspire others toward greatness.
2. Know your students. Our students must be our top priority. Know your students’ names, their interests, fears, hopes and dreams. This helps to build trust and inspire confidence, which is critical to success as a music teacher.
3. Know your craft. Be actively involved in as many professional associations as possible. Make friends with colleagues and collaborate with them. Seek out opportunities for leadership in your school, profession and community.
If you are intentional and work on these aspects of your job consistently, not only will you be successful and enjoy a satisfying career in music education, you will also change the world for the better in more ways than you could possibly imagine.
 Adam Calus, Executive Director of Education Through Music — Massachusetts in Boston, offers these three tips:
1. There is no magical curriculum out there that will help you be good at teaching music. There are lots of tools for the toolbox and it is up to YOU to find which ones work best for you by studying many and synthesizing your own style based on what you have learned.
2. Pace yourself mentally, physically, spiritually, etc.
3. Everyone makes a lot of mistakes during their first year. Go out there and fail. Fall super hard and learn what it takes to get back up.
 Kristopher Chandler, Director of Bands at Gautier High School in Mississippi, says:
1. Surround yourself with successful people. Study their practices and enjoy being a life-long learner!
2. Never be afraid to ask questions about ALL aspects of your career — not just pedagogy. Ask about organization, choosing literature, even maintaining a healthy work/personal life balance.
3. Find your person — or a small group of people — who you consider your biggest mentors/band family. These people need to be successful in their own careers, but also genuine friends who can help you no matter the situation. Every day will not be “sunshine and rainbows,” and you will need this support system to help you keep your passion for teaching!
 Danielle Collins, Director of Music, Media, Entertainment Technology Department at the Academy for the Performing Arts at Huntington Beach High School in California, recommends that first-year educators:
1. Breathe! You will make mistakes — learn and grow from them. Things are hectic around change. Breathe through it and take things in small bites.
2. Balance. Make sure you create time and space to get outside and spend time doing other things you love. Spend time with friends or family, even if it’s virtually. Balance is very important for our well-being, and our students will model it back to us!
3. If a door opens, take it, even if it isn’t the door for which you waited. Sometimes life nudges you in a different direction for which you planned — the door you’ve been waiting on may never open, so when a door opens, take it!
 Dr. Nathan Dame, Director of Choral Activities and Fine Arts Department Chair at Wylie East High School in Texas, says:
1. Seek out a mentor who you trust, aspire to be like and with whom you can be open without fear of judgment.
2. A growth mindset is everything. Go to conferences and conventions, network with others, arrange and advocate for professional development days where you can observe exemplary music educators.
3. Instill the important values in your students that will inspire them for whatever future that will meet them. Remember that we teach kids music (in that order).
 Brandon Felder, Fine Arts Music Director at SHABACH! K-8 Christian Academy in Landover, Maryland, and Music Director at Georgetown University Gospel Choir in Washington, D.C., offers these tips:
1. Take your time: Know that music education is a marathon and not a sprint. You will not see results immediately but just stay consistent and stay the course!
2. Assess your strengths and weaknesses quarterly: Assess your needs, take stock of your resources to utilize your assets to address your needs as a teacher.
3. Be the solution: There are challenges in learning the culture of a school. My toughest class in my first year of teaching was a 5th-grade class, but I learned to teach them. I taught that class consistently every day like I was being observed by the principal and the state department. Within a few months, it became my favorite class and the students didn’t want to leave my classroom! Be the solution!
 Bryson Finney, Artistic Director of We are Nashville Festival and Learning Technology Specialist at metro Nashville Public Schools in Tennessee, recommends that first-year educators:
1.Be your authentic self — this may take some time to find, but don’t ever try to be someone else in your classroom because your students will always be able to detect a “phony.” Be YOU, it’s the most effective way to teach!
2. If you’re not enjoying your lesson, neither are your students — remember your students will always “play” off of you. If you seem uninterested or you don’t enjoy your lesson, how can you expect your learners to stay interested and learn anything? Be creative and teach in a way that you enjoy! I promise it will communicate much more effectively.
3. Dream big! Don’t settle for where you are. If you have aspirations and goals, hold on to them and keep working at them. Even when today looks so far from where you may want to be, take a step/do something, even if it’s a little something each day and keep your dream in front of you!
 Alain Goindoo, Director of Bands at Jeaga Middle School and Executive Director of Hope Symphony in West Palm Beach, Florida, says:
I’ll give you 5 tips.
1. Identify the areas you place your personal value. If your value is based on how well the students perform, you are not loving yourself enough.
2. Find out your students’ favorite foods. Conversation centered around FOOD is a doorway to learn more about your students, such as their likes and their cultures.
3. Make it fun. Students who are having fun will progress further and recruit their friends to join, and as a side benefit, tell their parents how much fun they are having, which encourages parental participation.
4. Build relationships with current and retired band directors. No one is an island.
5. Make it about the students. Music proficiency is important, but investing in your students’ passion for music, their cultures and their personal growth will yield dividends. When you invest in children, you never lose.
 Jayme Hayes, Director of Bands at Mayberry Cultural and Fine Arts Magnet Middle School in Wichita, Kansas, offers these tips:
1. Love yourself first and keep your family at your center. When you love yourself and can keep those most important to you as your priority, you will have more to give to your students because you will be grounded and happier. Fill your bucket with joy first, then you can share it with others.
2. Be true to your own way of teaching, don’t try to be someone else. Learning from veteran teachers is vital but finding ways to tailor that knowledge and advice to fit your classroom is when it is the most beneficial.
3. Be honest, transparent, consistent and forgiving. If you make a mistake, admit it and move on. If students make a mistake, address it and then move on. Mistakes are part of the learning process. Just as you are learning and will make mistakes, so are they. You wouldn’t want your principal to dwell on a mistake you made, so don’t dwell on theirs.
 Dr. Jonathan Helmick, Director of Bands and Associate Professor of Music at Slippery Rock University in Pennsylvania, says:
1. “Hug the cactus, embrace the vulnerability.” You will make mistakes. Making mistakes in front of students is an excellent opportunity to teach students how to make mistakes and grow gracefully.
2. Put your first year in perspective: Treat yourself with the respect and understanding that you give to your students. This means taking care of your own needs. It also means monitoring your own self-talk, goals and expectations. So, be realistic and kind. Offer grace to yourself and celebrate the small things. This is a marathon, not a sprint.
3. Become part of an “us.” Develop relationships, grow community and make friends fast. This is true for your classroom, your colleagues and the community outside of your school. The first year is very much about listening to others. Furthermore, being a part of an “us” will make that first year more fulfilling and help you to find balance.
 Anastasia Homes, Director of Bands at San Elijo Middle School in San Marcos, California, recommends that first-year educators:
1. Set small achievable goals during your first couple years of teaching. You will fail more than succeed, but it gets better.
2. Be organized with not just your lesson plans but all aspects of your program. This could be boosters if you have them, scheduling concerts/performances or the setup of your room and storage areas. When you are not organized, kids misbehave because they like structure and knowing the plan.
3. Laugh with your students and get to know them. I hate that old saying “don’t smile until Christmas.” Your students need to trust you before you can get them to respect you, and it starts with creating that bond. I joke with my students all the time, but they also know when it is time to work. Find a balance that works for you.
 Amir Jones, Director of Bands at Thomas W. Harvey High School in Painesville, Ohio, offers these tips:
1. Regardless of where you are, you are not constrained.
2. Do not be intimidated by larger programs
3. Place emphasis on the environment you create. Your students are capable of so much when they are in a good environment.
 Damon Knepper, Director of Bands and Orchestras at Ironwood Ridge High School in Oro Valley, Arizona, says:
1. Don’t be afraid to ask questions.
2. Expect the unexpected. You will not have classes that teach you about many of the daily occurrences you will have in a classroom. These new experiences will change you as a teacher, and THAT IS OKAY!
3. Remember why you got into this profession. That initial dream will keep you going during hard times.
 Katie O’Hara LaBrie, composer, conductor and clinician from Fairfax, Virginia, offers these tips:
1. The best thing you can do is make memories for the students. It doesn’t always have to be a musical memory — it could be having a bonding day, a pizza party or a concert that they organize from start to finish.
2. Teach students tools and then let them lead the way. If you teach them how to practice and how to rehearse you can create amazing rehearsals and amazing student leaders.
3. Rotate your seating. You never know what you can learn from that kid in the back row.
 Wes Lowe, Director of Instrumental Arts at The King’s Academy in West Palm Beach, Florida, recommends that first-year educators:
1. Be authentic: Students don’t care how much you know until they know how much you care. Be genuine and honest even when you don’t know all the answers. It’s okay not to know everything as long as you continuously strive for excellence.
2. Be team-oriented: Surround yourself with a great team of people to support you, your program and your vision. Be proactive in inviting guest artists and clinicians to work with your students. Watch other professionals teach and instruct — thisis one of the best ways to improve your own craft.
3. Be creative: Look for new and innovative performance opportunities and experiences. Stay modern with your approach. Find the best experiences that will benefit your students’ growth as musicians and people. Here’s a quote by Ellen Johnson Sirleaf, the former president of Liberia (and Africa’s first female head of state), that I strive to live by: “If your dreams do not scare you, then they are not big enough.”
 Tracy Meldrum, Director of Bands and Fine Arts Department Chair at Verrado High School in Buckeye, Arizona, says:
First, find your own voice. Don’t try to be someone else. It’s AMAZING to have a mentor, but you are you. Use your own voice to teach, not your mentor’s. It is far more authentic and students will respond far better to it.
Second, have that mentor or someone you can trust to bounce ideas off. This is far more helpful than you realize. Not only for your teaching, but your mental health.
Third, have fun! If you love your job, and you love your music, and you are having fun, your kids will too!
 Tammy Miller, Artist Faculty of Piano, Omaha Conservatory of Music in Nebraska, offers these tips:
1. Love your students as much as you love the music you are teaching them.
2. Continue to learn new things! This can help you relate to your students and is important for your own growth as a musician and educator.
3. Be creative and think out of the box! There is more than one way to teach a concept and some of the most memorable and impactful teaching moments come from a creative approach!
 Gabrielle Molina, Executive Director of Project Music in Stamford, Connecticut, recommends that first-year educators:
1. Be ready for a lot of work! Aside from being in the classroom, which is exciting but also very tiring, there are a lot of other responsibilities that come along with the job, even more so now with COVID.
2. Be able to advocate for what you do. Part of being a music educator is being able to speak to the importance of music, the impact it has and why it’s a VITAL part of a well-rounded education.
3. Be able to shape shift and code switch. You will have to be a teacher, coach, advocate, administrator and so much more in your role as “music educator.”
 Dr. Justin John Moniz, Associate Director of Vocal Performance and Coordinator of Vocal Pedagogy at New York University — The Steinhardt School of Culture, Educator and Human Development in New York, says:
1. When you find yourself in a moment of uncertainty (there will be many!), pick up the phone. Reconnect with those teachers and mentors who have enabled you to follow your own path and pursue your passions.
2. Prioritize your own mental and physical health. For me, it means an early morning workout to clear my mind before jumping into course content, lecture material or grading. My ability to be an effective communicator is reliant upon my capacity to maintain balance and clarity for myself.
3. Be flexible. No matter how well you plan, good teaching is often dependent upon one’s ability to reroute, sometimes mid-flight.
 Bryant Montalvo, music teacher and Choir Director at Central Falls High School in Rhode Island, offers these tips:
1. Connect with your students in ways that exist outside of the curriculum. When you take a step back from drilling the foundations of music literacy and sight singing and musicianship, you will see your students as individuals which will strengthen your teaching and the students’ learning.
2. Establish your own support system and connect with different teachers across multiple disciplines. Many times, music is “othered” in schools and put in a side category instead of being included with the “core” subjects. Sometimes you may be the entire music department. Whatever the case may be, it is necessary for music teachers to feel supported if you want the program to succeed. Sometimes, administrators do not know how to support music teachers. Therefore, it is essential that new music teachers guide not only their administrators, but other faculty and staff members on how best they can support them and their music program (especially if music is new to the school). It is also helpful to establish connections with other teachers in other disciplines within your building. You will come to find many cross-curricular connections which will help other faculty to see and understand the importance of music education.
3. Try everything! Find what works best for you AND your students. Just because you read it out of a methods book or learned it as part of your music education teacher training program does not necessarily mean it’s the best fit for you and your students. There is no one-size-fits all approach to teaching music. Even the most well-known and popular methods within music education will show their limitations in your classroom. Take a bit from everything until you find the way that not only allows you to be your most authentic self but also the way that is most accessible to your students.
 Cody Newman, Director of Bands at Forney High School in Texas, recommends that first-year educators:
1. You MUST, repeat MUST, get a trusted mentor to work with you. There are so many great organizations that provide mentorship, many for free, so use those resources! MANDATORY!
2. You WILL, repeat WILL, make mistakes in your teaching. We don’t ask our students to be mistake free — why should you ask that of yourself? Recover from errors, modify and adjust, just as if you were performing on your instrument.
3. You NEED, repeat NEED, to keep your eyes focused on the real reasons we do this job instead of being seduced into the chasing of trophies and medals. Those are all great, but they are hollow inside. Find your true reason for going to work each day and remind yourself of it often!
 Terry Nguyen, lecturer at the University of California, Riverside, offers these tips:
1. You can learn a lot from your students! In such a diverse music program at University of California, Riverside, I have met students who are talented composers and audio engineers. My students have helped me with audio set-ups for recording music as well as navigating hybrid, online teaching.
2. Talk to your colleagues. Ask questions. It’s always good to stay on top of professional development opportunities — for example, requesting funding to continue to grow your own skills as a musician and educator.
3. Keep more seasoned students engaged by giving them opportunities to teach new students. Giving students a sense of investment and ownership in the program really elevates the experience for all involved.
 Tanner Otto, Orchestra Director at Sycamore Community Schools in Cincinnati, Ohio, says:
1. Set your classroom routine and expectations from day one, it will save you a lot of time later on. Your students should know exactly what they need to do when they come in the room. Continue to look for ways to make the start of class as efficient as possible.
2. Really get to know your students — relationships are everything. Make a point to have at least one meaningful conversation with a student each day. I find that there is usually time while students are coming into the room and getting settled.
3. Strive to be the best teacher you can be by finding areas for growth, while also giving yourself lots of grace. Your colleagues and mentors are there to answer questions and to help you improve. Having at least one person to bounce ideas off of may ensure that they are well thought out and ready for your program and your students. Having a “go-to” list of colleagues and mentors will help you throughout your career.
 Kenneth Perkins, music teacher at Joseph Keels Elementary School in Columbia, South Carolina, recommends that first-year educators:
1. Always be open to try new things.
2. Remember that iron sharpens iron so surround yourself with teachers who are amazing role models, and find success in simple things.
3. Don’t be afraid to ask for help or say plainly, “I don’t know how to do this thing.” That is perfectly fine — in fact, it shows that you are always willing to learn. Your students and colleagues will respect your honesty.
 Joel Pohland, Band Director (8-12) and Assistant Band Director (5-7) at Pierz Healy High School in Minnesota, says:
1. Build relationships: Take time to get to know your students beyond their instruments and the music classroom. Ask what they like to do and try to connect, even if it means trying something new as a teacher/person. Students love when you are invested in them as people and go out of your way to make connections beyond music, especially when you remember their activities or interests out of the blue.
2. Have fun with your students: This goes with Tip No. 1 above — building relationships. Joke with students and make them know you are human. Read the manga comics they talk about, play Spikeball with them, shoot hoops as you pass by, play video games with them before events when the entire band is hanging out in the music room. Students want to see us as human beings and the more we can be on their level, the more they will get on our level when we want to work hard and make music together.
3. Go home (work will always be there tomorrow): This took me the longest time to learn, and I am still not great at it. The lesson plans, the trip planning, the schedules, the information for events, it all must be done, but it must be done at work and not at home. When you go home, disconnect. Do the things you enjoy, and you will find that you are way more refreshed and ready to take on the tasks to be done the next day. You, your family and your students will all benefit.
 Alec Powell, Director of Choirs at Mountain Ridge Junior High in American Fork, Utah, offers these tips:
1. Make sure your artistic bucket is filled with things that make you happy. It is easy to get lost in the devotion to your program. I find I have the most fulfilling teacher moments when I pursue artistic endeavors outside of the classroom.
2. Know the value of your time. My students know that I will never answer an email outside of school hours unless it is a true emergency. I don’t take work home with me, and that means redefining what are the most essential elements of my curriculum. Don’t let teaching become your personality trait. That is just one facet of your life — you are so much more than that.
3. Failure is the mark of someone who is trying. Whether that is lessons, concerts, festivals, etc. This not only applies to you, but your students and program as well. Give yourself grace when things don’t go exactly the way you envisioned. Allow yourself to laugh off a bad lesson, remember the growth that happened in the weeks leading up to a poor rating. This mindset has greatly enhanced my experience as a teacher and made for a fulfilling career.
 Benjamin Rogers, Director of Choirs at Liberty Middle School in Spanaway, Washington, recommends that first-year educators:
1. Make self-care a part of your weekly schedule. Our nation’s mental health crisis has affected teachers, and I see many leaving the profession every day. Just like our students, we need to consider our own needs in Maslow’s Hierarchy because we cannot enrich others if we don’t take care of ourselves.
2. Teach the students first. Take time to get to know them. Build community first. Great literature is great literature, but first and foremost, you are teaching people. My students do a community circle every week and activities like these help foster a collaborative spirit while supporting each other in the classroom.
3. This may be more of a tip for a future educator: If you get a chance, work a job in customer service. Nothing prepares you for talking with parents more than working on the front lines of customer service.
 Amanda Schoolland, Music Director and computer coding instructor at Metlakatla High School in Alaska, says:
1. Relationships are everything! Make positive connections with students, families and colleagues. Be genuine and always assume the best intentions. Everything else will fall into place.
2. Have a sense of humor! Laugh with your students as much as possible. Tell anecdotes, listen to their stories, have class jokes. Not only will your students be more comfortable, but you will enjoy your role so much more.
3. Be flexible. Students, staff, admin and parents will constantly throw curveballs. Try not to stress about it. Go with the flow and adjust, that way when you ask colleagues/students/staff to adjust for a concert or extra rehearsal, you have a bank account of positive interactions to draw on.
 Jennifer Stadler, independent piano teacher at Jennifer Stadler’s Piano Studio in Oklahoma City, Oklahoma, offers these tips:
1. Learning doesn’t end when you finish school. Continue to hone your craft as a teacher and musician. Find an experienced teacher to keep you accountable. And, apply for grants to help cover the cost. In my first year of teaching, I received a grant from my local chapter of MTNA toward a mentorship with Dr. Rebecca Johnson, who helped me write lesson plans, troubleshoot issues and hone my studio policies. She provided constructive criticism of my teaching and connected me with seasoned teachers to observe. Our work together was invaluable in establishing a successful studio. I also continued private piano lessons with my undergraduate teacher Dr. Christopher Durrenberger. The pace of our work was slower than in an academic setting, but it helped me maintain my skills and, more importantly, stay connected to the experience of being a student.
2. Carve out uncompromisable time for yourself each week outside of work. Spend time with family and friends, pursue recreational activities and try new things. It may seem counterintuitive to take a break when you have a massive to-do list, but it’s important to rest so that you can be more productive when you are working. And, although it may be tempting to center your life around music, spending time outside of your field will broaden your knowledge and increase your creativity as a teacher. Some of my best lessons in the classroom were learned outside of it. For example, comedy improvisation taught me how to get out of my head and into the moment, which translated into exercises to help my students struggling with performance anxiety. And, my current hobby, rock climbing, has increased my bodily awareness and problem solving, which has helped me troubleshoot technical challenges with my students.
3. Document your successes in a way that’s meaningful to you. For example, create a folder for student thank-you notes, composition projects, awards, etc. Or, keep a journal of positive experiences or simply make a photo album of memorable moments. Make sure that these items are easily accessible and refer back to them often, especially on difficult days to counteract your brain’s negativity bias. I implanted this practice three years ago and I wish I had started sooner because it has had a tremendous impact on my confidence as a teacher.
 Mark Stanford, Director of Bands and music teacher at Springfield High School in Pennsylvania, says:
1. Avoid making major program changes in your first year. You are an outsider stepping into the community. Change will be most impactful when you are able to create it as a member of the organization and culture.
2. Seek advice from your colleagues. Experienced music educators are not just a resource for pedagogical practices, they can help you better understand your community and how your decisions will be received.
3. Build positive relationships with students, colleagues, administrators, community members. While our job is to teach music, we must remember that we teach music to and with people.
 Brandon Tambellini, Band Director at Blackhawk High School in Beaver Falls, Pennsylvania, offers these tips:
1. Inspire your students to love music instead of instructing them to. Students who are inspired to create music are stronger musicians.
2. Know three facts or interests about each student you teach. The more you are able to connect and relate with your students, the easier it is to educate them.
3. As a music educator, you have an obligation to possess and demonstrate strong musicianship to your students. Perform the musical details you are rehearsing instead of verbally explaining them.
 Heather Taylor, instrumental music teacher at Lakeshore Elementary School in Rochester, New York, says:
1. Don’t be afraid to ask for help! There are so many people willing to offer their guidance and expertise!
2. Observe other music teachers! I found my own style of teaching by watching what worked and didn’t work for others.
3. Build relationships with students! I have worked in seven different buildings in my district, and I always start by building relationships with my students first. When you win over your students the rest will follow (staff, parents, etc.).
 Katie VanDoren, Associate Director of Bands at Vandegrift High School in Austin, Texas, recommends that first-year educators:
1. Plan: Always have a plan for how you are going to teach something, your timeline and your goals. When we look at contest prep, a concert cycle or a full year of band, it is very easy to become overwhelmed or lost in where to begin. I always start with my long-term goals by writing them down and then build my short-term goals off of them. This helps me break a large goal into smaller, more manageable chunks to achieve benchmarks. Spreadsheets can help organize this and show you where you are, where you want to be and how long you have to get there.
2. Ask Questions: We never want to feel uneducated or “less than,” but the only way to grow is to put yourself out there and ask. No matter how many years you’ve been in the classroom, there is always something new to learn. This is especially true for young teachers, and the more questions you ask, the more you will learn. Ask questions about anything and everything (timeline, lesson planning, sequencing, pedagogy, classroom management, team teaching, etc.). As uncomfortable as it is and as difficult as it may seem to find someone to help with all these things, there are people who would love to help you and answer these questions — all you have to do is ask!
3. Get Help: Find mentors and get their help! Not everyone has a built-in mentor within their program. However, everyone came from somewhere and is a teacher because someone inspired them to do so. Start there! Use your previous teachers as mentors, to ask questions of and to listen to your groups. If there are other teachers in the fine arts department, ask them for help with classroom management and lesson planning. There are also incredible online resources these days with veteran teachers who would love to help you with sequencing, pedagogy, music selection, etc.
 Chris Vitale, Director of Bands at Westfield High School in New Jersey, says:
1. Never put the product over the process. The process drives the student experience, and nothing is more important than the experience you provide your students.
2. Invite mentors into your rehearsals. Feel comfortable admitting that you have a lot to learn and be open to getting help from anyone who will offer it.
3. It’s OK to admit when you are wrong, especially to your students.
 Armond Walter, Director of Instrumental Music at Meadville Area Middle School and Meadville Area Senior High School in Pennsylvania, offers these tips:
1. Communicate. Don’t be afraid to ask for help. Mistakes are going to happen.
2. Student success must be a priority. Measuring success will be different for each individual student. Make sure your students feel and see their success.
3. Be yourself and have fun! Let your students and colleagues get to know who you are. Be involved with your school and public community.
 Alex Wilga, Director of Bands at Davenport Central High School in Iowa, recommends that first-year educators:
1.Ask for help. There are a lot of things that you don’t know. Ask those around you for answers to the things you don’t know. Don’t worry, as soon as you learn what you don’t know there will be a lot more that you don’t know. I don’t know if that ever ends.
2. Make sure you are creating a program that you would want to be in and not one that you think others expect you to have. Your students will have a lot more fun if you are having fun.
3. Don’t try to compete with others, just be you. You know what is best for your program and your community, and if you ever get stuck, refer to tip 1.
Read tips for first-year music teachers from the 2026 “40 Under 40,” 2025 “40 Under 40,” 2024 “40 Under 40,” 2023 “40 Under 40” and 2021 “40 Under 40” educators for more invaluable advice.


")


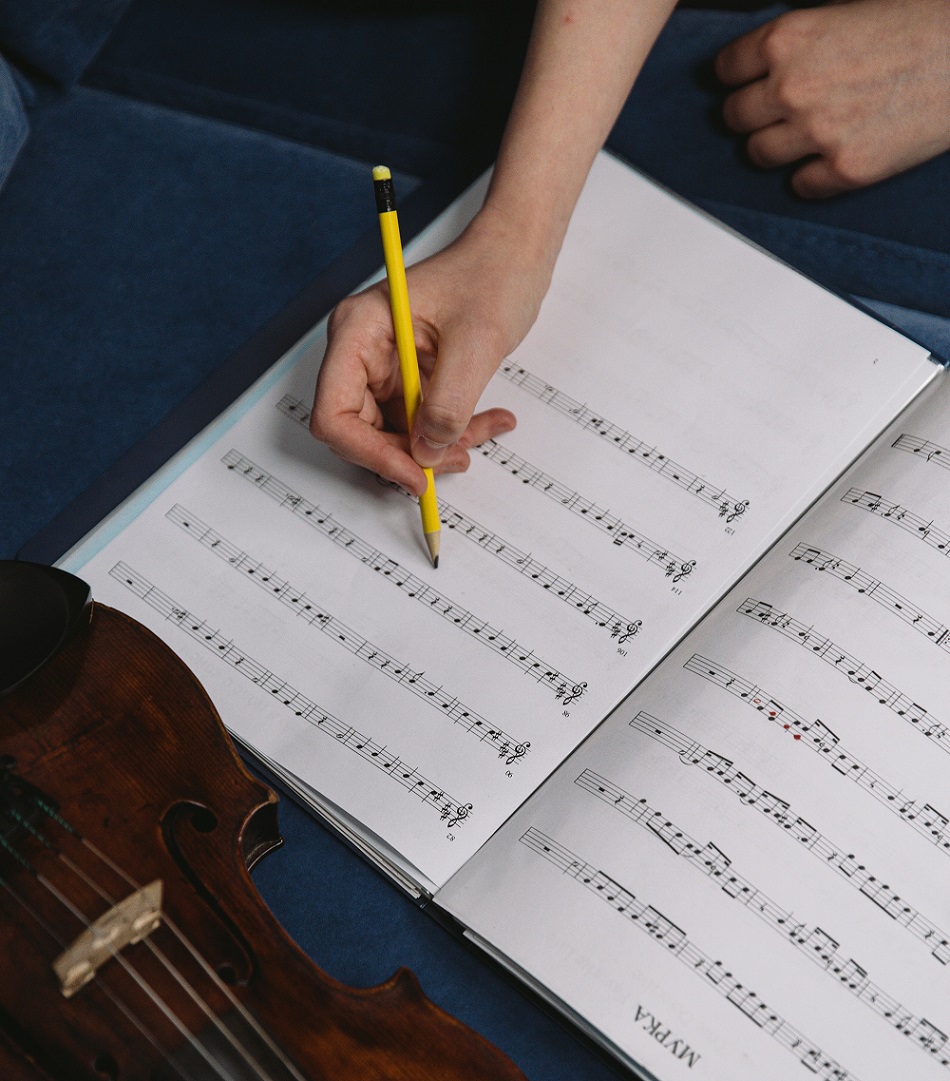
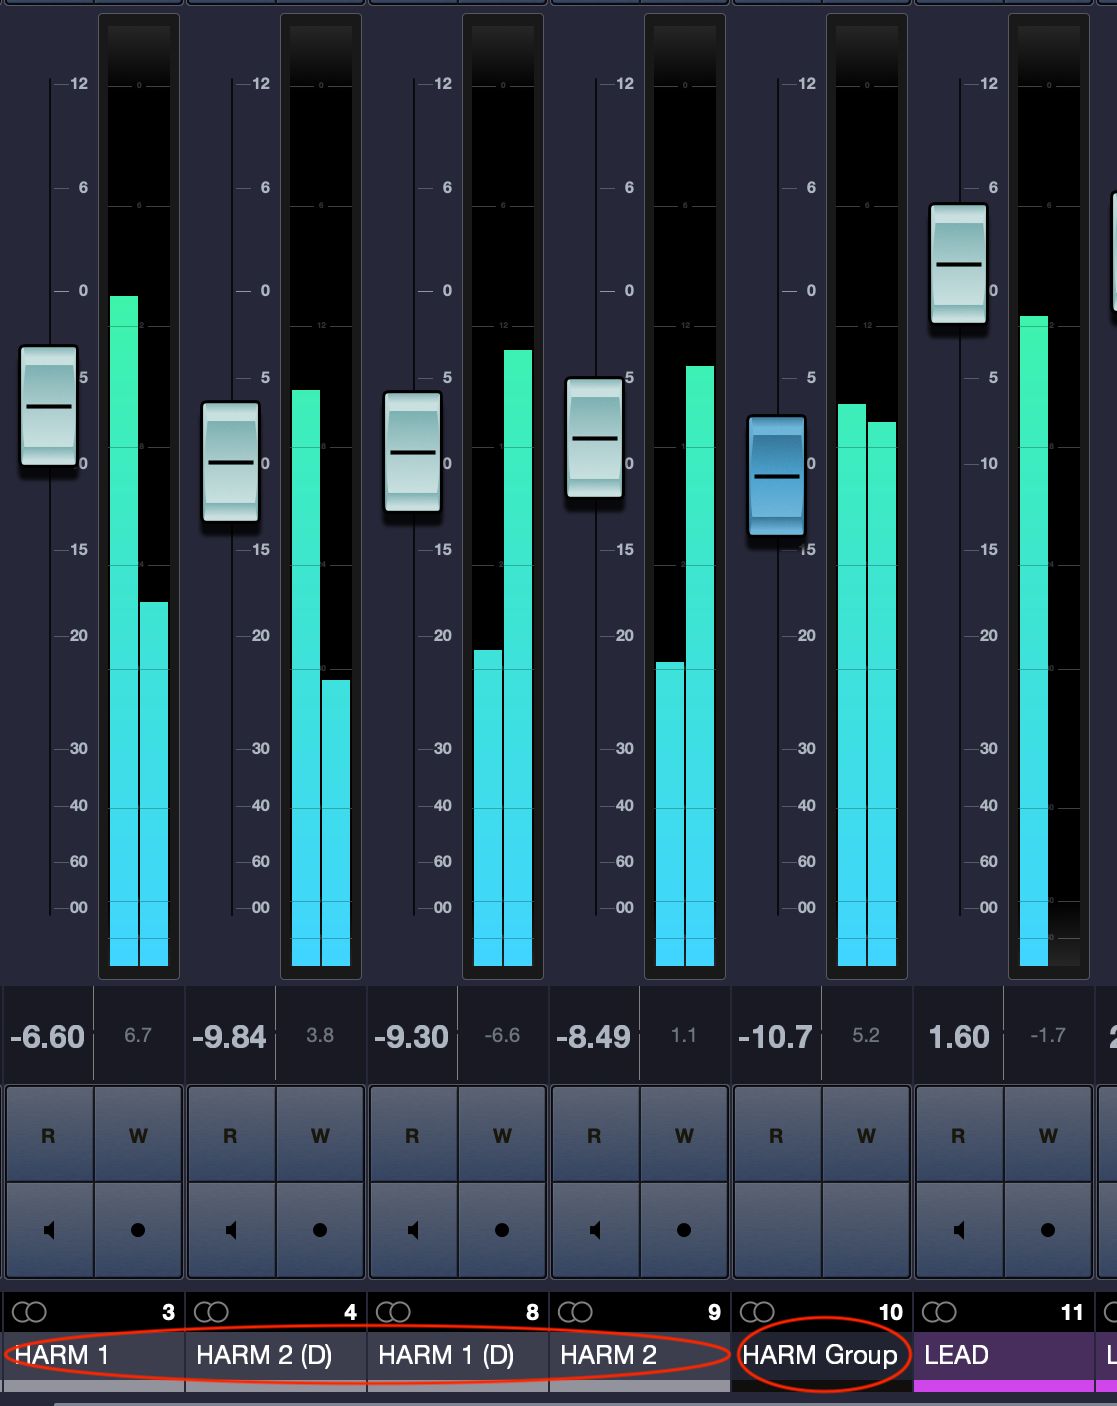
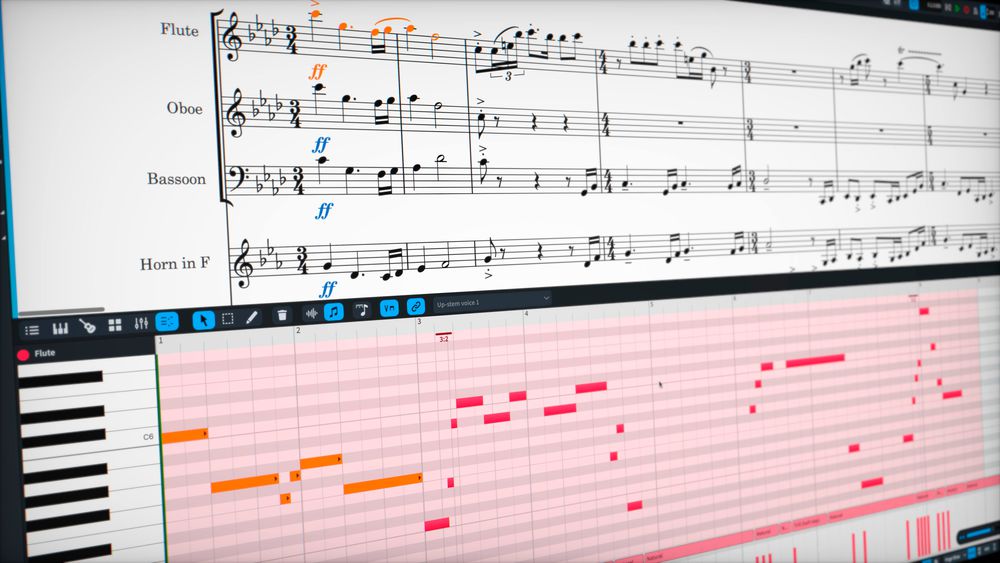
 Sometimes we can get in a rut of making sure all pitches and rhythms are correct before adding the expressive layers of dynamics, articulation and other interpretative devices. However, if we wait until the final stages of learning, it can be too late. By this time, our students’ habits for a particular piece are already ingrained in their minds and muscle memory, and they may not be able to make the changes consistently and successfully to their playing.
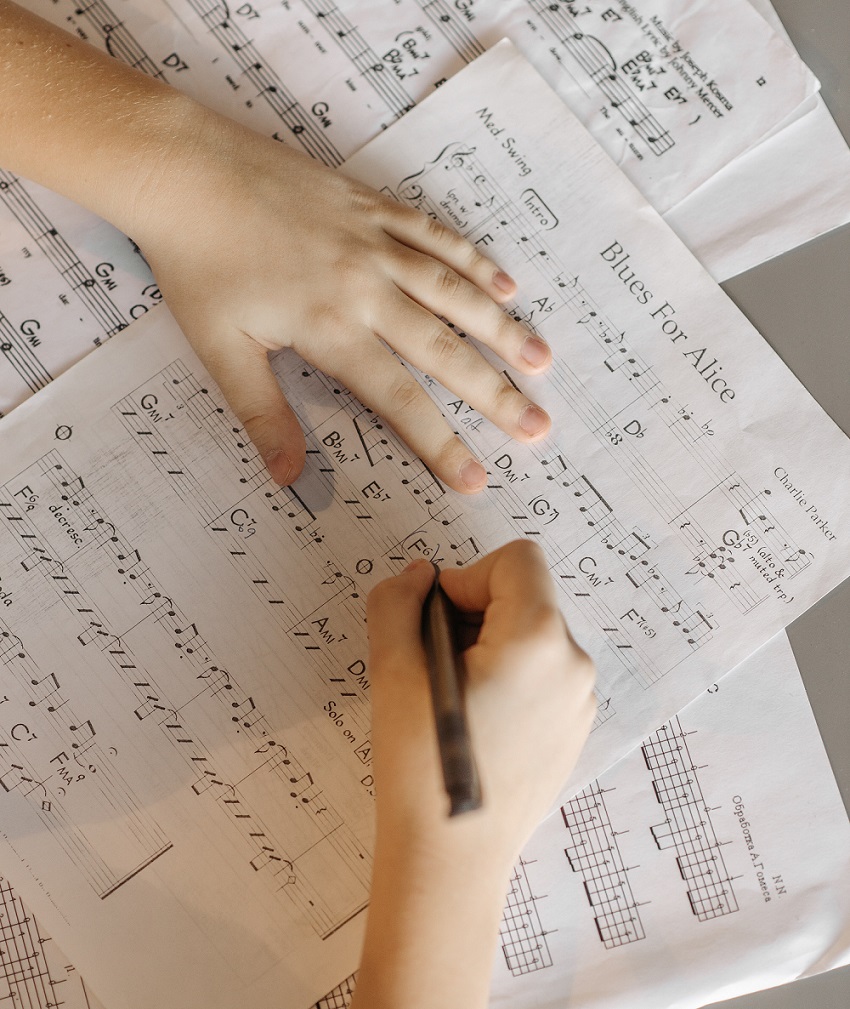 Prior to asking students to “drill” a passage a certain number of times, make sure they can play it accurately and independently. A helpful way to make sure this happens is by assisting them with mental study. Create a copy of their score and then have them use colored pencils, markers or digital ink to annotate the music and highlight certain score details that they may easily forget. By having the students write in the scores themselves, they are more likely to remember those specific musical markings. By using different colors, there is a higher chance they will accurately visualize the score without having the physical book in front of them.


 When we opened
  Reagan also had a logistical team called SCORE, which stood for Student Care of Resources and Equipment. This team included 10 to 15 students who were dedicated to keeping the band hall clean, setting up for rehearsals and managing events. Line leaders and section leaders were often members of SCORE as well. The Reagan students were so motivated to serve the program, and because they had a voice in the process, they took ownership of all tasks, big and small.
 Students in appointed positions apply each spring and submit a resume, portfolio and teacher references, and they go through an interview process and teaching audition. Drum major candidates also complete a conducting audition. Appointed positions are selected by a committee that includes band directors from the high school and middle school, private lesson teachers, former student leaders and several guest panel members, including marching techs or visitors from another district school.
 Execution and Pacing — In our teaching workshops, student leaders break into groups of 10 to 12 to practice teaching with one another. Each student will inform the others in the group what he or she plans to do, take them through the lesson and then receive feedback from a director or coach on improving the lesson. Student leaders learn pacing, time management and how their peers respond to feedback. This is where directors work with student leaders to develop patience, kindness, compassion and confidence. Topics we focus on during this process:


 Broken/Old Drumsticks: I’ve used these for everything from removing stuck slides to rolling out small dents on a brass instrument. Sand down any rough edges before using.
 Eyeglass Screwdrivers: A set of small screwdrivers are always helpful in a pinch. I also have some longer screwdrivers on hand, which can help to loosen some stuck screws. Warning: Don’t force screws too much because a stripped head is a more significant repair.
 Would you consider donating to our program if you have any of the items below in your garage, basement or workroom?
 Explore Other Options
 Why then, do so many people equate music reading with note naming?
 When students are focused on note-naming, they would look at the notes to the right and say, “C, E, G.” That is three bits of information that really serve no musical purpose. When we emphasize intervallic reading, the student recognizes that these three notes, built up in skips, create a C major chord — one bit of information. The student can audiate that chord, the hand automatically knows what shape to create to play the chord and the knowledge is easily transferable to other keys.

 At the beginning of my career, I contacted a few well-known directors and asked if I could observe an evening rehearsal. The response was almost always a “yes” or a “yes, but would another time of year work?” Bring a notebook, jot down some thoughts and just take it all in. The next day, try something new in your classroom that you observed the night before. It might work or it might not — but it’s another tool in your bag.
 Figure Out What You Need First
 My general rule for a new technique or approach is to try it for 30 days. Sometimes, I record our first day trying out the new suggestion out, and then compare it to how the band sounds 30 days later. If I followed the technique correctly, and the group sounds better, we kept it.
 My mentors are great overall, but some excel in specific areas. When I have a marching band question, I contact a particular person. When I have a question concerning a situation specific to my school, I reach out to a friend who also works in a low-income/underserved school. I have another friend who doesn’t even work in music but who has been incredibly helpful with financial advice.


 The first thing you must do as a new director is to learn about the community, students, stakeholders and the general dynamics of the school. That’s what I did when I accepted the job at
  Perform Often — No matter the age of your students, they should be performing. The typical model of fall, holiday, performance assessment and spring concerts truly doesn’t meet students’ ability to perform. It also leads to performance anxiety. To eliminate this, I try to schedule at least one performance each month after students’ first year of instruction. This could be as simple as a chamber group performing at a nursing home. The more students perform, the better they become at performing, and it increases their music-reading skills. My high school students will perform 12 times in various ensembles from November to January, and only one of those times is a full ensemble concert. These include multiple jazz performances at nursing homes and community events; our marching band performing in the city Christmas parade; and our chamber ensembles performing at the
  Build Your System — The same concept works for music as you develop your own system. Being the only 6-12 director, using the same language from top to bottom makes my life easier. For example, I use the same method book series from beginner band all the way through high school. I also use the same methodology for counting rhythm. Whether you choose to count in the traditional method, Eastman Technique or in any other form, you must make it the same from bottom to the top. I started this process during my first year at SCHS, and now four years down the road, all grade levels count using the same system. Our rhythmic integrity has greatly improved and our students’ abilities have increased. This is part of building your system.
 With every big decision I have taken to our administration, I always have a back-up plan. Your administrators are there to support you, not to fight with you, and if they are fighting against you, then you might need to look in the mirror. Your top priority is your program, and you must fight for it. But you must realize that you are just one program at your school. If your plan is rejected, don’t be discouraged. Have a back-up plan or be willing to work with administrators on a revised plan. Or, come back at a later date and say, “Remember when I wanted to do XYZ — what are your thoughts on it now?” You may be shocked, as I have been, at how administrators are more willing to approve, or at least discuss, the original plan. Team-building and collaboration are essential.
 String
 Popsicle Sticks
 Visual Music: Play Dough, Styrofoam Putty and Pipe Cleaners
 Sensory Tools
 4. Take a Trot
 7. Put Down that Book
 10. Chew a Piece of Gum


 In 2008,
  What excellence looks and sounds like: Consider watching videos or playing audio recordings for students of professional groups, as well as great groups their own age. Students will learn to admire professional recordings, but they can learn as much from listening and watching great examples of their peers performing.
 Getting our students to a place where they were excited to be great together and to believe in the journey was a process! It was paramount for us to have the values listed above in place before we ever attempted to improve as musicians and athletes.
 Friend Groups Might Change
 Students might challenge many of the changes you want to implement. It helps to be aware of the teacher you are replacing and the program’s history. If the program was successful and everyone loved the previous director, don’t change too much at first. If you do, be ready to hear complaints from students and parents. Again, it’s not personal — people tend to think about what they’re losing rather than what they will be gaining. Be patient and guide them through this.
 Buyer’s Remorse
 Additional tips on questions for the interviewer:
 Some Other Thoughts
 Have Your Elevator Pitch Ready
 Practice, Practice, Practice
 Have Someone Look It Over
 Brag About Yourself
 List Other Relevant Information


 In the article “

 Do
Do Even if you have a standard uniform, many things can go wrong. Consider the following:


 In music, the performance is the essay, and students knowing what to do and doing it are two very different things. The knowledge often doesn’t translate. How beautifully and musically our students play hinges on their ability to move from conceptualizing to actualizing, and the gap often appears in the results of their performances. For example:
 Guiding students to listen beyond their ears and react to certain stimuli is no different than training students to form an embouchure or take a proper breath. In other words, provide clear information to students, have them practice, give them feedback — then repeat. Keep in mind that students will only fix what bothers them. Until they are as bothered by a problem as their coach, they will be limited in the amount they can improve.
 and Joe Dixon") Train your students to respond in one of three ways: “Yes, I think so,” “No, I don’t think so” or “I don’t know” — which may sound surprising.
Train your students to respond in one of three ways: “Yes, I think so,” “No, I don’t think so” or “I don’t know” — which may sound surprising. Breathing to Play vs. Breathing to Live
 Rule: Students should avoid breathing in predictable places such as at bar lines.
 Tuners and metronomes
 The article referenced above contains excerpts from their book, “
 In interleaved practice, “a student practices an identified problem area for a brief amount of time, leaving it to begin practicing a different skill area. The performer is alternating and intermixing the practice tasks. The long-term retention is better with interleaved practice, even though the short-term satisfaction isn’t as great.” She illustrates interleaved practice using the letters ABCBACACB. In other words, in interleaved practice, certain material is practiced, then left alone but interspersed with, or revisited back and forth, between other practice material.
 A final type of practice is known as mental practice. This kind of practice is undertaken away from our instruments and does not entail any playing whatsoever.


 The Pennsylvania Music Education Association conference gives us an opportunity to connect with all of you and to remind you that Yamaha is your partner in music education, not just through our great instruments and professional audio products but also with resources, support and professional development. We know how difficult these past two years have been as we have navigated through these uncertain times, and we want to express our appreciation and gratitude for everyone involved in making this conference possible. We want to continue to hear about your programs and learn about you and your specific needs to see how Yamaha can partner with you to help.
 Stop by and say hi to us in the exhibit hall. We’ll be showing some new instruments in the booth, including the Harmony Director, the YBS-480 Baritone Saxophone and the MS-9414 Marching Snare Drum.
 The Kansas Music Educators Association conference gives us an opportunity to connect with all of you and to remind you that Yamaha is your partner in music education, not just through our great instruments and professional audio products but also with resources, support and professional development. We know how difficult these past two years have been as we have navigated through these uncertain times, and I want to express my appreciation and gratitude for everyone involved in making this conference possible. We want to continue to hear about your programs and learn about you and your specific needs to see how Yamaha can partner with you to help.
 The California All-State Music Educator Conference gives us an opportunity to connect with all of you and to remind you that Yamaha is your partner in music education, not just through our great instruments and professional audio products but also with resources, support and professional development. We know how difficult these past two years have been as we have navigated through these uncertain times, and we want to express our appreciation and gratitude for everyone involved in making this conference possible. We want to continue to hear about your programs and learn about you and your specific needs to see how Yamaha can partner with you to help.


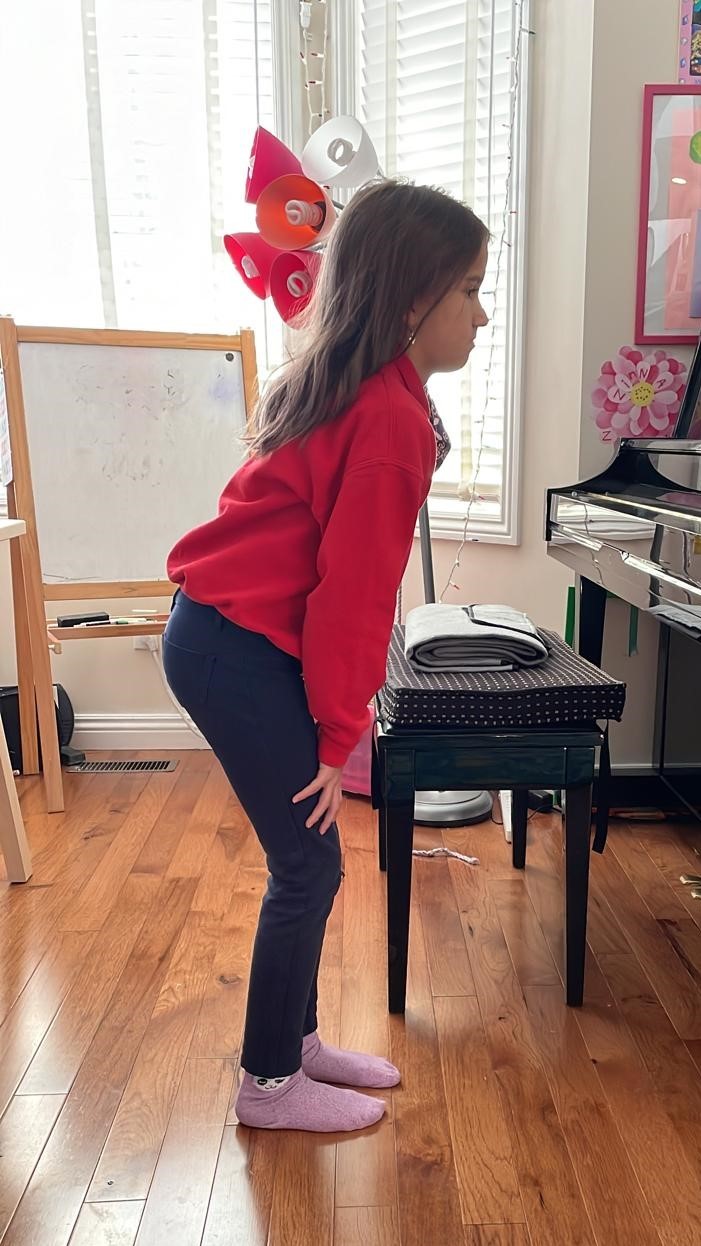 Solution — To address
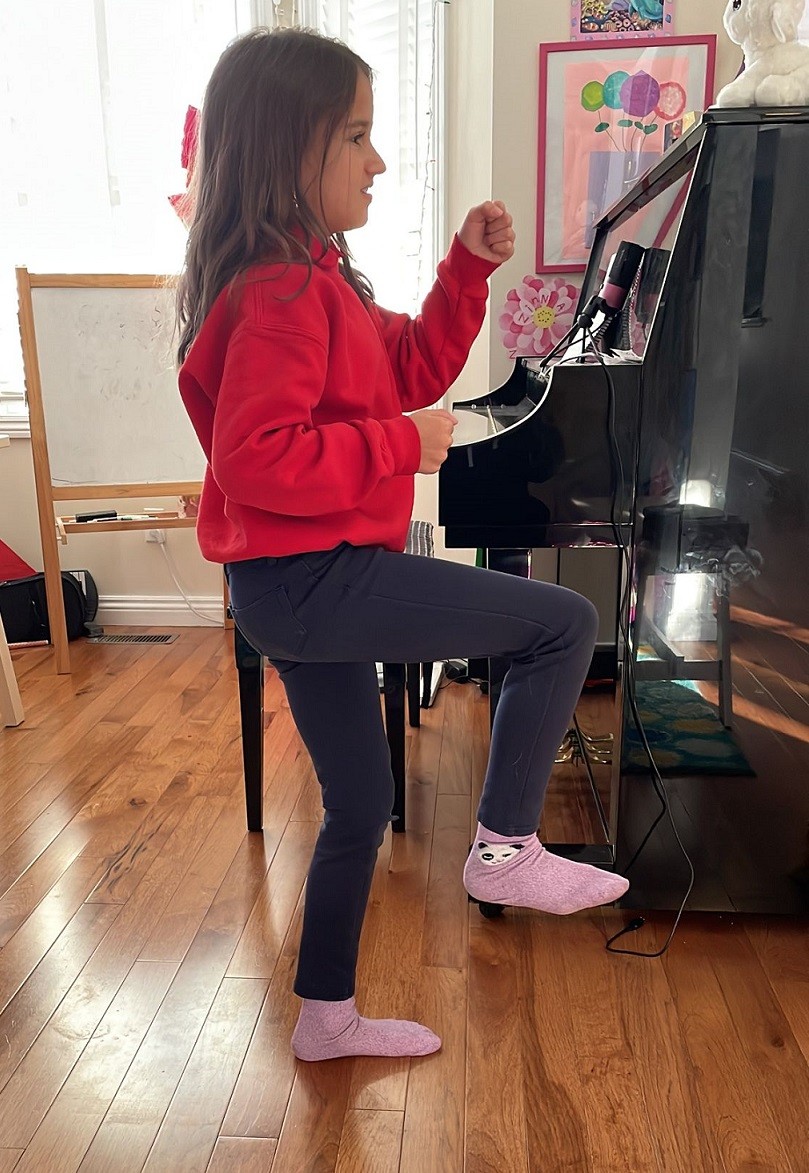 pulse and rhythm problems, I like to use movement activities that can be accomplished away from the piano. I find this approach to be more effective. It also creates a small break in the lesson when the student can stand up and refocus with a different activity. Some movement ideas include marching or patsching (tapping on thighs) while singing the melody of the piece.
 The musical flow of 4/4 versus 6/8 meter is very different. Often, students may not read rhythms correctly because they do not have a full understanding of the meter.

 Auxiliary Brass
 The must-have auxiliary woodwind for a concert band is a


